I have a few really old Windows programs from the Windows 95 era that I never ended up replacing. Nowadays, these are really hard to run on Windows 10. Ironically, it is quite easy to run them on Linux, thanks to WINE:
“Wine (originally an acronym for “Wine Is Not an Emulator”) is a compatibility layer capable of running Windows applications on several POSIX-compliant operating systems, such as Linux, macOS, & BSD. Instead of simulating internal Windows logic like a virtual machine or emulator, Wine translates Windows API calls into POSIX calls on-the-fly, eliminating the performance and memory penalties of other methods and allowing you to cleanly integrate Windows applications into your desktop.”
One such program is this Family Tree software that came with the July 2001 issue of PC Format magazine.
To run this, we first need to install WINE, which on Ubuntu (or similar) would work something like this:
sudo apt-get install wine
After popping in the PC Format CD containing the software, simply locate the autorun executable. Then run the wine command, passing this executable (in this case PCF124.exe) as an argument:
After inserting the CD, locate the autorun executable, and run it using WINE. Although it’s a Windows program, it works just fine.
Selecting Family Tree 2 from the menu runs the corresponding installer. Although this expects a Windows-like filesystem and writes to a Windows registry, WINE has no problem mapping these out.
Select the install location on what looks like a Windows filesystem.Doesn’t this make you feel nostalgic?
When this finishes, the program is actually installed, and can be found and run from the application menu of whatever desktop environment you’re using (in my case, Plasma by KDE):
Running Family Tree 2.0, we get an error that says “Please install default printer”.
For some bizarre reason, this particular family tree software requires a printer to be installed, and will not work without one. While you probably won’t have this problem, for me it was a tough one that left me wondering for a while. I managed to solve it only by asking for help on Ask Ubuntu and getting an extremely insightful answer:
“When you install printer-driver-cups-pdf (or cups-pdf for Ubuntu 15.10 and earlier) a PDF printer is added which saves the printed files in ~/PDF/. All the printers installed in your Ubuntu OS also work from WINE, you don’t need to do anything about it. “But: “If you just normally installed CUPS on your 64-bit Ubuntu (uname -r gives x86_64 if it is 64-bit), this won’t work when you run a 32-bit software like yours from 1995 presumably is. The solution in this case is to install the 32-bit CUPS library, so that 32-bit WINE is also able to find your printers:”
sudo apt install libcups2:i386
Sure enough, that worked when I did this on a virtual machine on another laptop, but not on this one. This time, I simply needed to install cups-pdf, because the CPU architecture is different.
Family Tree 2.0 is running on Linux Kubuntu 19.10, thanks to WINE.
As you can see, this Windows-95-era piece of software is now working flawlessly on Linux. Once this is done, don’t forget to eject the CD (the eject command in the terminal has been a fun discovery for me) to unmount it from the filesystem. If you need to uninstall a Windows program you installed via WINE, you can do so directly from your desktop environment’s application menu. And if you need go deeper, WINE’s filesystem is located in the hidden .wine directory under your home folder.
Encryption is fundamental and ubiquitous. Whether it’s to prevent sensitive settings (such as passwords and API tokens) from falling into the wrong hands, or making sure no one listens in on confidential communications, encryption is extremely important. Many people do not even realise that they use it every day.
Encrypting data using the .NET Framework or .NET Core libraries, however, is not trivial. There are different ways to encrypt and decrypt data, and sometimes this requires some knowledge about the underlying algorithm.
To keep things really simple, we’ll use a third party library that provides a simple interface for encryption and decryption. Because this library uses strings and byte arrays, it is not suitable for encryption of large amounts of data, such as huge files, which would bloat the application’s memory. However, it is perfectly fine for small strings.
Later in the article, I also share a simple tool that I built to help generate keys and test encryption and decryption. You can find this tool under the AuthenticatedEncryptionTester folder in the Gigi Labs BitBucket repository.
Using AuthenticatedEncryption
AuthenticatedEncryption is a library that provides simple methods for encryption and decryption:
“The library consists of a single static class. This makes it very easy to use. It uses Authenticated Encryption with Associated Data (AEAD), using the approach called “Encrypt then MAC” (EtM). It uses one key for the encryption part (cryptkey) and another key for the MAC part (authkey).”
All we need to start using this is to install the corresponding NuGet package, either using the Package Manager Console:
Install-Package AuthenticatedEncryption
…or using the .NET Core command line tools:
dotnet add package AuthenticatedEncryption
The project’s readme file (which is the first thing you see in the GitHub repo) explains how it’s used, and it is really simple. First, you generate two keys, called the cryptkey and authkey respectively:
var cryptKey = AuthenticatedEncryption.AuthenticatedEncryption.NewKey();
var authKey = AuthenticatedEncryption.AuthenticatedEncryption.NewKey();
This is something you will typically do once, since you have to encrypt and decrypt using the same pair of keys.
Next, we need something to encrypt. We can get this from user input:
Console.Write("Enter something to encrypt: ");
string plainText = Console.ReadLine();
We can now encrypt the plain text by using the keys we generated earlier:
You will by now have noted the double AuthenticatedEncryption that is constantly repeated throughout the code. This is a result of the unfortunate choice of the library author to use the same for the class and namespace. There is already an open issue for this.
Update 20th July 2020: this syntactical problem was recently fixed by renaming the class. As from version 2.0.0, once you have your using AuthenticatedEncryption;, you can call the relevant methods directly on the static Encryption class, such as Encryption.NewKey().
Let’s run this code and see what happens:
Simple encryption and decryption using the AuthenticatedEncryption library. Running on Kubuntu 19.10 using .NET Core.
As you can see, the input string was encrypted and the result was encoded in base64. This was later decrypted to produce the original input string once again.
Authenticated Encryption Tester
To facilitate key generation as well as experimentation, I wrote this small tool:
Authenticated Encryption Tester. A simple tool to quickly use the functions of the AuthenticatedEncryption library.
This lets you use the AuthenticatedEncryption library functionality that we have just seen in the previous section. It’s useful to initially generate your keys, and also to test that you are actually able to encrypt and decrypt your secrets successfully.
It is a WPF application running on .NET Core 3, so unlike the AuthenticatedEncryption library, unfortunately it only works on Windows. However, for those of you who, like me, have the misfortune of already using Windows, it can turn out to be a handy utility.
You can get the code from the AuthenticatedEncryptionTester folder in the Gigi Labs BitBucket repository. While I won’t go through all the code in the interest of brevity, I’d like to go through some parts and show that it’s doing pretty much what we’ve seen in the previous section.
The first two fields in the window expect to have the two keys in base64 format. You can either use keys you had generated earlier and stored, or you can hit the Generate buttons to create new ones. These buttons create new keys using the NewKeyBase64Encoded() method, which is just like NewKey() except that it returns a base64-encoded string instead of a byte array. This is handy in situations where you want a string representation, such as in a GUI like this.
Encryption and decryption also work just like in the previous section, and the implementation merely adds some extra code for validation and I/O. This is the method that runs when you click the Encrypt button:
The Encrypt button takes what’s in the Plain Text field and puts an encrypted version in the Cipher Text field. The Decrypt button does the opposite, taking the Cipher Text and putting the decrypted version in the Pain Text field. The code for the Decrypt button is very similar to that of the Encrypt button so I won’t include it here.
One thing you’ll note as you experiment with this is that the encrypted output string changes every time. This is an expected behaviour that provides better security. By clearing the value in the Plain Text field before hitting Decrypt, you can verify that it is always decrypted correctly to the original input string, even with different encrypted values.
Summary
The AuthenticatedEncryption library is great for encryption and decryption of simple strings. For large amounts of data, you should instead use streams together with the cryptographic APIs available in the .NET Framework or .NET Core.
You can use my Authenticated Encryption Tester to generate keys or experiment with encryption and decryption using the AuthenticatedEncryption library. It is built on WPF so it only works on Windows.
A few months ago, looking for a replacement for Windows (which always finds new ways to get on my nerves), I spent a couple of weeks playing with Linux Mint with MATE desktop. During this test drive, one of the annoyances I came across was the inability to drag a URL from Chromium’s address bar to create a link on the desktop. I literally ended up asking for help, and still didn’t figure it out.
Creating a URL shortcut on a Windows 10 desktop by dragging the padlock icon in Chrome
In Windows, this is something I’ve been doing for many, many years. It’s not rocket science. You drag the padlock icon next to the address bar onto your desktop and a shortcut is created, pointing to that URL.
Ubuntu 19.10
Since Ubuntu 19.10 was released a week and a half ago, I thought I’d try it out. The first thing I figured I’d make sure was that I could drag and drop links to the desktop. Ubuntu is one of the most popular and mature operating systems around. Surely they’d support such a basic usability feature, right?
Ubuntu 19.10 doesn’t let you drag links to the desktop.
Well, it turns out that dragging links from default browser Firefox to the desktop has no effect whatsoever. Odd, isn’t it? Let’s try dragging that link to some other folder instead.
We try dragging a link from Firefox to the Documents folder“Drag and drop is not supported. An invalid drag type was used.”
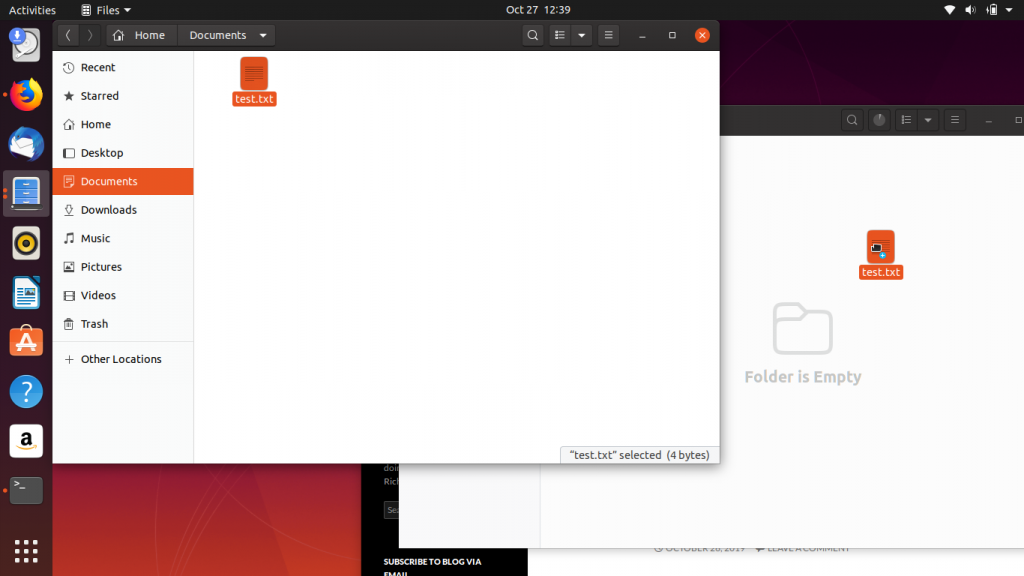
That’s annoying. I mean, drag and drop is a really basic feature that has been around forever. Let’s try dragging a file from one folder to another… obviously that’s going to work, no?
It looks like it’s going to work, but it doesn’t.
As you drag the file, a little plus icon appears beneath the hand as if to tell you that something’s going to happen. Alas, however, this also has no effect.
And of course, dragging the file to the desktop similarly does not work:
Dragging the file to the desktop has no effect
So we can’t drag links from Firefox, and we can’t drag and drop files. Maybe we’ll have better luck with Chromium?
We try dragging a link from Chromium into the Documents folderOnce again, we get that “Drag and drop is not supported” failure.
So it seems, like someone hinted in that original question about drag and drop in Linux Mint, that this has nothing to do with the browser and is something related to the desktop environment.
Once again, I had to swallow that feeling of incompetence and ask for help with this. Aside from the usual Stack Overflow treatment of getting my question closed as a duplicate, one of the comments led to other Q&As that uncovered a bitter truth: that drag and drop support was intentionally removed. Why would anyone in their right state of mind do that?
Kubuntu 19.10
Incredulous, I decided to try the KDE flavour of Ubuntu — Kubuntu. Drag and drop a link from browser to desktop? No problem:
We drag the padlock icon next to the address bar to the desktopA context menu appears, asking what we want to do with the URL. “Link Here” creates the equivalent of a desktop shortcut in Windows.An icon is created on the desktop, leading to the webpage we wanted to keep track of.
Was that really so hard? I get it, there were reasons why GNOME decided to do away with desktop icons and the like. But surely there are better ways to solve the problem than to do away with a basic and essential usability feature.
A desktop environment without basic drag and drop support in… almost 2020… is just garbage.
If you’ve been following Gigi Labs for a while, you’ve no doubt noticed that things have somewhat slowed down in the last couple of years. This is the result of a number of things, not least of which is having spent a year and a half living and working in Dublin, Ireland. I have also had the opportunity to write blog posts on a professional, freelance basis, and I continue to get involved in other things that allow me to keep learning.
One of the views from Killiney Hill Park, Dublin, Ireland on 10th February 2019. No, it’s not always raining in Dublin, and you can go on some really nice hikes even when it is.
More importantly, however, I’ve been trying to focus on writing quality articles using the little free time I have available, rather than simply blogging about whatever everyone else is talking about.
In fact, while the past couple of years have seen a mixture of content, I think they have included the publication of some of the most interesting articles on this blog to date, such as:
Also worth mentioning are some “Getting Started” articles, including a few on Microsoft Orleans 2.x, one on Angular 8, and another on Umbraco 8. I have a lot of such step-by-step beginner articles at Gigi Labs which often tend to be a good starting point for people wanting to start learning about new technologies.
I have had the fortune of learning a lot in these last two years, and I hope I will get the chance to share some of that. Even if articles might not be published very regularly, I hope that you will find that they’re worth the wait.
I also continue to be involved in the local tech community in Malta — in fact, I launched a new website in June called Teknologija to keep track of events across the various groups. I am also open to getting involved with and speaking at events abroad, so get in touch if you’re interested.
Two-factor authentication (2FA) is becoming more and more important, as its adoption is driven by a need for major software companies to secure their systems against threats, as well as due to legal requirements of strong customer authentication, such as the PSD2 directive that came in force in Europe last month.
2FA can be implemented in a number of ways. Typically, it is a combination of the usual username/password login as well as something else, often being a one-time password (OTP) that is sent via SMS or email, or generated by an algorithm.
In this article, we’ll focus entirely on generating and verifying Time-Based One-Time Passwords (TOTP) using Google Authenticator and the Otp.NET library.
Update 20th October 2019: This also works if you use Microsoft Authenticator instead of Google Authenticator. Microsoft Authenticator requires more permissions on your device, sends usage data to Microsoft by default, and is slightly more confusing because you have to choose the type of account.
Update 22nd October 2019: I discovered another mobile app called Authy, and it works just as well to acquire the TOTP secret and generate codes. It is interesting because it has a mechanism to take encrypted backups in the cloud and synchronise across devices, addressing the problem of when you lose or change your phone.
About TOTP
TOTP is an algorithm used to generate one-time passwords based on a shared secret and the current time. It is defined in RFC6238, and is a variant of the HOTP algorithm (RFC4226) which uses a counter instead of time.
The client and server use the same algorithm, the same shared secret and (roughly) the same time to generate the same code.
TOTP can be thought of as a function that takes the shared secret and current time as inputs, and generates a one-time password as output. Given that the client and server both know the same shared secret, and that their software clocks are more or less in sync without major clock skew, then they would generate the same code. This allows a code generated on a mobile device to be verified on the server side.
Generating a Shared Secret
We will use Otp.NET to perform most operations related to TOTP generation and verification. This can easily be installed in a .NET (Core) console application via NuGet:
Install-Package Otp.NET
It is then really easy to generate and output a shared secret using the following code:
var secret = KeyGeneration.GenerateRandomKey(20);
var base32Secret = Base32Encoding.ToString(secret);
Console.WriteLine(base32Secret);
The secret that we generated on the first line is an array of bytes. However, we output it in base32 encoding. This is important for the next step when we will pass the secret to the mobile device. As I learned the hard way, it does not work if the secret is an arbitrary string and not base32-encoded.
Running the above, I just got the following in the output:
6L4OH6DDC4PLNQBA5422GM67KXRDIQQP
Generating a QR Code for the Secret
Stefan Sundin made this great 2FA QR code generator. The two required fields are the Secret (where we paste the value generated above) and a Label (which is arbitrary and identifies the application — we’ll simply put “MFA Test 1” in there).
The QR code helps to synchronise the secret between the server and the mobile device.
Setting up Google Authenticator
Find Google Authenticator in your phone’s app store and install it. It requires access to your camera as we’ll see in a second.
Get Google Authenticator from your phone’s app store.
After installation and its brief in-built tutorial, you get to the point where you can set up your first TOTP code generator (they call it an “account”):
To synchronise a shared secret onto your mobile device, you can scan a barcode or type in the secret directly.
This step is where you enter the shared secret into Google Authenticator. You can do that by scanning a QR code (first option), or by typing it in (second option). The latter is slow and painful, especially on a mobile device, and should be kept as a fallback in case there is some kind of problem scanning the QR code. Scanning the QR code is really just a convenience mechanism and is an encoded version of the same secret.
Scan the barcode to get the shared secret into Google Authenticator.
Once you’ve scanned the QR code, Google Authenticator has acquired the shared secret and starts generating TOTP codes every 30 seconds:
Google Authenticator is generating TOTP codes.
Since you can have more than one of these code generators in here (for different applications), they come with a label. In this case, you’ll notice that we have “MFA Test 1”, which is exactly what we entered in the Label field when generating the QR code.
Generating TOTP codes from Otp.NET
If you need to generate TOTP codes from .NET code (essentially to do what Google Authenticator is doing), then Otp.NET makes it very easy to do that:
            string base32Secret = "6L4OH6DDC4PLNQBA5422GM67KXRDIQQP";
            var secret = Base32Encoding.ToBytes(base32Secret);

            var totp = new Totp(secret);
            var code = totp.ComputeTotp();

            Console.WriteLine(code);
The ComputeTotp() method takes an optional DateTime parameter as the current time to use for the code generation algorithm. If not provided, it uses DateTime.UtcNow, which is typically what you want to use.
The TOTP code generated from the C# program (top right) is identical to the one generated from Google Authenticator on my phone (bottom centre).
Since we are using Google Authenticator, we don’t actually need this at all, so this is just something to keep in mind if you ever actually need it. It also gives some assurance that we’re on the right track, because what we’re doing in C# and on the mobile device are evidently well in sync.
Verifying TOTP Codes
Like every other operation we’ve seen, verifying TOTP codes with Otp.NET is also very easy. The following code shows how to do this, although most of the code is actually handling input and output.
            string base32Secret = "6L4OH6DDC4PLNQBA5422GM67KXRDIQQP";
            var secret = Base32Encoding.ToBytes(base32Secret);

            var totp = new Totp(secret);

            while (true)
            {
                Console.Write("Enter code: ");
                string inputCode = Console.ReadLine();
                bool valid = totp.VerifyTotp(inputCode, out long timeStepMatched,
                    VerificationWindow.RfcSpecifiedNetworkDelay);

                string validStr = valid ? "Valid" : "Invalid";
                var colour = valid ? ConsoleColor.Green : ConsoleColor.Red;
                Console.ForegroundColor = colour;
                Console.WriteLine(validStr);
                Console.ResetColor();
            }
Here’s what it might look like while you test it out repeatedly:
A number of tests show interesting results.
As you can see above, I did a number of things:
I entered two invalid codes, and got invalid responses.
I entered a valid code, and got a valid response as expected.
I waited for a new code to be generated, then entered the same code as before, and it was accepted.
I entered the new code that was generated, and it was validated.
I entered another invalid code, and it was marked as such.
The most interesting part of the above is the third step, and it requires further explanation. Codes are generated in time windows, by default every 30 seconds. That doesn’t necessarily mean that the previous code should be rejected. The time window might have shifted just as the user was typing the code, or there could be network delays, etc. Typically, some leeway is allowed when validating these codes. The RFC recommends allowing codes from one time window in the past or future, and that’s what the value of VerificationWindow.RfcSpecifiedNetworkDelay that we passed in as the third parameter to VerifyTotp() does. If you want, you can pass in something different that is more lenient or more restrictive.
On the other hand, accepting the same code twice is wrong, considering we are supposed to be generating one time passwords. In order to make sure that a code isn’t used twice, we need to store something that we can later check to know whether a code has been used. That’s the reason for the second parameter to VerifyTotp(). It gives us back a number indicating the time step used, so we can save this whenever a code is used, and later check whether the same time step has already been used before.
Assuming a single shared secret, a very quick-and-dirty dummy implementation using a HashSet instead of real persistence could look something like this:
            string base32Secret = "6L4OH6DDC4PLNQBA5422GM67KXRDIQQP";
            var secret = Base32Encoding.ToBytes(base32Secret);

            var totp = new Totp(secret);

            var usedTimeSteps = new HashSet<long>();

            while (true)
            {
                Console.Write("Enter code: ");
                string inputCode = Console.ReadLine();
                bool valid = totp.VerifyTotp(inputCode, out long timeStepMatched,
                    VerificationWindow.RfcSpecifiedNetworkDelay);

                valid &= !usedTimeSteps.Contains(timeStepMatched);
                usedTimeSteps.Add(timeStepMatched);

                string validStr = valid ? "Valid" : "Invalid";
                var colour = valid ? ConsoleColor.Green : ConsoleColor.Red;
                Console.ForegroundColor = colour;
                Console.WriteLine(validStr);
                Console.ResetColor();
            }
Like this, there’s no way you can ever have the same code be valid twice:
The same code, even within the same time window, is invalid the second time.
Conclusion
In this article we’ve seen how Time-Based One-Time Passwords can be generated and verified. We’ve focused mainly on:
Generating a shared secret using Otp.NET
Bringing it to a mobile device with Google Authenticator
Using Google Authenticator to generate TOTP codes
Using Otp.NET to validate these codes
In a two-factor authentication implementation, this is of course only one of the factors, and usually takes place after a regular username/password login.
"You don't learn to walk by following rules. You learn by doing, and by falling over." — Richard Branson