In this article, we’re going to develop a Peer-to-Peer (P2P) Chat application. This means that unlike the official Chat example, which has distinct Client and Server roles, each running instance of the application is exactly the same, except for configuration. The Akka.Remoting documentation explains that Akka.Remote is better suited for P2P applications rather than client/server.
In my typical style, I am keeping this example super simple so that we can focus on learning to message remote actors using Akka.Remote. I am still learning to use Akka .NET, so do not consider this article as an example of best practices.
The source code for this article is available at the Gigi Labs BitBucket repository.
NuGet Packages
Aside from the Akka package needed by all Akka .NET applications, we will also need the Akka.Remote package if we want to send messages to remote actors.
Install-Package Akka
Install-Package Akka.Remote
Configuration
If you’re going to use HOCON configuration from your App.config file, you need to declare a configSection for it:
  <configSections>
    <section name="akka" type="Akka.Configuration.Hocon.AkkaConfigurationSection, Akka" />
  </configSections>
You then set up Akka.Remote as follows:
  <akka>
    <hocon>
      <![CDATA[

        akka
        {
            actor
            {
                provider = "Akka.Remote.RemoteActorRefProvider, Akka.Remote"
            }

            remote
            {
                helios.tcp
                {
                    port = 5248
                    hostname = localhost
                }
            }
        }

      ]]>
    </hocon>
  </akka>
The provider part is always the same, so you can just copy it. The helios.tcp section specifies the TCP endpoint on which the ActorSystem will listen for incoming connections, in this case localhost:5248.
For this particular example only, I am also going to include some AppSettings that we need in order to differentiate between different running instances of the chat application:
  <appSettings>
    <add key="actorSystemName" value="ChatPeer1" />
    <add key="remoteActorAddress" value="akka.tcp://ChatPeer2@localhost:5249/user/ChatActor" />
  </appSettings>
The actorSystemName setting has two purposes here.
- We will use it to display a different console title, so that we can distinguish between different running instances of the same application.
- We will actually give a different name to each running ActorSystem.
The remoteActorAddress setting, on the other hand, tells us the location of the remote chat actor. In this way, two running instances of the application will be able to connect and send messages to each other:
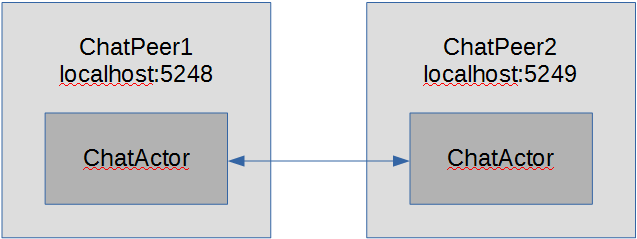
Typically you could just have one instance connect to the other, and the second communicates to the first via Sender.Tell() as in the Sending Messages to Remote Actors documentation. I arbitrarily chose not to do this to keep the application instances as symmetrical as possible (which is a typical trait of P2P applications).
Chat Application
Without further ado, here is the full code for the P2P Chat application within a console application’s Main() method:
            string actorSystemName = ConfigurationManager.AppSettings["actorSystemName"];
            Console.Title = actorSystemName;

            try
            {
                using (var actorSystem = ActorSystem.Create(actorSystemName))
                {
                    var localChatActor = actorSystem.ActorOf(Props.Create<ChatActor>(), "ChatActor");

                    string remoteActorAddress = ConfigurationManager.AppSettings["remoteActorAddress"];
                    var remoteChatActor = actorSystem.ActorSelection(remoteActorAddress);

                    if (remoteChatActor != null)
                    {
                        string line = string.Empty;
                        while (line != null)
                        {
                            line = Console.ReadLine();
                            remoteChatActor.Tell(line);
                        }
                    }
                    else
                    {
                        Console.WriteLine("Could not get remote actor ref");
                        Console.ReadLine();
                    }
                }
            }
            catch(Exception ex)
            {
                Console.WriteLine(ex);
            }
From all this code, there are only two parts that are important to note. First, we are creating a local chat actor. This is what the remote actor will connect to in order to talk to the current instance of the application. It does this using the highlighted portion of code. It is simply getting a reference to the remote actor (using the address we specified in configuration) and locating it via an ActorSelection.
The ChatActor doesn’t do anything special. It simply writes whatever message it receives to the console:
    public class ChatActor : TypedActor, IHandle<string>
    {
        public ChatActor()
        {

        }

        public void Handle(string message)
        {
            using (var colour = new ScopedConsoleColour(ConsoleColor.White))
                Console.WriteLine(message);
        }
    }
It’s using the ScopedConsoleColour utility class from my Scope Bound Resource Management in C# article just to make received text look different from the text you type in:
    public class ScopedConsoleColour : IDisposable
    {
        private ConsoleColor oldColour;

        public ScopedConsoleColour(ConsoleColor newColour)
        {
            this.oldColour = Console.ForegroundColor;

            Console.ForegroundColor = newColour;
        }

        public void Dispose()
        {
            Console.ForegroundColor = this.oldColour;
        }
    }
Running the Application
We want to run two instances of the same application, but using different configuration. This not only allows us to recognise which is which, but also ensures that each instance can connect to the other at the right endpoint. The applications could run on the same machine or on different machines altogether.
The first instance will use configuration as shown earlier:
<?xml version="1.0" encoding="utf-8" ?>
<configuration>
  <configSections>
    <section name="akka" type="Akka.Configuration.Hocon.AkkaConfigurationSection, Akka" />
  </configSections>

  <startup>
    <supportedRuntime version="v4.0" sku=".NETFramework,Version=v4.6.1" />
  </startup>

  <appSettings>
    <add key="actorSystemName" value="ChatPeer1" />
    <add key="remoteActorAddress" value="akka.tcp://ChatPeer2@localhost:5249/user/ChatActor" />
  </appSettings>

  <akka>
    <hocon>
      <![CDATA[

        akka
        {
            actor
            {
                provider = "Akka.Remote.RemoteActorRefProvider, Akka.Remote"
            }

            remote
            {
                helios.tcp
                {
                    port = 5248
                    hostname = localhost
                }
            }
        }

      ]]>
    </hocon>
  </akka>
</configuration>
The second will use opposite configuration:
<?xml version="1.0" encoding="utf-8" ?>
<configuration>
  <configSections>
    <section name="akka" type="Akka.Configuration.Hocon.AkkaConfigurationSection, Akka" />
  </configSections>

  <startup>
    <supportedRuntime version="v4.0" sku=".NETFramework,Version=v4.6.1" />
  </startup>

  <appSettings>
    <add key="actorSystemName" value="ChatPeer2" />
    <add key="remoteActorAddress" value="akka.tcp://ChatPeer1@localhost:5248/user/ChatActor" />
  </appSettings>

  <akka>
    <hocon>
      <![CDATA[

        akka
        {
            actor
            {
                provider = "Akka.Remote.RemoteActorRefProvider, Akka.Remote"
            }

            remote
            {
                helios.tcp
                {
                    port = 5249
                    hostname = localhost
                }
            }
        }

      ]]>
    </hocon>
  </akka>
</configuration>
When we run the two instances, each with its own configuration, we can actually have them send messages to each other:

Disconnecting
If we close the second instance, you’ll see that this does not go unnoticed by the first instance that is still running:

However, if we run the second instance again, you can see that it recovers, and from then it’s business as usual:

Further Reading
This article was really just a proof of concept to show how Akka.Remote works in practice. You might also want to check out:
- Akka.Remote Overview (official documentation)
- Sending Messages to Remote Actors (official documentation)
- Location Transparency (official documentation)
- Chat Example (official examples)