How do you move an object in response to keyboard input in Godot? Read on and find out! This article is similar to “Unity3D: Moving an Object with Keyboard Input“, but for Godot. Also, I literally started learning Godot yesterday, so don’t expect any expert advice!
Setting the Scene
Start by creating a new project. Then, within the “Scene” tab on the left, click the “Other Node” button:
In the modal that comes up next, search for and select a “ColorRect”, then click the “Create” button:
With that, you’ve just added a white square to the top-left of our 2D window. You can optionally change the colour in the Inspector to the right, and/or drag the white square to a more central position:
When you’re happy, press the Play button near the top-right of the Godot editor, or press F5. You’ll be prompted to select the main scene; go with “Select Current”:
Then, you’ll be able to save the current scene (i.e. the lovely square). You can leave the defaults and simply press “Save”:
Once the scene is saved, the game starts running, and you can see what your square would look like in a game:
Creating a Script
In order to move the square when we press a key, we have to add a script. To do this, right-click on the ColorRect in the Scene tab on the left, and select “Attach Script…”:
In the next modal window, leave the defaults and click “Create”:
This opens the Godot script editor, and gives you a little code template written in GDScript to get you started:
Programming Keyboard Movement
We now have a square that we can see in a Godot window, with a script attached to it. We can now program it to do our bidding!
Near the top, just below the “extends ColorRect“, add the following:
var speed = 400
Then, in the “func _process(delta)“, replace “pass” with the following:
	if Input.is_action_pressed("ui_left"):
		position += Vector2.LEFT * delta * speed
Here we’re using the “Input.is_action_pressed()” function to determine whether a key was pressed, and the “ui_left” value specifies that we’re specifically checking whether the left arrow key was pressed. If that’s the case, then we update our square’s position. Here’s a breakdown of that second line:
Vector2.LEFT is literally something (a mathematical vector) pointing towards the left.
delta is a value that gets passed to the _process() function each time, indicating how much time passed since it was last called. Because framerates can vary, it helps us ensure smooth movement regardless of how the framerate changes.
speed is that variable we just defined earlier. We can change that as we like to adjust how quickly the square moves when we press the left arrow key.
position is our square’s position. It is itself a vector, and we update it by adding other vectors to it.
This is enough to make the square move to the left when you press the left arrow key, as you can quickly verify if you run it. In the same way, you can support the other arrow keys. Below is what the completed script should look like, also after removing the “_ready()” function which we don’t need here:
extends ColorRect

var speed = 400

# Called every frame. 'delta' is the elapsed time since the previous frame.
func _process(delta):
	if Input.is_action_pressed("ui_left"):
		position += Vector2.LEFT * delta * speed
	if Input.is_action_pressed("ui_right"):
		position += Vector2.RIGHT * delta * speed
	if Input.is_action_pressed("ui_up"):
		position += Vector2.UP * delta * speed
	if Input.is_action_pressed("ui_down"):
		position += Vector2.DOWN * delta * speed
At this point, run it (F5 / Play button) again and use the arrow keys to move the square in any direction, including diagonally:
A Better Way
The 2D movement overview page in the official Godot documentation demonstrates an “Input.get_vector()” function that can obtain a single vector representing the combined movement resulting from any of the arrow keys, effectively replacing the need for separate conditional statements. Let’s try that:
extends ColorRect

var speed = 400

# Called every frame. 'delta' is the elapsed time since the previous frame.
func _process(delta):
	position += Input.get_vector("ui_left", "ui_right", "ui_up", "ui_down") * delta * speed
It works just as well, but it’s a lot more concise! Lovely.
Summary
We’ve seen how to implement basic keyboard movement using Godot. The ColorRect is a 2D element that’s very handy to start playing with. Once we attach a script to it, we can react to keyboard movements using the static Input class. We’ve seen how to do that using two different functions: is_action_pressed(), which tells us whether individual keys have been pressed, and get_vector(), which can check all the ones we want at the same time.
So you’ve set up Unity3D on Linux, but now you need a good text editor to write your scripts. In that case, you can consider using Visual Studio Code (VS Code for short), a cross-platform text editor from Microsoft. VS Code has become hugely popular for web development, but its versatility means that it can also be used for programming in languages such as C#, Python, Go, etc.
Note that I am using Linux Kubuntu 20.04 (LTS) and Unity3D 2020.3.15f2 (LTS).
Installing VS Code
The VS Code documentation explains how to set up VS Code on Linux. The easiest option is via the snap package manager as follows:
sudo snap install --classic code
Alternatively, you can download and install a .deb or .rpm package of you prefer. See the documentation for details.
Configuring the External Editor in Unity3D
Next, we’ll configure Unity3D to use VS Code as its external editor for scripts.
First, you’ll need to have the “Visual Studio Code Editor” package installed. This is set up for you when you create a new project, but you can double-check via the Window menu and then Package Manager:
Visual Studio Code Editor 1.2.3 is installed.
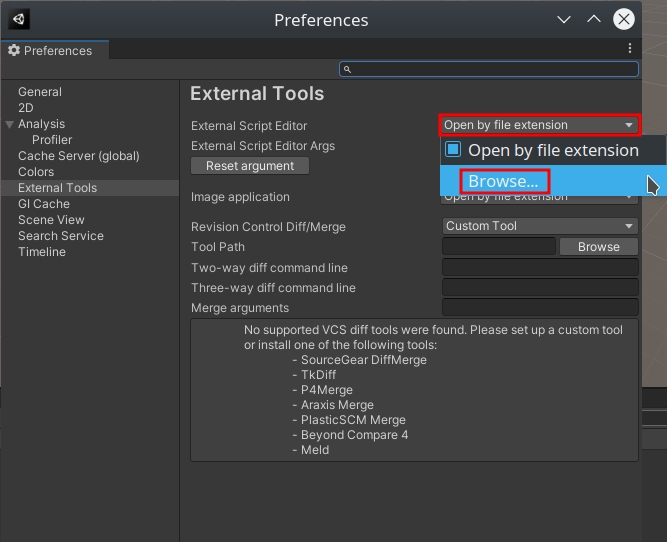
With that in place, go to the Edit menu and then Preferences… and switch to the External Tools tab. Click the dropdown next to the “External Script Editor” setting and then Browse… for the VS Code executable. If you don’t know where it is, use the following command in a terminal to locate it. In my case it’s at /snap/bin/code.
whereis code
To set VS Code as the Unity3D script editor, go to the Edit menu -> Preferences…, switch to the External Tools tab and then set the value of “External Script Editor” to the path to the VS Code executable.
Now, if you create a C# script in Unity3D and open it, it should open in VS Code.
Configuring VS Code for Unity3D
You can now write C# scripts for Unity3D in VS Code and you have syntax highlighting to help you. However, Intellisense — the helpful suggestions that pop up e.g. when you try to access an object’s properties — doesn’t work yet. You also don’t get any indication of C# syntax errors. Let’s fix this so that we can write Unity3D scripts in a comfortable environment.
Update 14th May 2023: The rest of this section below is now obsolete. A breaking change was applied to OmniSharp last year that removed the omnisharp.useGlobalMono setting and changed the default value of the omnisharp.useModernNet setting to true. This way, you can install a recent version of the .NET Core SDK (e.g. 6.0) and configure it in the VS Code Omnisharp settings (Ctrl+Shift+P, search for “omnisharp sdk”, set path and version). It’s not necessary to install Mono.
Update 12th June 2023: After much fiddling around, I found that Intellisense only really works if you set useModernNet to false. OmniSharp seems to download a Mono version of its own, so I’m not sure whether a .NET Core SDK is necessary at all, without tinkering further.
Next, head to the Mono Download page, and follow the first set of instructions to add the Mono repository to your system. Then, for the second step, install mono-complete instead of mono-devel as shown below. (Note: don’t run the following command before first setting up the Mono repository. The version coming from the Ubuntu repositories doesn’t seem to play well with VS Code and Unity3D.)
sudo apt-get install mono-complete
Then, in VS Code, go to the Extensions tab on the left, search for “C#”, and install the first extension that comes up:
Install the C# extension for Visual Studio by Omnisharp.
Open up settings via File menu -> Preferences -> Settings (or Ctrl+, (control comma)) and search for “Omnisharp: Use Global Mono“, then set its value to “always”. Click “Restart Omnisharp” from the notification that appears at the bottom-right. You can also restart Omnisharp at any time by pressing Ctrl+Shift+P and selecting “OmniSharp: Restart OmniSharp”.
In Settings, set “Omnisharp: Use Global Mono” to “always” and then restart OmniSharp.
Still No Intellisense?
The above steps are usually enough to get Intellisense working, but as I’m writing this right now, it doesn’t seem to work. To fix this, I had to downgrade the C# extension in VS Code, as follows:
Go into the Extensions tab in VS Code.
Locate the C# extension by OmniSharp.
Click the small arrow next to the “Uninstall” button.
Select “Install Another Version…”
In my case, the latest version (1.23.14) was released just 3 days ago. I went for an older version that had been around for a couple of months (1.23.12).
Click the “Reload Required” button.
Watch the Output and wait for OmniSharp to finish downloading and installing.
Install Another VersionChoose versionReload RequiredInstalling C# dependencies
Testing Intellisense
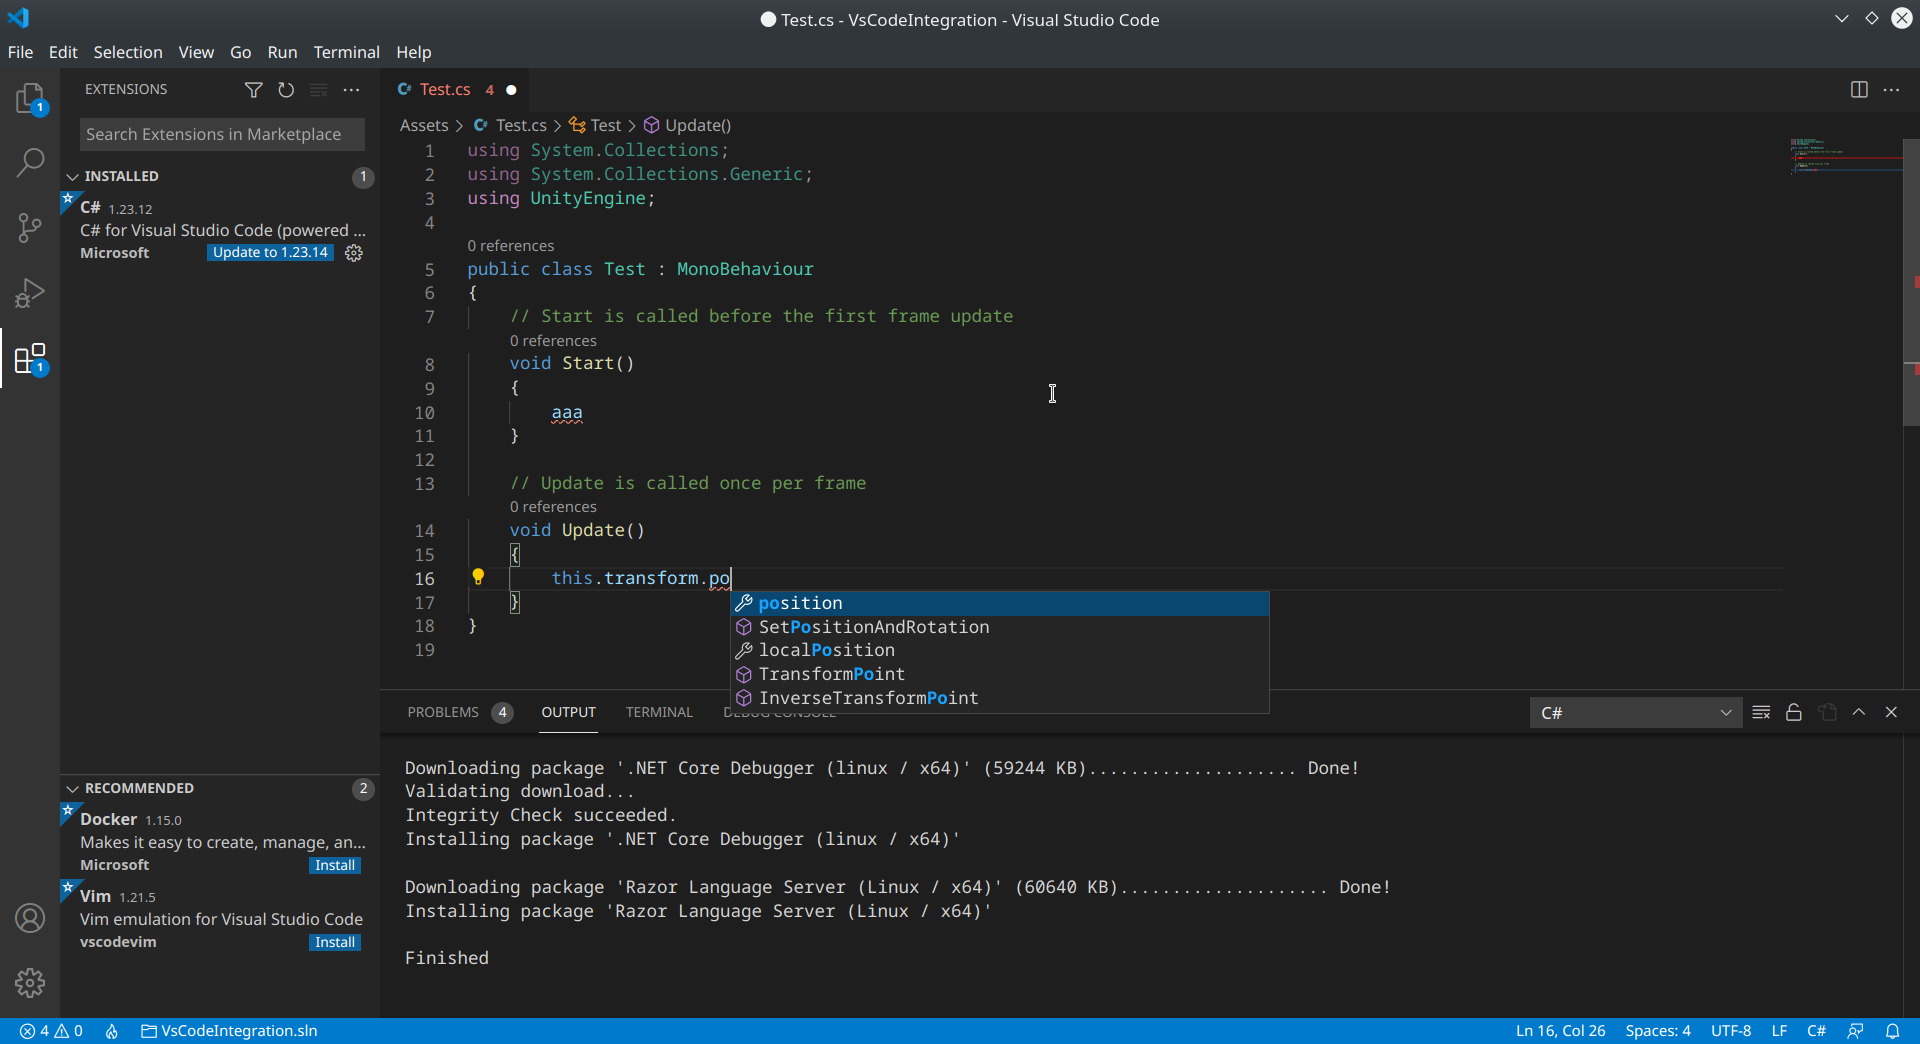
VS Code should now provide Intellisense as you type, and you should also see syntax errors called out via both a squiggly red underline and in the Problems window below.
Intellisense and errors both work.
You should now be all set up. Happy game development!
Before 3D took the gaming world by storm, many RPGs used a pseudo-3D engine in which you could move in discrete steps within a grid, with a first person view. Although this was popularised by “blobbers” such as Dungeon Master and Eye of the Beholder, it goes at least as far back as 1979 with Akalabeth.
“Blobber: A slang term for party-based games with first-person view, such as Wizardry, Dungeon Master and Legend of Grimrock, where the entire party moves as one, as if it was an amorphous blob.”
Unity3D gives us everything we need to easily set up this first-person grid-based movement.
This article is based on Unity3D 2020.3.13f1 (LTS), and the source code is available in the Unity3dFirstPersonGridMovement folder of the Gigi Labs Bitbucket Repository.
Setting the Scene
First, create a new 3D project. Add a few Cubes to the scene so that we’ll have something to see as we move around. You can do this via GameObject menu -> 3D Object -> Cube, although after creating the first one, you can select it and press Ctrl+D to duplicate it. Set their X and Z positions to integer values, leaving their Y position set to zero. Since the Main Camera faces down the Z-axis, it’s also nice to not set X=0 for any cubes, so that we have a corridor that we can immediately walk down.
Added a few cubes to the scene.
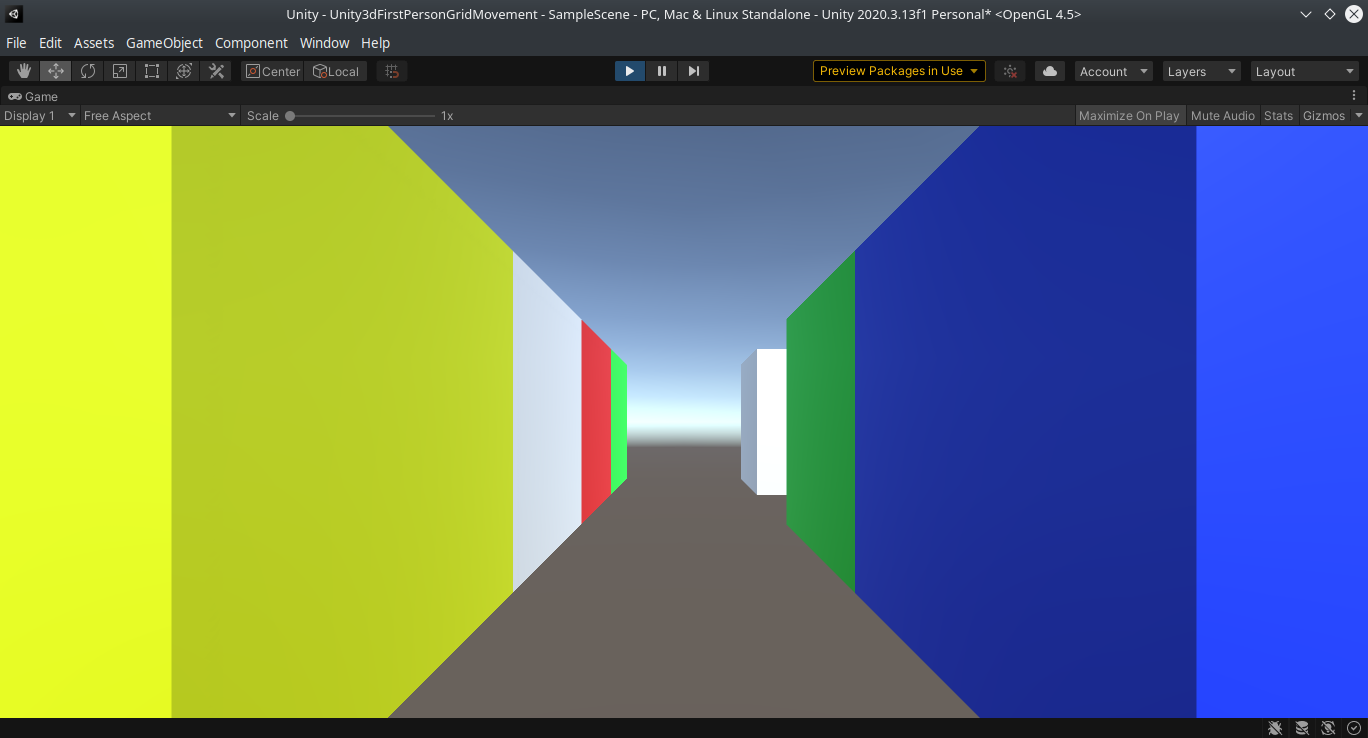
Optionally, add a few different-coloured materials and apply them to the cubes. This will later help make the movement more obvious, rather than just having a long, solid white wall. Refer to “Simple Brick Wall with Unity3D” if you don’t know how to do this.
A bit of colour makes all the difference.
Finally, adjust the camera so that its Y-position is zero, aligning it with the cubes.
Create a script called “Movement”, and drag it onto your Main Camera. Double-click the script to open it in an editor.
In the Update() method, add the following to enable the typical WASD keyboard movement (‘W’ to go forwards, ‘S’ to go backwards, ‘A’ to move left, and ‘D’ to move right, all while facing down the Z-axis):
    void Update()
    {
        if (Input.GetKeyDown(KeyCode.W))
            this.transform.position += Vector3.forward;
        else if (Input.GetKeyDown(KeyCode.S))
            this.transform.position += Vector3.back;
        else if (Input.GetKeyDown(KeyCode.A))
            this.transform.position += Vector3.left;
        else if (Input.GetKeyDown(KeyCode.D))
            this.transform.position += Vector3.right;
    }
If you press Play, you can use the WASD keys to move around:
Moving forwards into the corridor.
Implementing Rotation
That was easy enough! The fact that the camera is conveniently aligned with the Z-axis allows us to use predefined vectors to move in specific directions. However, this is no longer the case once we allow rotation. Any movement must be done with respect to whatever direction the camera is currently facing.
Fortunately, we already know what direction the camera is facing. That’s its transform.rotation. We can change direction by multiplying it by a Quaternion, which we can conveniently create based on an angle in degrees using Quaternion.Euler(). Let’s see this in practice by allowing the ‘Q’ and ‘E’ keys to rotate the camera 90 degrees left and right, respectively:
    void Update()
    {
        if (Input.GetKeyDown(KeyCode.W))
            this.transform.position += Vector3.forward;
        else if (Input.GetKeyDown(KeyCode.S))
            this.transform.position += Vector3.back;
        else if (Input.GetKeyDown(KeyCode.A))
            this.transform.position += Vector3.left;
        else if (Input.GetKeyDown(KeyCode.D))
            this.transform.position += Vector3.right;
        else if (Input.GetKeyDown(KeyCode.Q))
            this.transform.rotation *= Quaternion.Euler(0, -90, 0);
        else if (Input.GetKeyDown(KeyCode.E))
            this.transform.rotation *= Quaternion.Euler(0, 90, 0);
    }
The camera can now turn left and right:
I walked down the corridor and turned left.
However, this messes things up because the WASD keys still move with respect to the Z-axis, rather than in the direction that the camera is facing. We can easily fix this by multiplying the movement vectors by the camera’s rotation:
    void Update()
    {
        if (Input.GetKeyDown(KeyCode.W))
            this.transform.position += this.transform.rotation * Vector3.forward;
        else if (Input.GetKeyDown(KeyCode.S))
            this.transform.position += this.transform.rotation * Vector3.back;
        else if (Input.GetKeyDown(KeyCode.A))
            this.transform.position += this.transform.rotation * Vector3.left;
        else if (Input.GetKeyDown(KeyCode.D))
            this.transform.position += this.transform.rotation * Vector3.right;
        else if (Input.GetKeyDown(KeyCode.Q))
            this.transform.rotation *= Quaternion.Euler(0, -90, 0);
        else if (Input.GetKeyDown(KeyCode.E))
            this.transform.rotation *= Quaternion.Euler(0, 90, 0);
    }
And this works really nicely.
I walked down the corridor, turned right, and moved a step backwards. I’m actually inside the red cube, because we have no collision detection!
Watch the demo video on YouTube to see this in action!
Wrapping Up
As we’ve seen, Unity3D makes it really easy to set up this simple game mechanic where you have a first person view, move in steps, and turn in 90-degree angles. It does help to be comfortable with vectors. If you’re not, check out my “A Concise Introduction to Vectors” [PDF] at Swords and Software.
If you’d like a little extra exercise, try to make the movement and rotations as smooth transitions. You can use Vector3.MoveTowards() and Quaternion.RotateTowards() for this. You’ll also need to change your camera’s near clipping plane to zero to avoid weirdness during rotations.
In Unity3D, we can use prefabs to create a template for an object that we’ll create many times, such as bullets, planets, or – as we’ll see in this article – bricks. Prefabs are handy because each instance will carry the same scripts, materials, transforms, etc. Let’s see how this works in practice by creating a wall made up of many bricks.
To start off, create a new 3D project with Unity3D. I’m using Unity3D 2020.3.13f1 (LTS), although any version is probably fine for this beginner exercise.
Creating a Brick Prefab
We’ll start off by creating a simple brick, which will be the building block for our wall.
Create a Cube, via the menu GameObject -> 3D Object -> Cube. Rename it to “Brick”. In the Transform portion of the Inspector, set the X component of its Scale to 2, so that it looks elongated like… a brick.
After creating a Cube GameObject, name it “Brick” and set its X-scale to 2.
Next, we’ll create a material for the brick. In your Project window, right click on Assets and then go Create -> Material. (You could create an appropriate folder structure to separate things like Materials, Scripts etc, but since we’ll have very few of these in this case, I won’t bother.) Name it “Brick Material”, and then set the colour of its Albedo property to something that looks like brick red (in my case I went with RGB(183, 50, 57)).
Name the material “Brick Material”, and set its Albedo to an appropriate colour.
Drag the Brick Material onto the Brick (in either the Hierarchy or Scene windows) to apply the colour.
Next, drag the Brick GameObject from the Hierarchy window to the Assets folder in the Project window to create a prefab out of it. Note how the Brick is now blue in the Hierarchy window, and it also gets an “Open Prefab” button in the Inspector.
Drag the Brick GameObject from the Hierarchy window to the Assets folder in the Project window. The Brick GameObject is now an instance of a prefab.
Instantiating a Single Brick
We now have two concepts of “Brick” in this project: the original Brick GameObject (as seen in the Hierarchy and Scene windows), and the Brick prefab (in the Assets folder of the Project window). The Brick GameObject is an instance of the Brick prefab. We can create more instances of the Brick prefab, and they will have the same components (such as materials and transforms) unless we specifically change them.
This makes it very easy to write a script to create lots of bricks using the Brick prefab as a template. In fact, we don’t need the Brick GameObject any more. Go ahead and delete it.
Right click on the Assets folder of the Project window, select Create -> C# Script, and call it WallGenerator. Double-click the script to open it in your script editor.
Add a serializable field for the Brick prefab at the beginning of the class:
public class WallGenerator : MonoBehaviour
{
    [SerializeField]
    GameObject brickPrefab;
Save the script, then go back to the Unity3D editor. Then:
Drag the WallGenerator script onto your Main Camera.
Notice the Brick Prefab property for the script in the Inspector.
Drag the Brick prefab from the Project window into that slot in the Inspector.
Drag the WallGenerator script onto the Main Camera, and then drag the Brick prefab into the script’s relevant slot in the Inspector.
With this set up, we can start creating instances of the prefab from the script. Go back to the script editor, and add a call to Instantiate() in the Start() method as follows:
    // Start is called before the first frame update
    void Start()
    {
        Instantiate(brickPrefab);
    }
Back in the Unity3D editor, press Play to run the game. You’ll see that a brick is actually generated at runtime, even though we don’t have any in the Scene window in the editor:
A single brick, created by the WallGenerator script, is rendered in the scene at runtime.
Building a Wall
Now that we know how to create a single brick from a script, we can use simple loops to create more. Let’s create a 5×5 wall by using a different overload of Instantiate() that also takes a position (which we’ll provide) and rotation (which we’ll ignore):
    void Start()
    {
        for (int y = 0; y < 5; y++)
        {
            for (int x = 0; x < 5; x++)
            {
                Vector3 position = new Vector3(x * 2, y, 0);
                Instantiate(brickPrefab, position, Quaternion.identity);
            }
        }
    }
If you press Play, you’ll see the wall, although it’s a little hard to distinguish the bricks because they’re touching each other:
A 5×5 grid of bricks with no spacing in between, so it looks like one solid material.
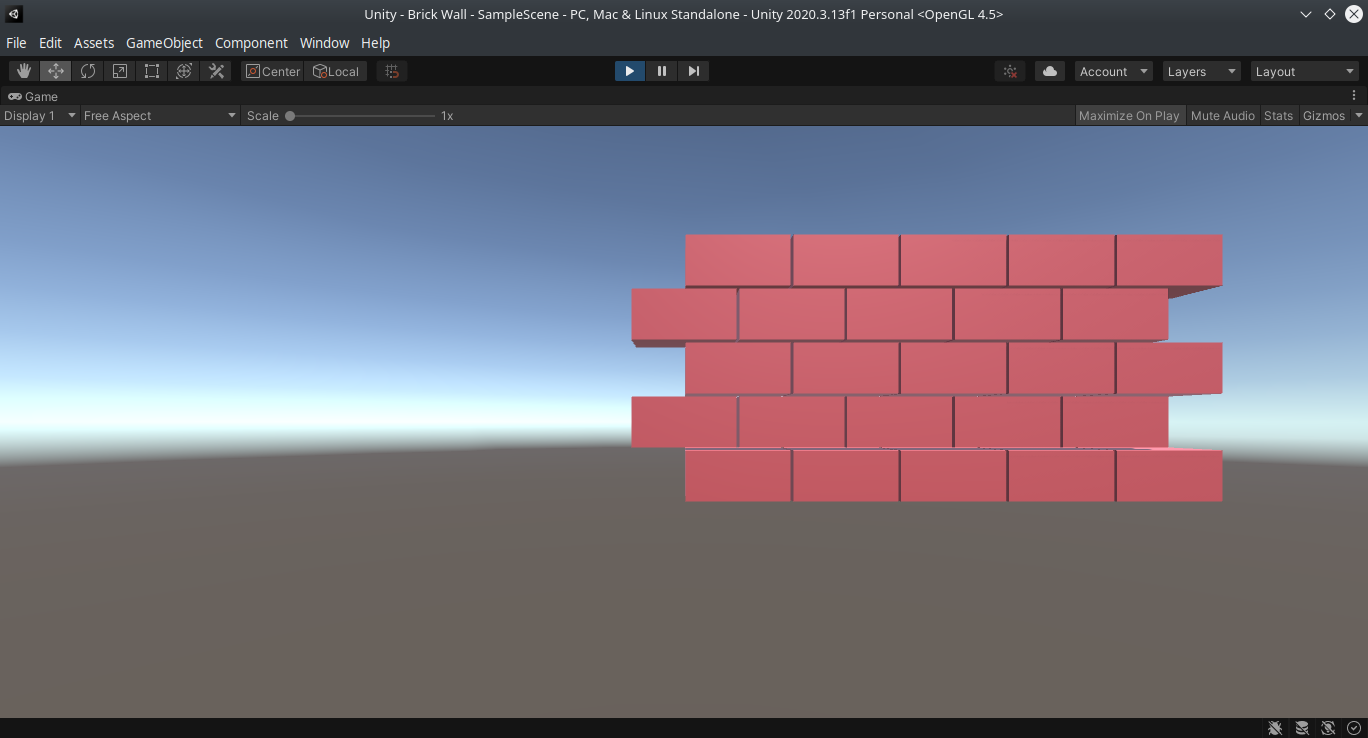
You can tweak the scale of the Brick prefab to get some space between the bricks. For instance, this is how it looks with a scale of (X, Y, Z) = (1.95, 0.95, 1):
The brick wall with each brick having a scale of (X, Y, Z) = (1.95, 0.95, 1).
Finally, just to give it a bit more style, let’s change the script so that it generates alternating patterns of bricks:
    void Start()
    {
        for (int y = 0; y < 5; y++)
        {
            int xOffset = (y % 2 == 0) ? 1 : 0;

            for (int x = 0; x < 5; x++)
            {
                Vector3 position = new Vector3(x * 2 + xOffset, y, 0);
                Instantiate(brickPrefab, position, Quaternion.identity);
            }
        }
    }
All we did here was use the modulus operator (%) to check whether the row is an even-numbered one, and if so, add an extra 1 to the X position of each brick. This results in the following wall, better than any that Donald himself could ever hope to build:
A brick wall with alternating, slightly spaced bricks.
Summary
A prefab is a template of a GameObject used to create instances of it that share the same or similar components. As we have seen, we can easily call the Instantiate() method to create lots of instances of a GameObject from a script, making this one of the cornerstones of dynamic behaviour in Unity3D.
In this article, I’m going to show you how to make a very simple simulation of planets orbiting the Sun, as well as rotating about their own axes. Even if you’re a beginner, you’ll be surprised how easy this is to set up. Just to set expectations, though: we’re keeping things simple to have fun and learn, so if you’re looking to create a realistic and accurate simulation of the Solar System, I’m afraid you’ve come to the wrong place.
Having said that, create a new 3D project with Unity3D, and let’s get to it! I’m using Unity3D 2021.1.10f1, which is one of the latest versions, but it’s also fine if you use an LTS version.
Creating the Sun and the Earth
From the GameObject menu (or by right-clicking in the Hierarchy window), click “3D Object” and then “Sphere” to create a sphere. Name it “Sun”. It should be positioned at the origin (0, 0, 0) by default, and that’s where we want it.
To add a sphere to the scene, click the GameObject menu, then “3D Object” and “Sphere”.
Repeat this process a second time, and name the second sphere “Earth”. From the Inspector window, set the “Y” component of its position to 5.
With Earth selected, set its position’s Y component to 5.
In order to make the Sun and the Earth look like the real deal, we’ll need textures. A texture is just an image that gets wrapped over the surface of a 3D object, so in our case we want a flat map of the Earth, and an equivalent for the Sun. You can find several on the internet, and in my case I’m using these Solar Textures which look pretty nice. The resolution doesn’t really matter, so pick whichever you like.
In the Project window in Unity3D, create three folders under Assets:
Materials
Scripts
Textures
Drag the Sun and Earth textures from wherever you downloaded them onto the Textures folder you just created, and they will get added to the project there. Next, drag the Sun texture (in my case it’s called “2k_sun”) onto the Sun GameObject in either the Hierarchy or Scene windows. You’ll see that this automatically creates a material in the Materials folder, and the Sun sphere in the Scene window now actually looks like the Sun. Repeat the process for the Earth.
Drag the images you downloaded into the Textures folder, then drag each one onto the respective sphere.
As a final touch, set the Sun’s scale to 2 (i.e. all of the X, Y and Z components). Press Play to admire your work so far:
The Sun and the Earth. Static, not to scale, and with a funny horizon in the distance, but sporting some lovely textures.
Adding Orbit
We’d like the Earth to orbit the Sun, so let’s add a script to do that. Right click on the Scripts folder we created earlier, and select “Create” and then “C# Script”. Name the script “Orbit”. Double-click it in the Project window, or click “Open” in the Inspector window to open it using your default script editor (if you want to change this, go to Edit -> Preferences -> External Tools -> External Script Editor).
To create a script, right click on the “Scripts” folder in the Project window, then click “Create” and “C# Script”. Name it “Orbit”, and then double-click it to edit it.
In the Update() method, add the following code to implement the orbiting behaviour:
    void Update()
    {
        var sun = GameObject.Find("Sun");
        this.transform.RotateAround(sun.transform.position, Vector3.forward,
            100f * Time.deltaTime);
    }
The first line gets a reference to the Sun GameObject via its name. The second line uses the RotateAround() method to make the Earth (this.transform) rotate around the Sun (sun.transform.position) around the axis that the camera is facing in (Vector3.forward) at an angle of 100f * Time.deltaTime.
Wait, why 100f * Time.deltaTime? The Time.deltaTime is the time that elapsed since the last frame was rendered, so with each frame, the Earth will rotate a bit more around the sun. But Time.deltaTime alone makes the orbit a little too slow, so I multiplied it by an arbitrary number, and by trial and error, I settled on 100f. This is actually a common practice, and can be done quite conveniently from the Inspector window if we make a small change to our code.
public class Orbit : MonoBehaviour
{
    [SerializeField]
    float speed = 100f;

    // Start is called before the first frame update
    void Start()
    {

    }

    // Update is called once per frame
    void Update()
    {
        var sun = GameObject.Find("Sun");
        this.transform.RotateAround(sun.transform.position, Vector3.forward,
            speed * Time.deltaTime);
    }
}
By declaring a speed variable within the script’s class, marking it with the [SerializeField] attribute, and then using it within the script, we’ve created a parameter that we can configure from the inspector.
Save the script from your editor, and go back to Unity3D, which will pause momentarily to reload and recompile the script. Drag the Orbit script onto the Earth in either the Hierarchy or the Scene window, and you will see it gets added as a component in the Inspector window. Interestingly, you will also see the Speed parameter:
The speed variable exposed by the Orbit script via a [SerializeField] attribute can be tweaked from the Inspector.
If you click Play, you should now see the Earth orbit the Sun. You can also change the value of Speed (even while the game is running), see what difference it makes, and adjust it until you are happy.
Adding Rotation
To make the Earth (and, later, the Sun) spin around its own axis, we just need to follow the same steps as for the Orbit functionality, with a slight change to the script.
Add a new script called Rotation to your Scripts folder.
Open the script.
Add the code below in the Update() method.
Drag the Rotation script onto both the Earth and the Sun.
Here, the Earth or the Sun (this.transform) will spin around itself (this.transform.position) about the Y-axis (Vector3.up) at an angle of 200f * Time.deltaTime. Again, the choice of speed for the angle is arbitrary. As with Orbit, you can expose it to the Inspector and adjust it if you like.
Note that it probably makes sense to use Prefabs rather than attaching the script to each GameObject, but since we don’t have many, I prefer to keep things simple in this particular example.
If you press Play, you should now see the Earth orbiting around the Sun, while both spin independently at the same time.
The Earth orbits the Sun, while both spin independently at the same time.
Finishing Touches
In this section, we’ll make a few tweaks to the project settings to make things look a little nicer.
First, let’s disable the Skybox. To do this, open the Window menu, then click “Rendering” and Lighting:
To open the Lighting window, click on the Window menu, then select Rendering -> Lighting.
In the Lighting window, switch to the Environment tab. The Skybox Material has a value of Default-Skybox. Click on the little circle next to that value and it select None from the new window that comes up.
Disable the Skybox by selecting None as the new value of Skybox Material, in the Environment tab of the Lighting window.
Changing the Skybox has changed the fields in the Environment tab of the Lighting window. There is now an Ambient Color field. Set its value to white (by clicking the top-left part of the colour-picker square, or by setting each of the (R, G, B) values to 255. This makes the objects in the scene somewhat brighter:
Set the Ambient Color to white (255, 255, 255) to make the scene brighter.
Next, we’ll get rid of the annoying blue background colour, which looks as odd in outer space as the Skybox. To do that, select the Main Camera from the Hierarchy window, click on the value of its Background property, and set it to black by either clicking on the bottom portion of the colour-picker square, or by setting each of the (R, G, B) values to zero:
Select the Main Camera, and set its Background to black.
The last thing that’s looking awkward is the lighting: we have a Directional Light that came with the project template, and it’s illuminating both the Sun and the Earth. Delete it.
By either clicking the GameObject menu or else right-clicking inside the Hierarchy window, select Light -> Point Light to create a light that gives off light in all directions.
To create a point light, click the GameObject menu (or right-click inside the Hierarchy window), then select Light -> Point Light.
If you press Play, you’ll notice that the light is a little bit weak, so bump up its Intensity to 10. Then you should see a highlight shine off the Earth.
Set the pint light’s Intensity to 10.
Finally, to make things a little crazier, I suggest adding another planet, such as Venus. To do this, follow the same steps you took when creating the Earth, with a few differences:
Create a new sphere, and name it “Venus”.
Set the Y component of its Position to 3.
Find an appropriate texture and drag it onto the Textures folder.
Drag that texture onto the Venus GameObject in either the Hierarchy or Scene window.
Drag both the Orbit and Rotation scripts onto Venus.
In the Inspector window, change the Speed setting on the Orbit script so that it is faster than the Earth’s speed, e.g. a value of 150.
Press Play and watch as Earth and Venus orbit the Sun with different speeds!
Going Further
This simulation, while very simplistic and not really representing the real behaviour of heavenly bodies, is a fun little exercise showing what you can do in Unity3D with very little effort. There are lots of ways you can take this further. Here are a few ideas:
Learn about Prefabs, use them to create a template for the planets, and create the remaining planets of the Solar System.
Add the Moon orbiting the Earth. Use the same Orbit script, but modify it so that you can plug which GameObject is orbited via the Inspector.
Instead of specifying a different speed for each planet, try to calculate it based on the distance between the planet and the Sun.
Tilt the Earth so that it rotates on something closer to its real axis.
Experiment with elliptical orbits.
"You don't learn to walk by following rules. You learn by doing, and by falling over." — Richard Branson