Tag Archives: SignalR

SignalR Core: Hello World

SignalR is a library that brought push notifications to ASP .NET web applications. It abstracted away the complexity of dealing with websockets and other front-end technologies necessary for a web application to spontaneously push out updates to client applications, and provided an easy programming model.

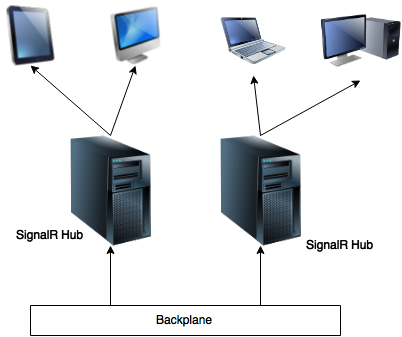
Essentially, SignalR allows us to implement publish/subscribe on the server. Clients, which are typically (but not necessarily) webpages, subscribe to a hub, which can then push updates to them. These updates can be sent spontaneously by the server (e.g. stock ticker) or triggered by a message from a client (e.g. chat).

The old SignalR, however, is not compatible with ASP .NET Core. So if you wanted to have push notifications in your web application, you had to look elsewhere… until recently. Microsoft shipped their first alpha release of SignalR Core (SignalR for ASP .NET Core 2.0) a few weeks ago, and the second alpha was released just yesterday. They also have some really nice samples we can learn from.

This article explains how to quickly get started with SignalR Core, by means of a simple Hello World application that combines a simple server-side hub with a trivial JavaScript client. It is essentially the first example from my “Getting Started with SignalR“, ported to SignalR Core.

The source code for this article is in the SignalRCoreHello folder at the Gigi Labs BitBucket Repository.

Hello SignalR Core: Server Side

This example is based on SignalR Core alpha 2, and uses ASP .NET Core 2 targeting .NET Core 2. As this is pre-release software, APIs may change.

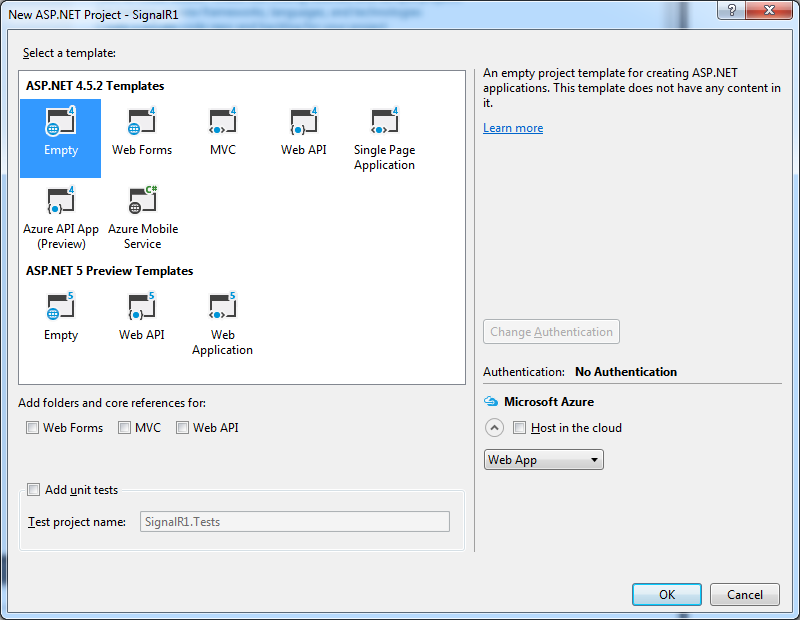
Let’s start off by creating a new ASP .NET Core Web Application in Visual Studio 2017. We can start off simple by using the Empty project template:

This project template should come with a reference to the Microsoft.AspNet.All NuGet package, giving you most of what you need to create our web application.

In addition to that, we’ll need to install the NuGet package for SignalR. Note that we need the -Pre switch for now because it is still prerelease.

Install-Package Microsoft.AspNetCore.SignalR -Pre

Next, let’s add a Hub. Just add a new class:

    public class HelloHub : Hub
    {
        public Task BroadcastHello()
        {
            return Clients.All.InvokeAsync("hello");
        }
    }

In SignalR Core, a class that inherits from Hub is able to communicate with any clients that are subscribed to it. This can be done in several ways: broadcast to all clients or all except one; send to a single client; or send to a specific group. In this case, we’re simply broadcasting a “hello” message to all clients.

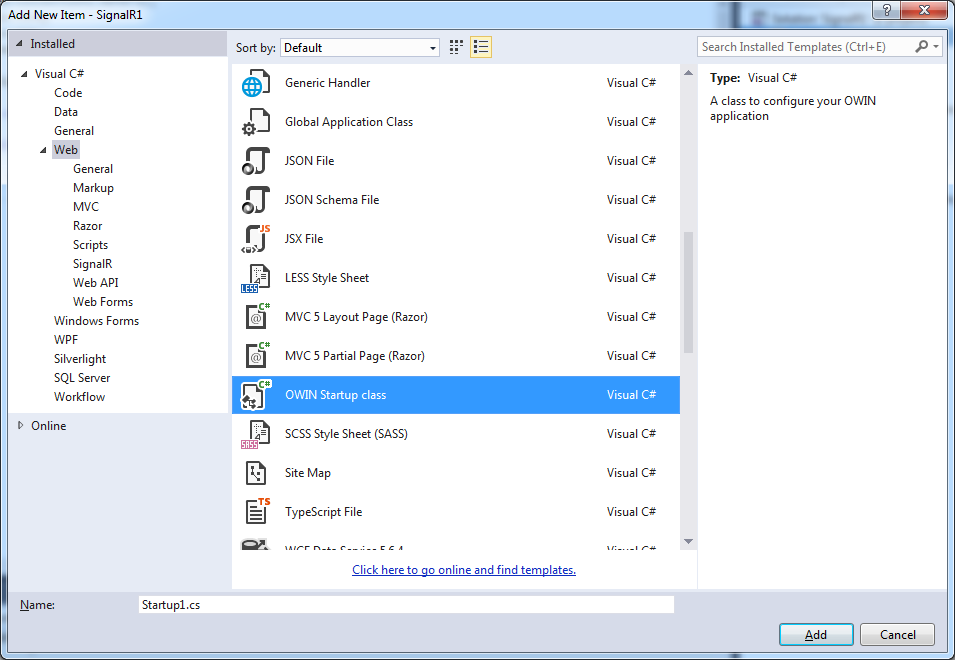
In the Startup class, we need to remove the default “Hello world” code and register our Hub instead. It should look something like this:

    public class Startup
    {
        // This method gets called by the runtime. Use this method to add services to the container.
        // For more information on how to configure your application, visit https://go.microsoft.com/fwlink/?LinkID=398940
        public void ConfigureServices(IServiceCollection services)
        {
            services.AddSignalR();
        }

        // This method gets called by the runtime. Use this method to configure the HTTP request pipeline.
        public void Configure(IApplicationBuilder app, IHostingEnvironment env)
        {
            if (env.IsDevelopment())
            {
                app.UseDeveloperExceptionPage();
            }

            app.UseFileServer();

            app.UseSignalR(routes =>
            {
                routes.MapHub<HelloHub>("hello");
            });
        }
    }

UseSignalR() is where we register the route by which our Hub will be accessed from the client side. UseFileServer() is there just to serve the upcoming HTML and JavaScript.

Hello SignalR Core: Client Side

In order to have a webpage that talks to our Hub, we first need a couple of scripts. We’ll get these using npm, which you can obtain by installing Node.js if you don’t have it already.

npm install @aspnet/signalr-client
npm install jquery

The first package is the client JavaScript for SignalR Core. At the time of writing this article, the file you need is called signalr-client-1.0.0-alpha2-final.js. The second package is jQuery, which is no longer required by SignalR Core, but will make life easier for our front-end code. Copy both signalr-client-1.0.0-alpha2-final.js and jquery.js into the wwwroot folder.

Next, add an index.html file in the wwwroot folder. Add references to the aforementioned scripts, a placeholder for messages (with ID “log” in this example), and a little script to wire things up:

<!DOCTYPE html>
<html>
<head>
    <meta charset="utf-8" />
    <title>Hello SignalR Core!</title>
    <script src="jquery.js"></script>
    <script src="signalr-client-1.0.0-alpha2-final.js"></script>
    <script type="text/javascript">
            $(document).ready(function () {
                var connection = new signalR.HubConnection('/hello');

                connection.on('hello', data => {
                    $("#log").append("Hello <br />");
                });

                connection.start()
                    .then(() => connection.invoke('BroadcastHello'));
            });
    </script>
</head>
<body>
    <div id="log"></div>
</body>
</html>

This JavaScript establishes a connection to the hub, registers a callback for when a “hello” message is received, and calls the BroadcastHello() method on the hub:

The way we implemented our Hub earlier, it will send a “hello” message to all connected clients.

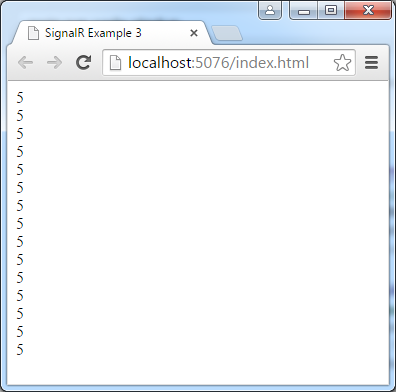
Let’s give that a try now:

Good! The connection is established, and we’re getting something back from the server (i.e. the Hub). Let’s open a couple more browser windows at the same endpoint:

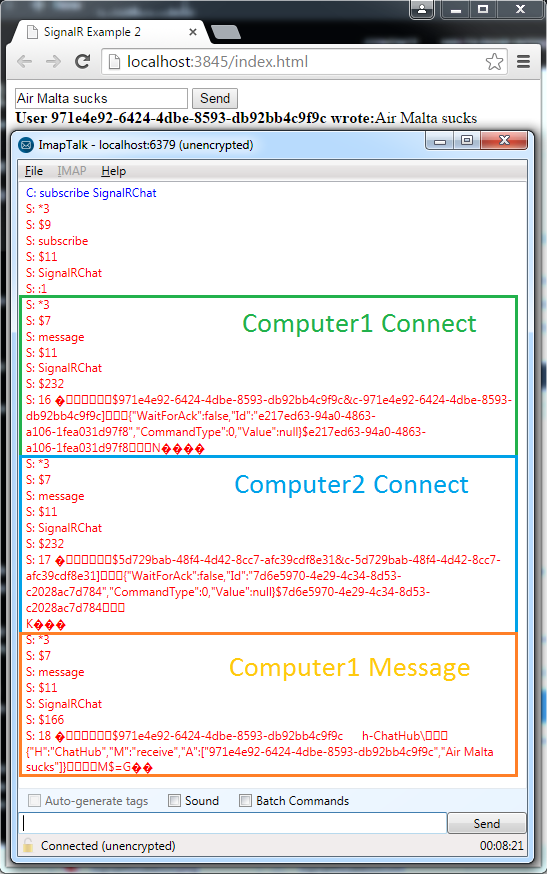
Here, we can see that each time a new window was opened, a new “hello” message was broadcasted to all connected clients. Since we are not holding any state, messages are sent incrementally, so newer clients that missed earlier messages will be showing fewer messages.
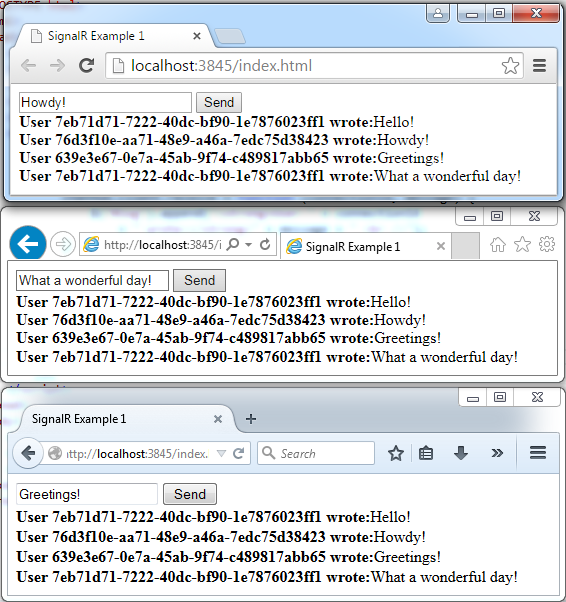
The Chat Sample

If you want to see a more elaborate example, check out the Chat sample from the official SignalR Core samples:

The principle is the same, but the Chat sample is a little more interesting.

SignalR Scaleout with Redis Backplane

Introduction

In “Getting Started with SignalR“, I provided a gentle introduction to SignalR with a few simple and practical examples. The overwhelming response showed that I’m not alone in thinking this is an awesome technology enabling real-time push notifications over the web.

Web applications often face the challenge of having to scale to handle large amounts of clients, and SignalR applications are no exception. In this example, we’ll see one way of scaling out SignalR applications using something called a backplane.

Scaleout in SignalR

SignalRScaleout

Introduction to Scaleout in SignalR” (official documentation) describes how SignalR applications can use several servers to handle increasing numbers of clients. When a server needs to push an update, it first pushes it over a message bus called a backplane. This delivers it to the other servers, which can then forward the update to their respective clients.

According to the official documentation, scaleout is supported using Azure, Redis or SQL Server as backplanes. Third-party packages exist to support other channels, such as SignalR.RabbitMq.

Scaleout Example using Redis

Introduction to Scaleout in SignalR” (official documentation) describes how to use SignalR as a backplane. To demonstrate this, I’ll build on the Chat Example code from my “Getting Started with SignalR” article.

All we need to scaleout using Redis is install the Microsoft.AspNet.SignalR.Redis NuGet package, and then set it up in the Startup class as follows:

        public void Configuration(IAppBuilder app)
        {
            GlobalHost.DependencyResolver.UseRedis("192.168.1.66", 6379, null, "SignalRChat");
            app.MapSignalR();
        }

In the code above, I am specifying the host and port of the Redis server, the password (in this case null because I don’t have one), and the name of the pub/sub channel that SignalR will use to distribute messages.

To test this, you can get a Redis server from the Redis download page. Redis releases for Windows exist and are great for testing stuff, but remember they aren’t officially supported for production environments.

Now to actually test it, I’ve set up the same scaleout-enhanced chat application on two different machines, and subscribed to the Redis pub/sub channel:

signalr-scaleout-computer1

Watching the pub/sub channel reveals what SignalR is doing under the hood. There are particular messages going through when the application initializes on each machine, and you can also see the actual data messages going through. So when you write a message in the chat, you can also see it in the pub/sub channel.

But even better than that, you’ll also see it on the client (browser) that’s hooked up to the other machine:

signalr-scaleout-computer2

The magic you need to appreciate here is that these aren’t two browsers connected to the same server; they are actually communicating with different servers on different machines. And despite that, the messages manage to reach all clients thanks to the backplane, which in this case is Redis.

Caveats

So I’ve shown how it’s really easy to scale out SignalR to multiple servers: you need to install a NuGet package and add a line of code. And I’ve actually tested it on two machines.

stash-1-244250d58073b0ed1

But that’s not really scaleout. I don’t have the resources to do large-scale testing, and only intended to show how scaleout is implemented with this article. The actual benefits of scaleout depend on the application. As the official documentation warns, the addition of a backplane incurs overhead and can become a bottleneck in some scenarios. You really need to study whether your application is a good fit for this kind of scaleout before going for it.

Getting Started with SignalR

Introduction

SignalR is an open source .NET library enabling real-time broadcasts of data on the web. Typical example applications include chats, stock tickers, and even games. It does this by leveraging and abstracting a number of different technologies, choosing the most suitable transport mechanism based on what the client and server support (since WebSocket support is not yet widespread).

At the time of writing this article, SignalR v2 is the latest implementation, but SignalR v3 is in beta along with ASP .NET 5. I’ll be using VS2015 for this article.

In this article, we’ll cover some really simple examples that will get you up and running fast.

The source code for this article is available on the Gigi Labs BitBucket repository:

Setting up a SignalR Hub

Create a new ASP .NET Web Application, and choose the Empty template. I’m using the one under ASP .NET 4.5.2 since ASP .NET 5 is still a preview at the time of writing this article:

signalr-empty-application

Next, you’ll need to add a SignalR Hub (screenshot below). A hub is a publish/subscribe implementation, and automatically tracks connections. Additionally, it provides ways of calling methods on clients, and selecting which clients to broadcast to – we’ll see how this works shortly.

signalr-add-hub

Adding the hub not only adds a class for the hub, but also gives you a basic method and also adds scripts needed for SignalR to run:

signalr-added-hub-scripts

Next, add an OWIN Startup Class:

signalr-add-owin-startup-class

In this class, just set up SignalR in the Configuration() method:

        public void Configuration(IAppBuilder app)
        {
            app.MapSignalR();
        }

Good! Now we’re all set to create our examples. We’ll also need some client code, so add an empty HTML page called index.html. Right click it in Solution Explorer, and select “Set as Start Page” so it will be automatically loaded when you hit F5 to debug.

Basic Hello World Example

When we added our Hub, we got some initial code:

        public void Hello()
        {
            Clients.All.hello();
        }

This works as follows: when a client calls this Hello() method on the server (Hub), the hub will call a hello() method on all the connected clients. We can use this example code as-is, but we need to create some client code.

First, add the following structure to index.html:

<!DOCTYPE html>
<html>
<head>
    <title>SignalR Example 1</title>
	<meta charset="utf-8" />
    <script src="Scripts/jquery-1.10.2.min.js"></script>
    <script src="Scripts/jquery.signalR-2.1.2.min.js"></script>
    <script src="signalr/hubs"></script>
    <script type="text/javascript">
        $(function () {
            // TODO client code goes here
        });
    </script>
</head>
<body>
    <div id="log"></div>
</body>
</html>

There are three things to notice here. First, we have a few references to JavaScript files – the versions need to match the ones in the Scripts folder. The signalr/hubs reference is autogenerated, so you don’t have to worry about it. Secondly, there is a placeholder for Javascript client code which we’ll add next. Finally, we have a “log” div which is where we’ll dump any output received from the server.

For the client code, we first need a reference to the hub itself:

var myHub = $.connection.myHub1;

Next, we add the method on the client that the server will call whenever it needs to broadcast something:

            myHub.client.hello = function () {
                $("#log").append("Hello <br />");
            }

Finally, we add code to initialize the hub itself, and when the initialization is complete, we will call the method on the server. This will in turn cause the client method above to be called:

            $.connection.hub.start().done(function () {
                myHub.server.hello();
            });

We can now test this and see that we get a Hello response from the server:

signalr-hello-1

More importantly, if we open a second browser window on the same URL, you’ll notice that both windows will get a new Hello response. That’s because the server/hub is broadcasting to all clients whenever a client calls its Hello() method.

signalr-hello-2

Chat Example

Creating a chat server is not much more complex than this. In fact it’s a typical example of SignalR usage, and you can check out the official tutorial if you like.

For this example, I’ve created a new project with a new Hub:

    public class ChatHub : Hub
    {
        public void Broadcast(string message)
        {
            Clients.All.receive(Context.ConnectionId, message);
        }
    }

Some names have changed, but it’s mostly the same as before. One thing you’ll notice that’s different, though, is that Context.ConnectionId. It’s SignalR’s way of giving you the connectionId of the client who called the server/hub method, and I’m using it to distinguish between clients in the chat (as opposed to the official tutorial which prompts for a name).

On the client side, things have also changed slightly. In the HTML body, I’ve added an input field and a send button:

<body>
    <input id="message" type="text" />
    <button id="send">Send</button>
    <div id="log"></div>
</body>

In the client JavaScript code, as before, we’re first getting a reference to the hub (different name this time):

var chatHub = $.connection.chatHub;

Then we add the method that the server will call on the client. Remember, the signature must match what we declared on the hub. In this case we’re passing in connectionId and message, and then displaying them:

            chatHub.client.receive = function (connectionId, message) {
                $("#log").append("<strong>User " + connectionId
                    + " wrote:</strong>" + message + " <br />");
            }

Then we add the hub initialization code, together with any actions we want to carry out post-initialization. In this case, we set up a handler for when the user sends a message:

            $.connection.hub.start().done(function () {
                $("#send").on("click", function () {
                    var message = $('#message').val();
                    chatHub.server.broadcast(message);
                })
            });

There’s nothing keeping us from adding further logic to show when someone joins the chat, for instance. But let’s keep this super-simple.

We can now test this:

signalr-chat-test

Stock Ticker Example

The previous examples show broadcasts to clients triggered by the clients themselves. There are many scenarios where it makes sense for the server to spontaneously send updates to clients – a stock ticker is a common example (see official tutorial).

For this example, I’ve again created a new project and a new Hub. Since the server will spontaneously send updates to clients, the hub does not need to expose any methods:

    public class StockTickerHub : Hub
    {

    }

Instead, we’ll have a thread that periodically sends updates to the clients of that hub. Since I have no better place to put this, it’s going in the Startup class:

    public class Startup
    {
        private static Thread stockTickerThread = new Thread(() =>
            {
                var stockTickerHub = GlobalHost.ConnectionManager.GetHubContext<StockTickerHub>();

                while (true)
                {
                    stockTickerHub.Clients.All.update(5);
                    Thread.Sleep(1000);
                }
            });

        public void Configuration(IAppBuilder app)
        {
            app.MapSignalR();

            stockTickerThread.Start();
        }
    }

The important thing to notice here is how we’re getting a reference to the hub via GlobalHost.ConnectionManager.GetHubContext<StockTickerHub>(). Since I’m more concerned with demonstrating how to use SignalR than any stock ticker logic, I’m just sending a fixed value of 5 every second.

The client code is practically the same as the first example, except that we don’t need to do anything once the hub is initialized:

<!DOCTYPE html>
<html>
<head>
    <title>SignalR Example 3</title>
    <meta charset="utf-8" />
    <script src="Scripts/jquery-1.10.2.min.js"></script>
    <script src="Scripts/jquery.signalR-2.1.2.min.js"></script>
    <script src="signalr/hubs"></script>
    <script type="text/javascript">
        $(function () {
            var stockTickerHub = $.connection.stockTickerHub;

            stockTickerHub.client.update = function (value) {
                $("#log").append(value + "<br />");
            }

            $.connection.hub.start().done(function () {
                
            });
        });
    </script>
</head>
<body>
    <div id="log"></div>
</body>
</html>

We can now test that the spontaneous updates are received:

signalr-stockticker-test

Beyond this Article

This article showed basic usage of SignalR. I intentionally kept the examples really simple so that you could get up and running in no time.

Having said that, there’s a lot more to SignalR than we’ve seen here. For instance, we’ve always broadcasted to all clients. SignalR allows you to choose which clients to send to, for example you can send to a specific client, or to clients subscribed to a particular topic. That’s beyond the scope of this article, so if you want to know more about SignalR, check out the multitude of resources on the net.