Determining the bitness (x86 or x64) of a DLL

This article was originally posted here at Programmer’s Ranch on 28th September 2014.

Hello guys and gals! šŸ™‚

In this article, we’re going to tackle a pretty frustrating scenario: making sure all your .NET assemblies or even native DLLs target the same architecture. At the time of writing, applications tend to be targeted at x86 or x64 architectures, or both. However, mixing DLLs or executables compiled for different architectures is a recipe for disaster. This kind of disaster, in fact:

bitness-badimageformatexception
That’s a BadImageFormatException, saying:

An unhandled exception of type ‘System.BadImageFormatException‘ occurred in Microsoft.VisualStudio.HostingProcess.Utilities.dll
Additional information: Could not load file or assembly ‘ClassLibrary, Version=1.0.0.0, Culture=neutral, PublicKeyToken=null’ or one of its dependencies. An attempt was made to load a program with an incorrect format.

This is why it’s happening:

bitness-mixed-architecture

That’s a very, very stupid thing to do, having an x64 console application depend on an x86 class library (or DLL). Remember:

bitness-dont-mix-architectures

Great, now you know. But you’re bound to run into the BadImageFormatException problem anyway, because while it’s easy to control the bitness of the assemblies in your project, you often depend on DLLs provided by third parties, and their own bitness isn’t clearly defined. Unfortunately, you can’t rely on rightclick -> Properties -> Details because that doesn’t give you the bitness at all.

Fortunately, however, there are tools you can use to find out what architecture those DLLs are compiled for.

Let’s start off with .NET assemblies. If the DLL in question is a .NET assembly, you canĀ use the corflags utilityĀ to find out the bitness. corflags is part of the Visual Studio developer tools, so you’ll first need to start a Visual Studio developer command prompt (seeĀ this StackOverflow threadĀ or search Windows for CorFlags.exeĀ in case you can’t find one from the Start menu).

Once you’ve located CorFlags.exe or have a Visual Studio developer command prompt, runCorFlags.exeĀ with the full path to the DLL you want to inspect, and check the 32BITĀ setting in the output:

bitness-corflags

Now CorFlags.exe works great to find out the architecture of a .NET assembly, but can’t tell you the architecture of a native DLL. This is what happens if you try to use it with SDL2.dll, for instance:

bitness-corflags-native

For unmanaged/native DLLs, we can insteadĀ use dumpbin. This will spit out a bunch of information, so you can find the architecture quickly if you filter the information by including only the line containing the word “machine”, as the linked Stack Overflow answer suggests:

bitness-dumpbin

So there you go – this article has presented two different ways to check the bitness or CPU architecture of managed and unmanaged DLLs respectively, which helps when troubleshooting those dreaded BadImageFormatExceptions. In reality this article is a consolidation of the information in the two Stack Overflow threads linked above, and I would like to thank the authors because I have found their tips useful on many occasions.

Authenticating with Active Directory

This article was originally posted here at Programmer’s Ranch on 14th March 2014.

Hi! šŸ™‚

If you work in a corporate environment, chances are that your Windows machine is connected to a domain based onĀ Active Directory. In today’s article, we’re going to write a very simple program that allows us to verify a user’s credentials for the domain using Active Directory.

In order to try this out, you’re going to need an Active Directory domain. In my case, I installed Windows Server 2008 R2 andĀ followed these instructionsĀ to set up a domain, which I called “ranch.local”. You may also be able to connect to your domain at work to save yourself the trouble of setting this up.

Let us now create a new Console Application using either SharpDevelop or Visual Studio. After adding a reference to System.DirectoryServices.AccountManagement, add the following statement near the top of your Program.csĀ file:

using System.DirectoryServices.AccountManagement;

Next, remove any code inĀ Main() and add a simple prompt for the username and password to authenticate against Active Directory:

// prompt for username

Console.Write("Username: ");
string username = Console.ReadLine();

// prompt for password

Console.Write("Password: ");
string password = Console.ReadLine();

For the authentication part, we can use a simple method describedĀ here.Ā After obtaining a reference to the domain using theĀ PrincipalContextĀ class (specifying the domain as a parameter), we simply use theĀ ValidateCredentials()Ā method to perform the authentication. This gives us a boolean value indicating whether the authentication was successful or not.

// authenticate

using (PrincipalContext pc = new PrincipalContext(ContextType.Domain, "RANCH"))
{
    bool authenticated = pc.ValidateCredentials(username, password);

    if (authenticated)
        Console.WriteLine("Authenticated");
    else
        Console.WriteLine("Get lost.");
}

At this point, we need only add a simple statement to wait for user input before letting the application terminate:

Console.ReadLine();

Now, we can build our application and test it on the server (or on any machine that is part of the domain). First, let’s try a valid login:

csadauth-valid

Very good! And now, a user that doesn’t even exist:

csadauth-invalid

Excellent! As you can see, it only takes a couple of lines of code to perform authentication against Active Directory. I hope you found this useful. Follow the Ranch to read more articles like this! šŸ™‚

SignalR Scaleout with Redis Backplane

Introduction

In “Getting Started with SignalR“, I provided a gentle introduction to SignalR with a few simple and practical examples. The overwhelming response showed that I’m not alone in thinking this is an awesome technology enabling real-time push notifications over the web.

Web applications often face the challenge of having to scale to handle large amounts of clients, and SignalR applications are no exception. In this example, we’ll see one way of scaling out SignalR applications using something called a backplane.

Scaleout in SignalR

SignalRScaleout

Introduction to Scaleout in SignalR” (official documentation) describes how SignalR applications can use several servers to handle increasing numbers of clients. When a server needs to push an update, it first pushes it over a message bus called a backplane. This delivers it to the other servers, which can then forward the update to their respective clients.

According to the official documentation, scaleout is supported using Azure, Redis or SQL Server as backplanes.Ā Third-party packages exist to support other channels, such as SignalR.RabbitMq.

Scaleout Example using Redis

Introduction to Scaleout in SignalR” (official documentation) describes how to use SignalR as a backplane. To demonstrate this, I’ll build on theĀ Chat Example codeĀ from my “Getting Started with SignalR” article.

All we need to scaleout using Redis is install the Microsoft.AspNet.SignalR.Redis NuGet package, and then set it up in the Startup class as follows:

        public void Configuration(IAppBuilder app)
        {
            GlobalHost.DependencyResolver.UseRedis("192.168.1.66", 6379, null, "SignalRChat");
            app.MapSignalR();
        }

In the code above, I am specifying the host and port of the Redis server, the password (in this case null because I don’t have one), and the name of the pub/sub channel that SignalR will use to distribute messages.

To test this, you can get a Redis server from the Redis download page. Redis releases for Windows exist and are great for testing stuff, but remember they aren’t officially supported for production environments.

Now to actually test it, I’ve set up the same scaleout-enhanced chat application on two different machines, and subscribed to the Redis pub/sub channel:

signalr-scaleout-computer1

Watching the pub/sub channel reveals what SignalR is doing under the hood. There are particular messages going through when the application initializes on each machine, and you can also see the actual data messages going through. So when you write a message in the chat, you can also see it in the pub/sub channel.

But even better than that, you’ll also see it on the client (browser) that’s hooked up to the other machine:

signalr-scaleout-computer2

The magic you need to appreciate here is that these aren’t two browsers connected to the same server; they are actually communicating with different servers on different machines. And despite that, the messages manage to reach all clients thanks to the backplane, which in this case is Redis.

Caveats

So I’ve shown how it’s really easy to scale out SignalR to multiple servers: you need to install a NuGet package and add a line of code. And I’ve actually tested it on two machines.

stash-1-244250d58073b0ed1

But that’s not really scaleout. I don’t have the resources to do large-scale testing, and only intended to show how scaleout is implemented with this article. The actual benefits of scaleout depend on the application. As the official documentation warns, the addition of a backplane incurs overhead and can become a bottleneck in some scenarios. You really need to study whether your application is a good fit for this kind of scaleout before going for it.

Getting Started with SignalR

Introduction

SignalR is an open source .NET library enabling real-time broadcasts of data on the web. Typical example applications include chats, stock tickers, and even games. It does this by leveraging and abstracting a number of different technologies, choosing the most suitable transport mechanism based on what the client and server support (since WebSocket support is not yet widespread).

At the time of writing this article, SignalR v2 is the latest implementation, but SignalR v3 is in beta along with ASP .NET 5. I’ll be using VS2015 for this article.

In this article, we’ll cover some really simple examples that will get you up and running fast.

The source code for this article is available on the Gigi Labs BitBucket repository:

Setting up a SignalR Hub

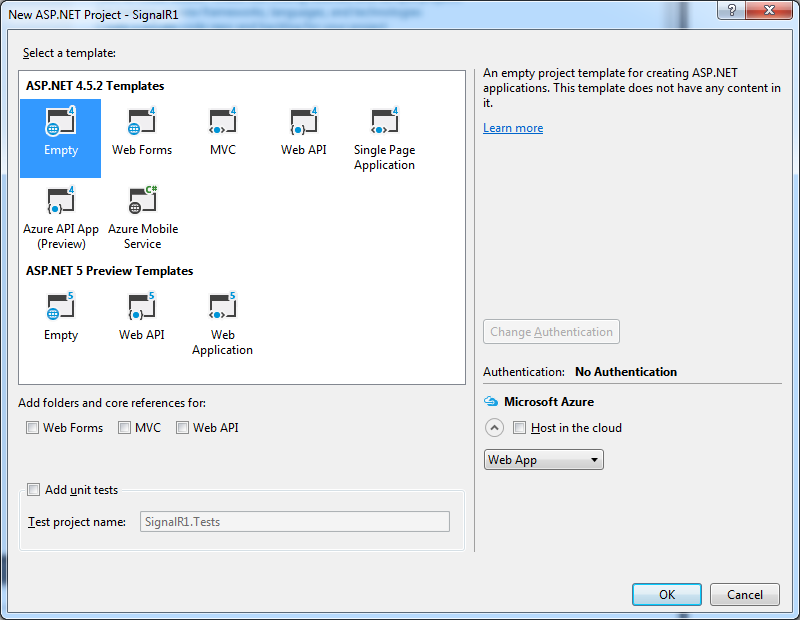
Create a new ASP .NET Web Application, and choose the Empty template. I’m using the one under ASP .NET 4.5.2 since ASP .NET 5 is still a preview at the time of writing this article:

signalr-empty-application

Next, you’ll need to add a SignalR Hub (screenshot below). A hub is a publish/subscribe implementation, and automatically tracks connections. Additionally, it provides ways of calling methods on clients, and selecting which clients to broadcast to – we’ll see how this works shortly.

signalr-add-hub

Adding the hub not only adds a class for the hub, but also gives you a basic method and also adds scripts needed for SignalR to run:

signalr-added-hub-scripts

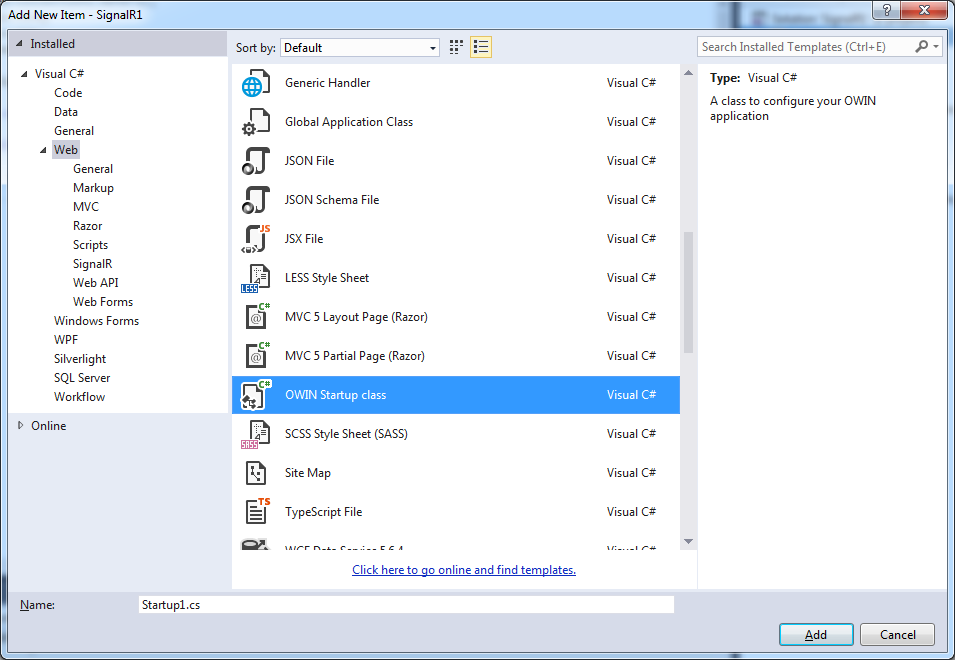
Next, add an OWIN Startup Class:

signalr-add-owin-startup-class

In this class, just set up SignalR in the Configuration() method:

        public void Configuration(IAppBuilder app)
        {
            app.MapSignalR();
        }

Good! Now we’re all set to create our examples. We’ll also need some client code, so add an empty HTML page called index.html. Right click it in Solution Explorer, and select “Set as Start Page” so it will be automatically loaded when you hit F5 to debug.

Basic Hello World Example

When we added our Hub, we got some initial code:

        public void Hello()
        {
            Clients.All.hello();
        }

This works as follows: when a client calls this Hello() method on the server (Hub), the hub will call a hello() method on all the connected clients. We can use this example code as-is, but we need to create some client code.

First, add the following structure to index.html:

<!DOCTYPE html>
<html>
<head>
    <title>SignalR Example 1</title>
	<meta charset="utf-8" />
    <script src="Scripts/jquery-1.10.2.min.js"></script>
    <script src="Scripts/jquery.signalR-2.1.2.min.js"></script>
    <script src="signalr/hubs"></script>
    <script type="text/javascript">
        $(function () {
            // TODO client code goes here
        });
    </script>
</head>
<body>
    <div id="log"></div>
</body>
</html>

There are three things to notice here. First, we have a few references to JavaScript files – the versions need to match the ones in the Scripts folder. The signalr/hubs reference is autogenerated, so you don’t have to worry about it. Secondly, there is a placeholder for Javascript client code which we’ll add next. Finally, we have a “log” div which is where we’ll dump any output received from the server.

For the client code, we first need a reference to the hub itself:

var myHub = $.connection.myHub1;

Next, we add the method on the client that the server will call whenever it needs to broadcast something:

            myHub.client.hello = function () {
                $("#log").append("Hello <br />");
            }

Finally, we add code to initialize the hub itself, and when the initialization is complete, we will call the method on the server. This will in turn cause the client method above to be called:

            $.connection.hub.start().done(function () {
                myHub.server.hello();
            });

We can now test this and see that we get a Hello response from the server:

signalr-hello-1

More importantly, if we open a second browser window on the same URL, you’ll notice that both windows will get a new Hello response. That’s because the server/hub is broadcasting to all clients whenever a client calls its Hello() method.

signalr-hello-2

Chat Example

Creating a chat server is not much more complex than this. In fact it’s a typical example of SignalR usage, and you can check out the official tutorial if you like.

For this example, I’ve created a new project with a new Hub:

    public class ChatHub : Hub
    {
        public void Broadcast(string message)
        {
            Clients.All.receive(Context.ConnectionId, message);
        }
    }

Some names have changed, but it’s mostly the same as before. One thing you’ll notice that’s different, though, is that Context.ConnectionId. It’s SignalR’s way of giving you the connectionId of the client who called the server/hub method, and I’m using it to distinguish between clients in the chat (as opposed to the official tutorial which prompts for a name).

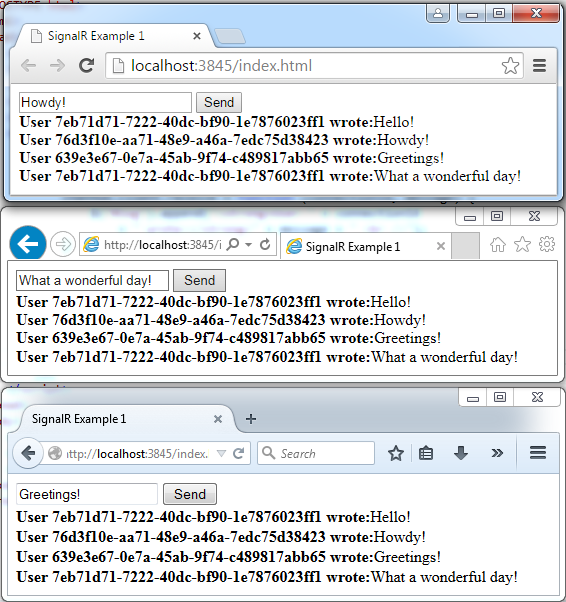
On the client side, things have also changed slightly. In the HTML body, I’ve added an input field and a send button:

<body>
    <input id="message" type="text" />
    <button id="send">Send</button>
    <div id="log"></div>
</body>

In the client JavaScript code, as before, we’re first getting a reference to the hub (different name this time):

var chatHub = $.connection.chatHub;

Then we add the method that the server will call on the client. Remember, the signature must match what we declared on the hub. In this case we’re passing in connectionId and message, and then displaying them:

            chatHub.client.receive = function (connectionId, message) {
                $("#log").append("<strong>User " + connectionId
                    + " wrote:</strong>" + message + " <br />");
            }

Then we add the hub initialization code, together with any actions we want to carry out post-initialization. In this case, we set up a handler for when the user sends a message:

            $.connection.hub.start().done(function () {
                $("#send").on("click", function () {
                    var message = $('#message').val();
                    chatHub.server.broadcast(message);
                })
            });

There’s nothing keeping us from adding further logic to show when someone joins the chat, for instance. But let’s keep this super-simple.

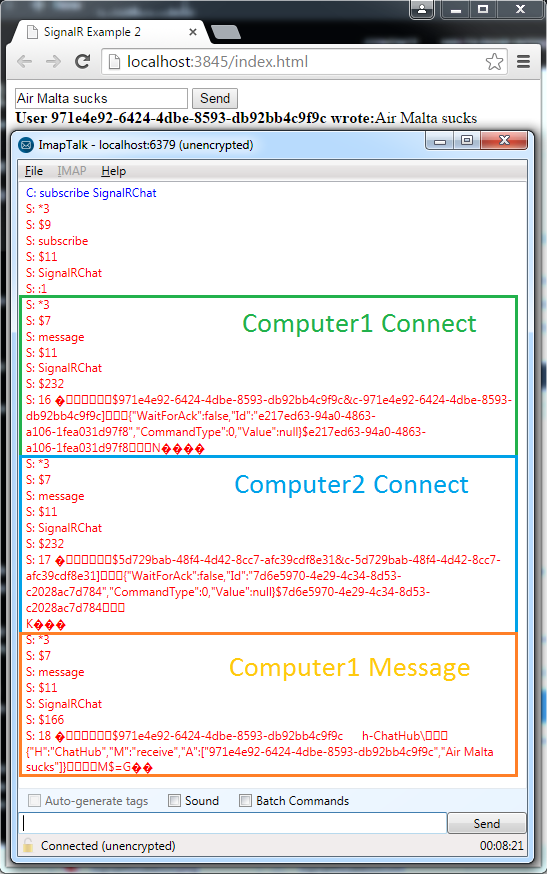
We can now test this:

signalr-chat-test

Stock Ticker Example

The previous examples show broadcasts to clients triggered by the clients themselves. There are many scenarios where it makes sense for the server to spontaneously send updates to clients – a stock ticker is a common example (see official tutorial).

For this example, I’ve again created a new project and a new Hub. Since the server will spontaneously send updates to clients, the hub does not need to expose any methods:

    public class StockTickerHub : Hub
    {

    }

Instead, we’ll have a thread that periodically sends updates to the clients of that hub. Since I have no better place to put this, it’s going in the Startup class:

    public class Startup
    {
        private static Thread stockTickerThread = new Thread(() =>
            {
                var stockTickerHub = GlobalHost.ConnectionManager.GetHubContext<StockTickerHub>();

                while (true)
                {
                    stockTickerHub.Clients.All.update(5);
                    Thread.Sleep(1000);
                }
            });

        public void Configuration(IAppBuilder app)
        {
            app.MapSignalR();

            stockTickerThread.Start();
        }
    }

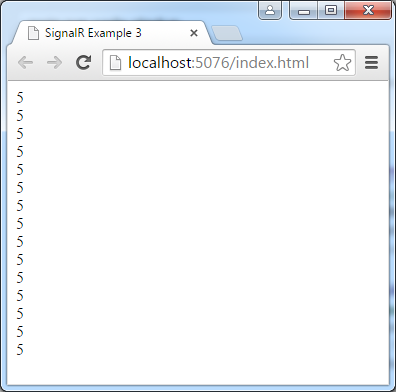
The important thing to notice here is how we’re getting a reference to the hub via GlobalHost.ConnectionManager.GetHubContext<StockTickerHub>(). Since I’m more concerned with demonstrating how to use SignalR than any stock ticker logic, I’m just sending a fixed value of 5 every second.

The client code is practically the same as the first example, except that we don’t need to do anything once the hub is initialized:

<!DOCTYPE html>
<html>
<head>
    <title>SignalR Example 3</title>
    <meta charset="utf-8" />
    <script src="Scripts/jquery-1.10.2.min.js"></script>
    <script src="Scripts/jquery.signalR-2.1.2.min.js"></script>
    <script src="signalr/hubs"></script>
    <script type="text/javascript">
        $(function () {
            var stockTickerHub = $.connection.stockTickerHub;

            stockTickerHub.client.update = function (value) {
                $("#log").append(value + "<br />");
            }

            $.connection.hub.start().done(function () {
                
            });
        });
    </script>
</head>
<body>
    <div id="log"></div>
</body>
</html>

We can now test that the spontaneous updates are received:

signalr-stockticker-test

Beyond this Article

This article showed basic usage of SignalR. I intentionally kept the examples really simple so that you could get up and running in no time.

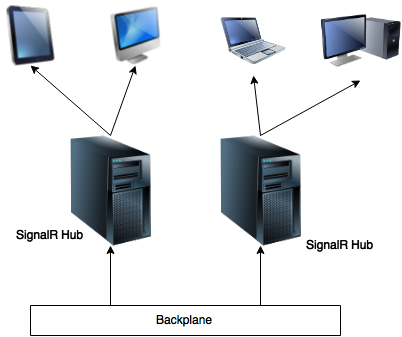
Having said that, there’s a lot more to SignalR than we’ve seen here. For instance, we’ve always broadcasted to all clients. SignalR allows you to choose which clients to send to, for example you can send to a specific client, or to clients subscribed to a particular topic. That’s beyond the scope of this article, so if you want to know more about SignalR, check out the multitude of resources on the net.

Getting Started with RabbitMQ with .NET

This article contains some instructions to make it easy for people to jump into the wonderful world of message queues with RabbitMQ. Its purpose is not to provide any in-depth explanations, as I’m pretty new to the topic myself. šŸ™‚

RabbitMQ is built on Erlang, so you’ll need to install that first:

rabbitmq-download-erlang

You can then download and install RabbitMQ itself:

rabbitmq-download-rabbitmq

Next, you should install the management plugin. This provides a web UI allowing you to manage your queue and perform basic testing (e.g. publish messages).

To do this, navigate to the folder where you installed RabbitMQ, and go into theĀ sbin folder. From here, enter the following command:

rabbitmq-plugins enable rabbitmq_management

Once that is installed, you can access the administrative web UI by going toĀ http://localhost:15672/ with username guest and passwordĀ guest. Go to theĀ Queues tab and create a new queue:

rabbitmq-add-queue

You’ll now see the new queue listed under “All queues”. Click on the name to select it. This will allow you to view information about the queue (including statistics, such as the number of messages in the queue) and perform a number of operations (including publishing messages).

But before we do that, let’s create a simple client in .NET that can subscribe to the queue and consume any messages we publish. Some basic code is available in this tutorial, so we can just install the RabbitMQ.Client NuGet package and then write some code based on it:

        static void Main(string[] args)
        {
            var factory = new ConnectionFactory() { HostName = "localhost" };

            using (var connection = factory.CreateConnection())
            {
                using (var channel = connection.CreateModel())
                {
                    channel.QueueDeclare("testqueue", true, false, false, null);

                    var consumer = new EventingBasicConsumer(channel);
                    consumer.Received += Consumer_Received;
                    channel.BasicConsume("testqueue", true, consumer);

                    Console.ReadLine();
                }
            }
        }

        private static void Consumer_Received(object sender, BasicDeliverEventArgs e)
        {
            var body = e.Body;
            var content = Encoding.UTF8.GetString(body);
            Console.WriteLine(content);
        }

We can now run this client, and leave it waiting for messages.

To test it, let’s publish a message from the RabbitMQ management web UI:

rabbitmq-publish-message

You can see from the client that the message has been received:

rabbitmq-consume-message

So that shows in a very basic way how you can setup RabbitMQ on Windows, publish messages from the management web UI, and consume messages by writing a simple .NET client.

Update 2nd March 2016: If the management plugin fails to install with something like “unable to contact node”, here are a few things you can try: