Rediscovering Sensible World of Soccer

Back in the days when I actually had time to play computer games, I was a fan of three main genres: RPG, strategy, and FPS. The sports genre never really captured my interest, with maybe a couple of notable exceptions. One of these was Sensible World of Soccer.

swos-goal

This week I treated myself to playing Sensible World of Soccer ’96/97, which I had bought off GOG.com. Although this is not the classic I grew up playing (which was Sensible World of Soccer ’95/’96 European Championship Edition), it’s practically identical to it: the only noticeable difference is that some players have moved between teams.

Sensible World of Soccer (SWOS) is a game where you can both manage a football team and play football. It offers a great deal of flexibility. If you just want to play football, you can choose all sorts of friendly matches or tournaments to play. On the other hand, if you just want to manage your team, you can do that, and see only the game results. You can both manage the team and control it while playing football games. And you can even do neither: watch a game played by computer-controlled teams.


swos-menu

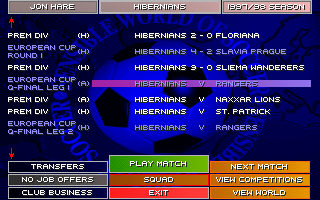
The management aspect is menu-driven. When you start a career (which lasts a maximum of four seasons), you are given control of every aspect of your team, including organising and training your team, buying and selling players, keeping track of the match schedule, watching the club’s profit/loss, goal statistics, and even watching the progress of various tournaments in the world.

swos-team

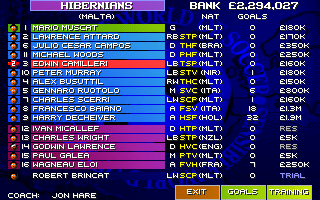
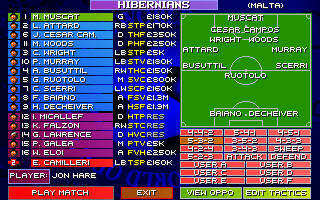
Managing your team alone is complex enough to give the game a great deal of replayability. Each player has a position in which he’s comfortable (e.g. defence, attack, etc). Each player also has a financial value and a set of top skills (e.g. speed, shot power, ball control, etc) denoted by the yellow letters in the screenshot above. It’s not all as easy as it looks, however. A player may thrive or stagnate depending on his position, and his value may change accordingly. Financial value also does not always accurately reflect a player’s skill. So trying out different players in different position is key to forming a functional team.

swos-strategy

Other than that, before and during each match, you can refine your team’s formation, allowing you to try different strategies to adapt to demanding situations.

swos-goal3

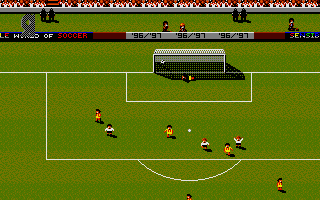
The gameplay itself is incredible fun. You control one player at a time while all the rest move automatically. This is where the player skills pose a challenge: depending on whether your player is good at speed, ball control, passing, or whatever, you may opt to pass the ball, dribble past your opponents, or shoot the ball into the goal. Controlling the ball when shooting is a skill in itself; you usually use the arrows to indicate a direction (e.g. top-right), but you can actually use different key combinations after shooting to give the ball a curved effect or elevation, allowing you to score some pretty spectacular goals.

swos-goal2

Once you go beyond the basic skills, you can get creative and have loads of fun, scoring in incredible ways and posing different challenges. For example, instead of just shooting into the goal, you can cross to another player and score with a tackle or header. You can score from a distance, or pass your way around the goalkeeper, and just run in with the ball. Or my personal favourite: get the goalkeeper and defenders to follow you, run the train around for a bit, and then just deposit the ball at the back of the net.

swos-beating

You might want to start with a pretty good team, such as Manchester United or Bayern Munich. But as you get more familiar with the game, it’s a fun challenge to start with a crappy team and buy better players. That allows you to pretty much dominate a league, and give your opponents a beating. For example, the above 12-0 in a typical 3-minute (real time) career game is a pretty nice feat, and a challenge to achieve.

SWOS is a simple game but gives you a world of opportunities to try out. Career games last 3 minutes of real time, but friendlies may be 3, 5, 7 or 10 minutes (you choose the setting). This means you can play the game for just a few minutes, or spend several hours at a time.

If you’re not put off by the dated graphics, and love some genuinely fantastic gameplay, give this game a go.

ASP .NET Web API Dependency Injection with Ninject

In this article, we’re going to set up dependency injection in a new ASP .NET Web API project, using Ninject as our IoC container.

For starters, do the following:

  1. Create a new Web API project.
  2. Install the Ninject.Web.WebApi NuGet package.
  3. Install the Ninject.Web.WebApi.WebHost NuGet package.

Since I need an injectable service to demonstrate this with, I’m also going to install my very own .NET Settings Framework via the Dandago.Settings NuGet package.

When you installed Ninject.Web.WebApi.WebHost, it added a NinjectWebCommon.cs class under the App_Start folder:

ninjectwebapi-ninjectwebcommon

Ignore the boilerplate crap and look for the RegisterServices() method. There, you can set up your dependencies. In my case, it looks like this (needs namespace Dandago.Settings):

        /// <summary>
        /// Load your modules or register your services here!
        /// </summary>
        /// <param name="kernel">The kernel.</param>
        private static void RegisterServices(IKernel kernel)
        {
            kernel.Bind<IConfigKeyReader>().To<AppSettingReader>();
            kernel.Bind<IConfigKeyProvider>().To<ConfigKeyProvider>();
        }     

Great! Now, let’s test it. Find ValuesController and at the following code at the beginning:

        private int x;

        public ValuesController(IConfigKeyProvider configKeyProvider)
        {
            this.x = configKeyProvider.Get<int>("x", 5);
        }

Run it, and we should hit the breakpoint when going to /api/values:

ninjectwebapi-breakpointhit

It’s working, and that’s all you need.

In case it wasn’t that smooth, however, here are a couple of things that might have gone wrong.

ninjectwebapi-parameterless-constructor

If you’re getting the above error complaining about not having a parameterless public constructor, then you probably forgot to install the Ninject.Web.WebApi.WebHost package.

ninjectwebapi-activationexception

If on the other hand you went ahead and installed Ninject.Web.WebApi.WebHost first, that brings in an older version of the Ninject.Web.WebApi package, causing the above ActivationException. The solution is to upgrade Ninject.Web.WebApi.

Lessons Learned from the Patreon Security Breach

Patreon is a popular crowdfunding platform, providing “recurring funding for artists and creators”. I was considering using it myself. I’m glad I didn’t.

Almost two months ago, Patreon suffered a security breach, and several gigabytes of data including a copy of their production database and their source code were leaked on the internet. An article at Ars Technica covers some of the details of the breach.

As I read the press release from Patreon about this incident, my feeling was of utter disbelief, particularly when reading these two points (emphasis mine):

  • “The unauthorized access was confirmed to have taken place on September 28th via a debug version of our website that was visible to the public. Once we identified this, we shut down the server and moved all of our non-production servers behind our firewall.
  • “There was no unauthorized access of our production servers. The development server included a snapshot of our production database, which included encrypted data.”

I’m not sure whether I need to explain why having your development environment publicly accessible, and why using production data in your development environment, are both very stupid things to do. Either way, now I don’t need to explain that. What happened to Patreon shows exactly why no one in his right state of mind would do this.

Further down, Jack Conte, CEO/Co-founder of Patreon, writes:

“I take our creators’ and patrons’ privacy very seriously.”

Sorry, but given what happened here, I find that very hard to believe. It doesn’t matter what steps are being taken to increase security. It’s already too late. People’s private data are now on the internet, and there’s no going back.

So if you want to spare your company a lot of embarrassment, here’s what you need to take away from this incident:

  • Keep your development environment isolated from your production environment.
  • Use dummy data, not production data, in your development environment.

Unity3D: Moving an Object with Keyboard Input

This is an updated version of the article originally posted on 24th May 2013 at Programmer’s Ranch. The original article used Unity 4.1.3f3, MonoDevelop, and 3D settings (2D in Unity didn’t exist back then), on Windows XP. This updated article uses Unity 5.2.2f1, Visual Studio 2015, and 2D settings, on Windows 10. Parts of the article have been rewritten, and syntax highlighting has been added.

The Unity3D game development engine has gained a lot of popularity in recent years. It supports various target operating systems, can be scripted in various languages, has a large community, and is always evolving. In this article, we’ll see how we can set up a simple project and have the player move an object by pressing the arrow keys on the keyboard.

The first thing you will need to do is to download and install Unity from their website. Once you’ve installed it and gone through the initial registration screens, you can opt to create a new project:

unity3d-input-startup

Click on the “New” button (shown in the image above). Here, you can choose the name and location of your new project, as well as whether to use 3D or 2D settings. For this particular article it doesn’t matter; the original article used 3D settings, while for this updated version I’ve done everything using 2D settings.

unity3d-input-newproject

Once you click “Create project“, your project will open in the Unity IDE.

From the GameObject menu, select 3D Object -> Cube to place a cube into the game world:

unity3d-input-create-cube

The cube will now be listed in the Hierarchy section – this section shows you a list of objects in your game world. You can also see the objects in the game world itself, in the left portion of the screen. If you click on the cube, you can see and manipulate its properties (e.g. position in the game world) in the Inspector:

unity3d-input-cube-properties

Right click on the Assets panel inside the Project section, and create a new C# script:

unity3d-input-create-cs-script

The script appears under Assets. Call the script “Movement“. Then, double-click the script to edit it. This will launch an external editor, probably MonoDevelop or Visual Studio:

unity3d-input-visual-studio

In the Update() method, add the following code:

if (Input.GetKeyDown(KeyCode.LeftArrow))
{
    Vector3 position = this.transform.position;
    position.x--;
    this.transform.position = position;
}

What are we doing here? In Unity, you can attach scripts to objects in order to make them do stuff. In our case, we will attach this script to the cube to be able to move it with the arrow keys.

The “this” in a Unity script refers to the object that the script is attached to (e.g. the cube). Each object has a transform property, which contains stuff like its position in the world. The position consists of a Vector3 which contains the x-, y- and z-coordinates of the object in the world.

The code above simply makes the object move left when the left arrow key is pressed, by varying the x-coordinate of the object’s position. While it would normally make sense to modify x directly, you can’t do that in Unity.

In the external editor, build the project to make sure it compiles (F8 in MonoDevelop, or Ctrl+Shift+B in Visual Studio). Then, switch back to Unity. Drag the Movement script onto the Cube object in the Hierarchy section. Once you click on the Cube in the Hierarchy section, you should see the Movement script in the Inspector:

unity3d-input-attached-script

Now, Press the Play button at the top of the Unity interface to start playing. The world view changes into an interactive rendering of the game:

unity3d-input-run-start

Test the game by pressing the Left Arrow key. Doing this should move the cube to the left:

unity3d-input-run-moved

Press the Play button again to stop the game. In the external editor, update the code to handle movement in all four directions:

if (Input.GetKeyDown(KeyCode.LeftArrow))
{
    Vector3 position = this.transform.position;
    position.x--;
    this.transform.position = position;
}
if (Input.GetKeyDown(KeyCode.RightArrow))
{
    Vector3 position = this.transform.position;
    position.x++;
    this.transform.position = position;
}
if (Input.GetKeyDown(KeyCode.UpArrow))
{
    Vector3 position = this.transform.position;
    position.y++;
    this.transform.position = position;
}
if (Input.GetKeyDown(KeyCode.DownArrow))
{
    Vector3 position = this.transform.position;
    position.y--;
    this.transform.position = position;
}

Press Play again in Unity to test it. Note that the cube returned to its original position. That is because each time you press Play, a new session is started with all objects having their default values.

So in this article, we have learned a few things about the Unity IDE, and we wrote a small script to move a cube in the game world. The intention was to get something working as quickly as possible, giving the reader a feel of working with Unity3D, while leaving details for other articles.

Pasting JSON/XML as Classes in Visual Studio

Note: This feature is available as from Visual Studio 2015.

REST and JSON together have revolutionised the way we expose and consume data in recent years. For this reason it has become increasingly common to need to integrate with REST services, and data itself is provided in either XML or JSON format. This typically involves creating a set of classes that match the data provided by the service, so that the application may take care of serialisation and deserialisation, and work with structured data.

Although you can create these data classes manually, Visual Studio provides a shortcut to generate classes from XML or JSON data. For instance, let’s say that we want to work with the data from the GitHub API:

github-api

We can easily generate a class for this by copying that data, and in Visual Studio going into Edit -> Paste Special -> Parse JSON As Classes:

paste-json-as-classes

And as if by magic, the following class gets generated:

        public class Rootobject
        {
            public string current_user_url { get; set; }
            public string current_user_authorizations_html_url { get; set; }
            public string authorizations_url { get; set; }
            public string code_search_url { get; set; }
            public string emails_url { get; set; }
            public string emojis_url { get; set; }
            public string events_url { get; set; }
            public string feeds_url { get; set; }
            public string followers_url { get; set; }
            public string following_url { get; set; }
            public string gists_url { get; set; }
            public string hub_url { get; set; }
            public string issue_search_url { get; set; }
            public string issues_url { get; set; }
            public string keys_url { get; set; }
            public string notifications_url { get; set; }
            public string organization_repositories_url { get; set; }
            public string organization_url { get; set; }
            public string public_gists_url { get; set; }
            public string rate_limit_url { get; set; }
            public string repository_url { get; set; }
            public string repository_search_url { get; set; }
            public string current_user_repositories_url { get; set; }
            public string starred_url { get; set; }
            public string starred_gists_url { get; set; }
            public string team_url { get; set; }
            public string user_url { get; set; }
            public string user_organizations_url { get; set; }
            public string user_repositories_url { get; set; }
            public string user_search_url { get; set; }
        }

Now, the class and property names might not be exactly the way you want them, and you might need to change some things, but this will still save you a lot of typing.

If you’re still not convinced, try it with a more complex example that involves nested data structures. For instance, let’s say we have this JSON data:

{
	"name" : "John Smith",
	"summary" : "Wannabe Superhero",
	"workexperience" : [{
			"title" : "Insurance Guy",
			"company" : "ABC Ltd.",
			"start" : "Feb 2015",
			"description" : "Current job, very bad"
		}, {
			"title" : "Cleaning Guy",
			"company" : "Super Clean Ltd.",
			"start" : "Jan 2013",
			"end" : "Jan 2015",
			"description" : "Dirty work",
			"recommendations" : [{
					"name" : "Boss guy",
					"position" : "Boss"
				}, {
					"name" : "Colleague girl",
					"position" : "Cleaning Girl"
				}
			]
		}
	]
}

With no effort whatsoever, you can get these classes generated for you:

        public class Rootobject
        {
            public string name { get; set; }
            public string summary { get; set; }
            public Workexperience[] workexperience { get; set; }
        }

        public class Workexperience
        {
            public string title { get; set; }
            public string company { get; set; }
            public string start { get; set; }
            public string description { get; set; }
            public string end { get; set; }
            public Recommendation[] recommendations { get; set; }
        }

        public class Recommendation
        {
            public string name { get; set; }
            public string position { get; set; }
        }

And there’s a similar function for XML.

You’re welcome.