All posts by Gigi

Setting Connection Strings at Runtime with Entity Framework 5.0, Database First, VS2012

This article was originally posted here at Programmer’s Ranch on Saturday 16th November 2013. The syntax highlighting was added when the article was migrated here.

Hi everyone! 🙂

This article deals with how to solve the problem of building and setting an Entity Framework connection string at runtime, based on a database-first approach (i.e. you have generated an Entity Data Model based on an existing database). You are expected to be familiar with ADO .NET and the Entity Framework. The first part of the article deals with setting up an Entity Data Model and simple interactions with it; this should appeal to all readers. The second part deals with the custom connection string issue, and will be helpful only to those who have actually run into that problem.

We’re going to be using Visual Studio 2012, and Entity Framework 5.0. Start a new Console Application so that you can follow along.

Setting up the database

You can use whatever database you want, but in my case I’m using SQL Server Compact edition (SQLCE). If you’re using something else and already have a database, you can just skip over this section.

Unlike many of the more popular databases such as SQL Server and MySQL, SQLCE is not a server and stores its data in a file with .sdf extension. This file can be queried and updated using regular SQL, but is not designed to handle things like concurrent users – something which isn’t a problem in our case. Such file-based databases are called embedded databases.

If you have Visual Studio, then you most likely already have SQLCE installed. Look for it in “C:\Program Files (x86)\Microsoft SQL Server Compact Edition\v4.0“. Under the Desktop orPrivate folders you’ll find a file called System.Data.SqlServerCe.dll which we need to interact with SQLCE. Add a reference to it from your Console Application.

Now, we’re going to create the database and a simple one-table schema. We’ll use good old ADO.NET for that. We’ll create the database only if it doesn’t exist already. First, add the following usings at the top of Program.cs:

using System.IO;
using System.Data.SqlServerCe;

In Main(), add the following:

String filename = "people.sdf";
String connStr = "Data Source=" + filename;

Since SQLCE works with just a file, we can create a basic connection string using just the name of the file we’re working with.

The following code actually creates the database and a single table called person.

            try
            {
                // create database if it doesn't exist already

                if (!File.Exists(filename))
                {
                    // create the actual database file

                    using (SqlCeEngine engine = new SqlCeEngine(connStr))
                    {
                        engine.CreateDatabase();
                    }

                    // create the table schema

                    using (SqlCeConnection conn = new SqlCeConnection(connStr))
                    {
                        conn.Open();

                        String sql = @"create table person(
                                       id int identity not null primary key,
                                       name nvarchar(20),
                                       surname nvarchar(30)
                                   );";

                        using (SqlCeCommand command = new SqlCeCommand())
                        {
                            command.CommandText = sql;
                            command.Connection = conn;
                            int result = command.ExecuteNonQuery();
                        }
                    }
                }
            }
            catch (Exception ex)
            {
                Console.WriteLine(ex);
            }

We first use SqlCeEngine to create the database file. Then we use ADO .NET to create the person table. Each row will have an auto-incrementing id (primary key), as well as a name and surname. Note that SQLCE does not support the varchar type, so we have to use nvarchar (Unicode) instead.

If you now build and run the application, you should find a people.sdf file in the bin\Debug folder. We’ll use that to create an Entity Data Model for the Entity Framework.

Creating the Data Model

Right click on the project and select Add -> New Item…:

cs-efconnstr-addnewitem

From the Data category, select ADO.NET Entity Data Model. You can choose a name for it, or just leave it as the default Model1.edmx; it doesn’t really matter.

cs-efconnstr-addedm

Click The Add button. This brings up the Entity Data Model Wizard.

cs-efconnstr-edmwiz1

The “Generate from database” option is the default selection, so just click Next.

cs-efconnstr-edmwiz2

Hit the New Connection… button to bring up the Connection Properties window.

cs-efconnstr-connprop

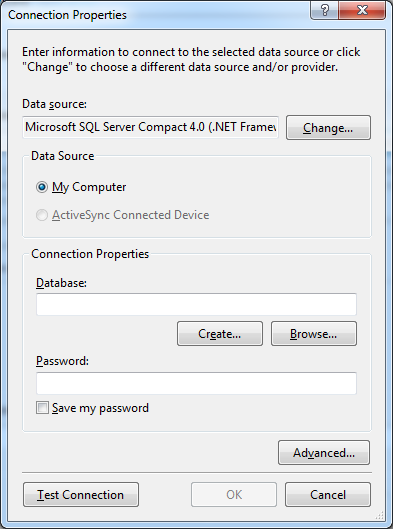
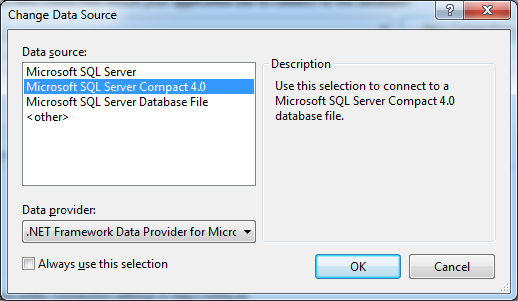
If SQL Server Compact 4.0 is not already selected as the Data source, click the Change… button and select it from the Change Data Source window:

cs-efconnstr-changeds

Back in the Connection Properties window, click the Browse… button and locate the people.sdf file in your bin\Debug folder that we generated in the previous section. Leave the Password field empty, and click Test Connection. If all is well, you’ll get a message box saying that the test succeeded.

Once you click OK, the Entity Data Model Wizard should become populated with a connection string and a default name for the model:

cs-efconnstr-edmwiz3

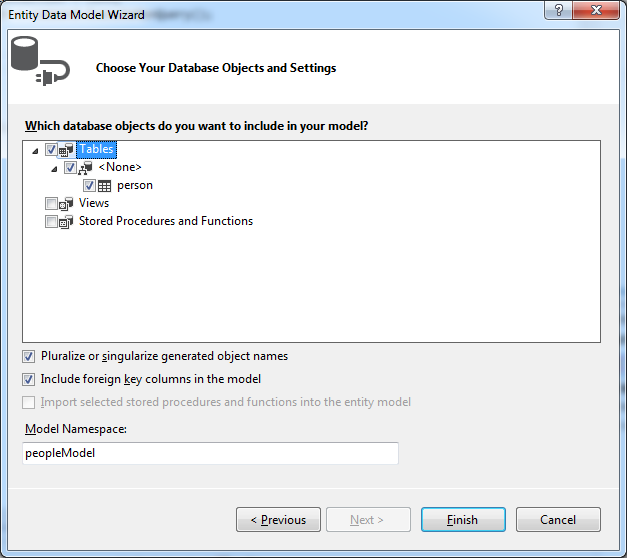
When you click Next, you’ll get the following message:

cs-efconnstr-localdata

Just click Yes and get on with it. In the next step, import the person table into your model by ticking the checkbox next to it:

cs-efconnstr-edmwiz4

Click Finish. The files for your model are added to the project. You may also get the following warning:

cs-efconnstr-security-warning

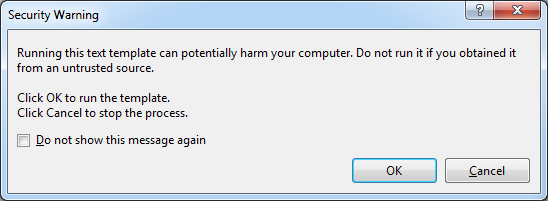
You don’t have to worry about it. Just click OK. If you click Cancel instead, you won’t have the necessary autogenerated code that you need for this project.

Interacting with the database using the Entity Framework

After the database-creation code from the first section, and before the end of the try scope, add the following code:

// interact with the database

using (peopleEntities db = new peopleEntities())
{
    db.people.Add(new person() { name = "John", surname = "Smith" });
    db.SaveChanges();

    foreach (person p in db.people)
    {
        Console.WriteLine("{0} {1} {2}", p.id, p.name, p.surname);
    }
}

Here, we create an instance of our entity context (peopleEntities) and then use it to interact with the database. We add a new row to the person table, and then commit the change via db.SaveChanges(). Finally, We retrieve all rows from the table and display them.

Also, add the following at the end of the Main() method so that we can see the output:

Console.ReadLine();

Run the program by pressing F5. The output shows that a row was indeed added:

cs-efconnstr-output1

The Entity Framework knows where to find the database because it has a connection string in the App.config file:

  <connectionStrings>
    <add name="peopleEntities" connectionString="metadata=res://*/Model1.csdl|res://*/Model1.ssdl|res://*/Model1.msl;provider=System.Data.SqlServerCe.4.0;provider connection string=&quot;data source=|DataDirectory|\people.sdf&quot;" providerName="System.Data.EntityClient" />
  </connectionStrings>

This might be good enough in some situations, but other times, we might want to build such connection string in code and ask the Entity Framework to work with it. A reason for this might be because the connection string contains a password, and you want to obtain it from an encrypted source. The following two sections illustrate how this is done.

Building a raw Entity Framework connection string

Let’s start out by commenting out the connection string in the App.config file:

  <connectionStrings>
    <!--
    <add name="peopleEntities" connectionString="metadata=res://*/Model1.csdl|res://*/Model1.ssdl|res://*/Model1.msl;provider=System.Data.SqlServerCe.4.0;provider connection string=&quot;data source=|DataDirectory|\people.sdf&quot;" providerName="System.Data.EntityClient" />
    -->
  </connectionStrings>

If you try running the program now, you’ll get a nice exception.

Now, what we want to do is add the connection string into our code and pass it to the entity context (the peopleEntities). So before our Entity Framework code (which starts with using (peopleEntities…), add the following:

String entityConnStr = @"metadata=res://*/Model1.csdl|res://*/Model1.ssdl|res://*/Model1.msl;provider=System.Data.SqlServerCe.4.0;provider connection string=&amp;quot;data source=|DataDirectory|\people.sdf&quot;";

If you now try to pass this connection string to the peopleEntities constructor, you’ll realise that you can’t. You can see why if you expand Model1.edmx and then Model1.Context.tt in Solution Explorer, and finally open the Model1.Context.cs file:

cs-efconnstr-dbcontext

The peopleEntities class has only a parameterless constructor, and it calls the constructor of DbContext with the connection string name defined in App.config. The DbContext constructor may accept a connection string instead, but we have no way of passing it through peopleEntities directly.

While you could add another constructor to peopleEntities, it is never a good idea to modify autogenerated code. If you regenerate the model, any code you add would be lost. Fortunately, however, peopleEntities is a partial class, which means we can add implementation to it in a separate file (see this question and this other question on Stack Overflow).

Add a new class and name it peopleEntities. Add the following at the top:

using System.Data.Entity;

Implement the class as follows:

    public partial class peopleEntities : DbContext
    {
        public peopleEntities(String connectionString)
            : base(connectionString)
        {

        }
    }

We can now modify our instantiation of peopleEntities to use our connection string as defined in code:

using (peopleEntities db = new peopleEntities(entityConnStr))

Since we are using a partial class defined in a separate file, any changes to the model will cause the autogenerated peopleEntities to be recreated, but will not touch the code we added in peopleEntities.cs.

When we run the program, we now get a very nice exception (though different from what we got right after commenting out the connection string in App.config):
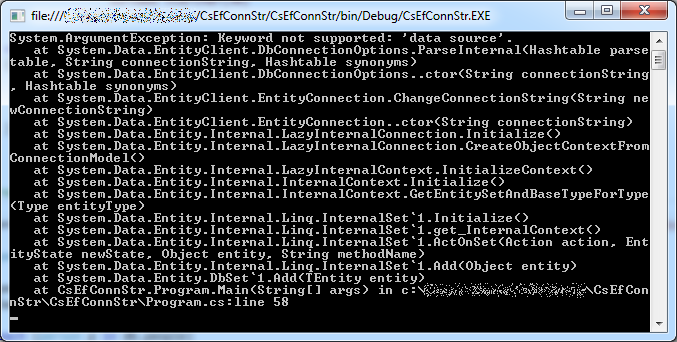
cs-efconnstr-output2

Apparently this happens because of the &quot; values, which are necessary in XML files but cause problems when supplied in a String literal in code. We can replace them with single quotes instead, as follows:

String entityConnStr = @"metadata=res://*/Model1.csdl|res://*/Model1.ssdl|res://*/Model1.msl;provider=System.Data.SqlServerCe.4.0;provider connection string='data source=|DataDirectory|\people.sdf'";

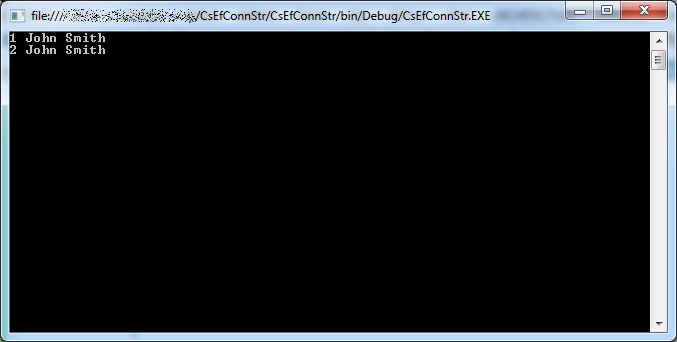
If we run the program now, it works fine, and a new row is added and retrieved:

cs-efconnstr-output3

Using EntityConnectionStringBuilder

You’ll notice that the connection string we’ve been using is made up of three parts: metadata, provider, and the provider connection string that we normally use with ADO.NET.

We can use a class called EntityConnectionStringBuilder to provide these values separately and build a connection string. Using this approach avoids the problem with quotes illustrated at the end of the previous section.

First, remove or comment out the entityConnStr variable we have been using so far.

Then add the following near the top of Program.cs:

using System.Data.EntityClient;

Finally, add the following code instead of the connection string code we just removed:

EntityConnectionStringBuilder csb = new EntityConnectionStringBuilder();
csb.Metadata = "res://*/Model1.csdl|res://*/Model1.ssdl|res://*/Model1.msl";
csb.Provider = "System.Data.SqlServerCe.4.0";
csb.ProviderConnectionString = "data source=people.sdf";
String entityConnStr = csb.ToString();

When you run the program, it should work just as well:

cs-efconnstr-output4

Summary

This article covered quite a bit of ground:

  • We first used the SqlceEngine and ADO .NET to create a SQL Server Compact database.
  • We then created an Entity Data Model for this database.
  • We added some code to add rows and retrieve data using the Entity Framework.
  • We provided the Entity Framework with a raw connection string in code. To do this, we used a partial class to add a new constructor to the entity context class that can pass the connection string to the parent DbContext. We also observed a problem with using &quot; in the connection string, and solved it by using single quotes instead.
  • We used EntityConnectionStringBuilder to build a connection string from its constituent parts, and in doing so completely avoided the &quot; problem.

I hope you found this useful. Feel free to leave any feedback in the comments below. Check back for more articles! 🙂

ASP .NET Web API: A Gentle Introduction

This article was originally posted here at Programmer’s Ranch on 1st August 2014.

Hello! 🙂

Last year, we saw how to intercept HTTP requests in Wireshark, and also how to construct them. As you already know, HTTP is used mainly to retrieve content from the Web; however it is capable of much more than that. In this article, we will learn how HTTP can be used to expose an API that will allow clients to interact with back-end services.

Ideally, you should be using Visual Studio 2013 (VS2013) or later. If you’re using something different, the steps may vary.

Right, so fire up VS2013, and create a new ASP .NET Web Application. In VS2013, Microsoft united various different kinds of web projects under a single banner, which is what people mean when they refer to something called “One ASP .NET“. So there isn’t that much choice in terms of project types:

webapi-intro-newproject

You are given some sort of choice once you click “OK”, however:

webapi-intro-newproject-template

At this stage there are various web project types you can choose from, and in this case you need to select “Web API”. You’ll notice that the “MVC” and “Web API” checkboxes are selected and you can’t change that. That’s because Web API is somewhat based on the ASP .NET MVC technology. Web API is sort of MVC without the View part, so discussing MVC is beyond the scope of this article; however just keep that in mind in case you ever dive into MVC.

Once you click “OK” and create your project, you’ll find a whole load of stuff in your Solution Explorer:

webapi-intro-newproject-created

This may already seem a little confusing. After all, where should we start from? Let’s ignore the code for a moment and press F5 to load up our web application in a browser. This is what we get:

webapi-intro-initialrun-homepage

You’ll notice there is an “API” link at the top. Clicking it takes you to this awesome help page, where things start to clear up:

webapi-intro-initialrun-help

It turns out that the Web API project comes with some sample code that you can work with out of the box, and this help page is telling you how to interact with it. If you look at the first entry, which says “GET api/Values”, that’s something we can point the browser to and see the web application return something:

webapi-intro-initialrun-values

And similarly, we can use the second form (“GET api/Values/{id}”) to retrieve a single item with the specified ID. So if you point your browser to /api/Values/1, you should get the first one:

webapi-intro-initialrun-values-1

That’s all well and good, but where are these values coming from? Let’s go back to the code, and open up the Controllers folder, and then the ValuesController in it:

webapi-intro-initialrun-valuescontroller

You can see how there is a method corresponding to each of the items we saw in the help page. The ASP .NET Web API takes the URL you enter in the web browser and tries to route the request to a method on a controller. So if you’re sending a GET request to /api/Values/, then it’s going to look for a method called Get() in a controller called ValuesController.

Notice how the “Controller” part is omitted from the URL. This is one of many things in Web API that you’re expected to sort of take as obvious – Web API uses something called “convention over configuration”, which is a cool way of saying “it just works that way, and by some kind of magic you should already know that, and good luck trying to change it”. If you’ve read my article about Mystery Meat Navigation, part of which addresses the Windows 8 “content over chrome” design, you’ll notice it’s not very different.

And since, at this point, we have digressed into discussing big buzzphrases designed to impress developers, let’s learn about yet another buzzword: REST. When we use HTTP to browse the web, we mainly use just the GET and POST request methods. But HTTP supports several other request methods. If we take four of them – POST, GET, PUT and DELETE, these map quite smoothly to the CRUD (Create, Read, Update and Delete) operations we know so well from just about any business application. And using these four request methods, we can build APIs that allow us to work with just about any object. That’s what is meant by REST, and is the idea on which the ASP .NET Web API is built. “How I Explained REST to My Wife” is a really good informal explanation of REST, if you want to learn more about it. The irritating thing is that the concept is so simple, yet it’s really hard to find a practical explanation on the web on what REST actually means.

To see this in action, let’s rename our ValuesController to BooksController so that it’s less vague. We’ll also need a sort of simple database to store our records, so let’s declare a static list in our BooksController class:

        private static List<string> books = new List<string>()
        {
            "How to Win Friends and Influence People",
            "The Prince"
        };

Now we can change our Get() methods to return items from our collection. I’m going to leave out error checking altogether to keep this really simple:

        // GET api/Books
        public IEnumerable<string> Get()
        {
            return books;
        }

        // GET api/Books/1
        public string Get(int id)
        {
            return books[id];
        }

We can test this in the browser to see that it works fine:

webapi-intro-books-get

Great! We can now take care of our Create (POST), Update (PUT) and Delete (DELETE) operations by updating the methods accordingly:

        // POST api/Books
        public void Post([FromBody]string value)
        {
            books.Add(value);
        }

        // PUT api/Books/1
        public void Put(int id, [FromBody]string value)
        {
            books[id] = value;
        }

        // DELETE api/Books/1
        public void Delete(int id)
        {
            books.RemoveAt(id);
        }

Good enough, but how are we going to test these? A browser uses a GET request when you browse to a webpage, so we need something to send POST, PUT and DELETE requests. A really good tool for this is Telerik’s FiddlerPostman, a Chrome extension, is also a pretty good REST client.

First, make sure that the Web API is running (F5). Then, start Fiddler. We can easily send requests by entering the request method, the URL, any HTTP headers, in some cases a body, and hitting the Execute button. Let’s see what happens when we try to POST a new book title to our controller:

webapi-fiddler-post1

So here we tried to send a POST request to http://localhost:1817/api/Books, with “The Art of War” in the body. The headers were automatically added by Fiddler. Upon sending this request, an HTTP 415 response appeared in the left pane. What does this mean? To find out, double-click on it:

webapi-fiddler-http415

You can see that HTTP 415 means “Unsupported Media Type”. That’s because we’re sending a string in the body, but we’re not specifying how the Web API should interpret that data. To fix this, add the following header to your request in Fiddler:

Content-Type: application/json

When you send the POST request with this header, you should get an HTTP 204, which means “No Content” – that’s because our Post() method returns void, and thus nothing needs to be returned. We can check that our new book title was added by sending a GET request to http://localhost:1817/api/Books, which now gives us the following in response:

webapi-fiddler-after-post

We can similarly test PUT and DELETE:

  • Sending a PUT request to http://localhost:1817/api/Books/1 with “The Prince by Niccolo’ Machiavelli” in the body updates that entry.
  • Sending a DELETE request to http://localhost:1817/api/Books/0 deletes “How to Win Friends and Influence People”, the first book in our list.
  • Sending a GET request to http://localhost:1817/api/Books again shows the modified list:

webapi-fiddler-after-all

Fantastic! In this unusually long article, we have learned the basics of working with the ASP .NET Web API. Lessons learned include:

  • The ASP .NET Web API is based on the REST concept.
  • The REST concept simply means that you use HTTP POST, GET, PUT and DELETE to represent Create, Read, Update and Delete operations respectively.
  • For each object you want to work with, you create a Controller class.
  • Appropriately named methods in this Controller class give you access to the CRUD operations mentioned above.
  • Use Fiddler or Postman to construct and send HTTP requests to your Web API in order to test it.
  • Add a content type header whenever you need to send something in the body (POST and PUT requests).

Thanks for reading, and please share this with your friends! Below is the full code of the BookController class for ease of reference.

    public class BooksController : ApiController
    {
        private static List<string> books = new List<string>()
        {
            "How to Win Friends and Influence People",
            "The Prince"
        };

        // GET api/Books
        public IEnumerable<string> Get()
        {
            return books;
        }

        // GET api/Books/1
        public string Get(int id)
        {
            return books[id];
        }

        // POST api/Books
        public void Post([FromBody]string value)
        {
            books.Add(value);
        }

        // PUT api/Books/1
        public void Put(int id, [FromBody]string value)
        {
            books[id] = value;
        }

        // DELETE api/Books/1
        public void Delete(int id)
        {
            books.RemoveAt(id);
        }
    }

Determining the bitness (x86 or x64) of a DLL

This article was originally posted here at Programmer’s Ranch on 28th September 2014.

Hello guys and gals! 🙂

In this article, we’re going to tackle a pretty frustrating scenario: making sure all your .NET assemblies or even native DLLs target the same architecture. At the time of writing, applications tend to be targeted at x86 or x64 architectures, or both. However, mixing DLLs or executables compiled for different architectures is a recipe for disaster. This kind of disaster, in fact:

bitness-badimageformatexception
That’s a BadImageFormatException, saying:

An unhandled exception of type ‘System.BadImageFormatException‘ occurred in Microsoft.VisualStudio.HostingProcess.Utilities.dll
Additional information: Could not load file or assembly ‘ClassLibrary, Version=1.0.0.0, Culture=neutral, PublicKeyToken=null’ or one of its dependencies. An attempt was made to load a program with an incorrect format.

This is why it’s happening:

bitness-mixed-architecture

That’s a very, very stupid thing to do, having an x64 console application depend on an x86 class library (or DLL). Remember:

bitness-dont-mix-architectures

Great, now you know. But you’re bound to run into the BadImageFormatException problem anyway, because while it’s easy to control the bitness of the assemblies in your project, you often depend on DLLs provided by third parties, and their own bitness isn’t clearly defined. Unfortunately, you can’t rely on rightclick -> Properties -> Details because that doesn’t give you the bitness at all.

Fortunately, however, there are tools you can use to find out what architecture those DLLs are compiled for.

Let’s start off with .NET assemblies. If the DLL in question is a .NET assembly, you can use the corflags utility to find out the bitness. corflags is part of the Visual Studio developer tools, so you’ll first need to start a Visual Studio developer command prompt (see this StackOverflow thread or search Windows for CorFlags.exe in case you can’t find one from the Start menu).

Once you’ve located CorFlags.exe or have a Visual Studio developer command prompt, runCorFlags.exe with the full path to the DLL you want to inspect, and check the 32BIT setting in the output:

bitness-corflags

Now CorFlags.exe works great to find out the architecture of a .NET assembly, but can’t tell you the architecture of a native DLL. This is what happens if you try to use it with SDL2.dll, for instance:

bitness-corflags-native

For unmanaged/native DLLs, we can instead use dumpbin. This will spit out a bunch of information, so you can find the architecture quickly if you filter the information by including only the line containing the word “machine”, as the linked Stack Overflow answer suggests:

bitness-dumpbin

So there you go – this article has presented two different ways to check the bitness or CPU architecture of managed and unmanaged DLLs respectively, which helps when troubleshooting those dreaded BadImageFormatExceptions. In reality this article is a consolidation of the information in the two Stack Overflow threads linked above, and I would like to thank the authors because I have found their tips useful on many occasions.

Authenticating with Active Directory

This article was originally posted here at Programmer’s Ranch on 14th March 2014.

Hi! 🙂

If you work in a corporate environment, chances are that your Windows machine is connected to a domain based on Active Directory. In today’s article, we’re going to write a very simple program that allows us to verify a user’s credentials for the domain using Active Directory.

In order to try this out, you’re going to need an Active Directory domain. In my case, I installed Windows Server 2008 R2 and followed these instructions to set up a domain, which I called “ranch.local”. You may also be able to connect to your domain at work to save yourself the trouble of setting this up.

Let us now create a new Console Application using either SharpDevelop or Visual Studio. After adding a reference to System.DirectoryServices.AccountManagement, add the following statement near the top of your Program.cs file:

using System.DirectoryServices.AccountManagement;

Next, remove any code in Main() and add a simple prompt for the username and password to authenticate against Active Directory:

// prompt for username

Console.Write("Username: ");
string username = Console.ReadLine();

// prompt for password

Console.Write("Password: ");
string password = Console.ReadLine();

For the authentication part, we can use a simple method described here. After obtaining a reference to the domain using the PrincipalContext class (specifying the domain as a parameter), we simply use the ValidateCredentials() method to perform the authentication. This gives us a boolean value indicating whether the authentication was successful or not.

// authenticate

using (PrincipalContext pc = new PrincipalContext(ContextType.Domain, "RANCH"))
{
    bool authenticated = pc.ValidateCredentials(username, password);

    if (authenticated)
        Console.WriteLine("Authenticated");
    else
        Console.WriteLine("Get lost.");
}

At this point, we need only add a simple statement to wait for user input before letting the application terminate:

Console.ReadLine();

Now, we can build our application and test it on the server (or on any machine that is part of the domain). First, let’s try a valid login:

csadauth-valid

Very good! And now, a user that doesn’t even exist:

csadauth-invalid

Excellent! As you can see, it only takes a couple of lines of code to perform authentication against Active Directory. I hope you found this useful. Follow the Ranch to read more articles like this! 🙂

SignalR Scaleout with Redis Backplane

Introduction

In “Getting Started with SignalR“, I provided a gentle introduction to SignalR with a few simple and practical examples. The overwhelming response showed that I’m not alone in thinking this is an awesome technology enabling real-time push notifications over the web.

Web applications often face the challenge of having to scale to handle large amounts of clients, and SignalR applications are no exception. In this example, we’ll see one way of scaling out SignalR applications using something called a backplane.

Scaleout in SignalR

SignalRScaleout

Introduction to Scaleout in SignalR” (official documentation) describes how SignalR applications can use several servers to handle increasing numbers of clients. When a server needs to push an update, it first pushes it over a message bus called a backplane. This delivers it to the other servers, which can then forward the update to their respective clients.

According to the official documentation, scaleout is supported using Azure, Redis or SQL Server as backplanes. Third-party packages exist to support other channels, such as SignalR.RabbitMq.

Scaleout Example using Redis

Introduction to Scaleout in SignalR” (official documentation) describes how to use SignalR as a backplane. To demonstrate this, I’ll build on the Chat Example code from my “Getting Started with SignalR” article.

All we need to scaleout using Redis is install the Microsoft.AspNet.SignalR.Redis NuGet package, and then set it up in the Startup class as follows:

        public void Configuration(IAppBuilder app)
        {
            GlobalHost.DependencyResolver.UseRedis("192.168.1.66", 6379, null, "SignalRChat");
            app.MapSignalR();
        }

In the code above, I am specifying the host and port of the Redis server, the password (in this case null because I don’t have one), and the name of the pub/sub channel that SignalR will use to distribute messages.

To test this, you can get a Redis server from the Redis download page. Redis releases for Windows exist and are great for testing stuff, but remember they aren’t officially supported for production environments.

Now to actually test it, I’ve set up the same scaleout-enhanced chat application on two different machines, and subscribed to the Redis pub/sub channel:

signalr-scaleout-computer1

Watching the pub/sub channel reveals what SignalR is doing under the hood. There are particular messages going through when the application initializes on each machine, and you can also see the actual data messages going through. So when you write a message in the chat, you can also see it in the pub/sub channel.

But even better than that, you’ll also see it on the client (browser) that’s hooked up to the other machine:

signalr-scaleout-computer2

The magic you need to appreciate here is that these aren’t two browsers connected to the same server; they are actually communicating with different servers on different machines. And despite that, the messages manage to reach all clients thanks to the backplane, which in this case is Redis.

Caveats

So I’ve shown how it’s really easy to scale out SignalR to multiple servers: you need to install a NuGet package and add a line of code. And I’ve actually tested it on two machines.

stash-1-244250d58073b0ed1

But that’s not really scaleout. I don’t have the resources to do large-scale testing, and only intended to show how scaleout is implemented with this article. The actual benefits of scaleout depend on the application. As the official documentation warns, the addition of a backplane incurs overhead and can become a bottleneck in some scenarios. You really need to study whether your application is a good fit for this kind of scaleout before going for it.