Setting up .NET Core on Linux

One of the biggest promises of .NET Core is the long-awaited promise of true cross-platform development. In this article, we’ll see how we can set up .NET Core on some flavours of Linux, and ensure that it works by running a simple console application.

Introduction

In general, if you want to run .NET Core on Linux, you should do the following before even starting development, to make sure it actually works:

  1. Install .NET Core itself.
  2. Create a simple .NET project.
  3. Build and run the application.

The steps to install .NET Core vary depending on the distribution you are using. Different distributions use different package managers (e.g. APT, RPM, YUM, DNF, etc) so you will often need to either add a .NET package source to your package manager’s configuration, or download binaries for .NET Core from Microsoft, before you can proceed to actually install .NET Core.

Microsoft’s Getting Started with .NET Core documentation lists a handful of supported Linux distributions, each with their own installation instructions. Unfortunately, this is not yet updated with the latest versions of several popular distributions. In fact, I have not been able to set up .NET Core in Ubuntu 17.04 (Zesty Zapus), Fedora 25, or CentOS 7. So in this article, we’ll focus on Ubuntu 16.10 (Yakkety Yak) and Linux Mint 18.1.

Unfortunately, these two are both Debian flavours, and both use the Ubuntu package server, so there is not much in the way of variety here.  In any case, let’s proceed with the setup.

Installing .NET Core on Linux Ubuntu 16.10 (Yakkety Yak)

First, we need to follow the installation instructions in the documentation in order to add the .NET package source to APT’s package source configuration:

sudo sh -c 'echo "deb [arch=amd64] https://apt-mo.trafficmanager.net/repos/dotnet-release/ yakkety main" > /etc/apt/sources.list.d/dotnetdev.list'
sudo apt-key adv --keyserver hkp://keyserver.ubuntu.com:80 --recv-keys 417A0893
sudo apt-get update

Here’s what the output of most of this should look like:

With that done, we can install the .NET Core SDK:

sudo apt-get install dotnet-dev-1.0.1

Once the installation is complete, we can create and run a simple project. We can do this without writing any code ourselves, because the dotnet command provides means of generating project templates out of the box.

First, let’s create a directory for our application, and switch to it (note: the documentation provides an alternative way of doing this):

mkdir hello
cd hello

Then, we can create a simple “Hello World” console application in the current directory by running the following command:

dotnet new console

Then, with the following commands, we restore dependencies via NuGet, build the application, and run it:

dotnet restore
dotnet run

Here’s the output, so you can see that it actually worked:

Installing .NET Core on Linux Mint 18.1

The same documentation page with the instructions to install .NET Core on Ubuntu also covers Linux Mint 17. Unfortunately, this doesn’t work for Linux Mint 18. However, you’ll notice that Ubuntu 14.04 and Linux Mint 17 share the same setup instructions. And this Stack Overflow answer shows that Ubuntu 16.04 and Linux Mint 18 also use the same setup. Thus:

sudo sh -c 'echo "deb [arch=amd64] https://apt-mo.trafficmanager.net/repos/dotnet-release/ xenial main" > /etc/apt/sources.list.d/dotnetdev.list'

sudo apt-key adv --keyserver hkp://keyserver.ubuntu.com:80 --recv-keys 417A0893

sudo apt-get update

Then, like before, we install the .NET Core SDK:

sudo apt-get install dotnet-dev-1.0.1

And then, we can actually test this out:

mkdir hello
cd hello
dotnet new console
dotnet restore
dotnet run

We get our “Hello World”, so it works!

Conclusion

We’ve seen how to set up .NET Core on the Ubuntu and Mint distributions of Linux, which are very similar. Different distributions have different setup instructions, and it would be a real pain to cover all of them. The official documentation does provide installation instructions for a handful of popular distributions, but they are slow to update documentation, and do not at this time cover the latest versions.

At least, however, this should be enough to get an idea of what it takes to set things up and run a simple application on Linux using .NET Core.

Playing a WAV File Using SDL2

Sound effects and music are fundamental in giving life to a game. In this article, we’re going to see how we can play a simple WAV file using just the native SDL2 Audio APIs. Unfortunately these APIs are very tricky to use, and the documentation is littered with incoherent examples and legacy function calls. For this reason, most people prefer to use the SDL_mixer extension library to handle sound and music.

The source code for this article is available at the Gigi Labs BitBucket repository. It includes a sample WAV file generated with Bfxr. You will need to copy the WAV file into the output directly (along with SDL2.dll) before running the program.

While error handling has been omitted in this article for conciseness, checking the output of each SDL2 function call and showing something in case of error (e.g. using SDL_ShowSimpleMessageBox()) will save you a lot of hair-ripping experiences.

In order to use audio in SDL2, the first thing we need to do is initialise the audio subsystem when we initialise SDL2 itself:

SDL_Init(SDL_INIT_AUDIO);

We can play simple sound effects in SDL2 by loading and playing a WAV file. We can load a WAV file by calling SDL_LoadWAV(), passing in arguments which it will populate with data read from the WAV file:

	// load WAV file

	SDL_AudioSpec wavSpec;
	Uint32 wavLength;
	Uint8 *wavBuffer;

	SDL_LoadWAV("Powerup5.wav", &wavSpec, &wavBuffer, &wavLength);

The next thing we need to do is get a handle on our audio device, which is a fancy way of saying speakers (or headphones, or whatever).

	// open audio device

	SDL_AudioDeviceID deviceId = SDL_OpenAudioDevice(NULL, 0, &wavSpec, NULL, 0);

You’ll notice we have a bunch of arguments, and for most of them we aren’t really caring about the details and passing in NULL or 0 to get reasonable defaults. Below is a summary of what each argument does; feel free to skip it if you just want to get something up and running quickly.

  • The first argument is the name of the audio device you want to open. While you might have several, passing in NULL will give you a reasonable default audio device. You can, however, use this to explicitly name a device you want to use – see SDL_OpenAudioDevice() documentation for more detail.
  • The second argument is relevant to recording devices, and we don’t care about it for playback.
  • The third argument represents the desired audio output format. We already got this information when we read the WAV file.
  • If provided, the fourth argument will be populated with the actual output format of the audio device. In our case, we don’t care, and can pass NULL.
  • The fifth argument is for advanced scenarios and we don’t need it either.

Now that we have a handle on the audio device, we can actually play something:

	// play audio

	int success = SDL_QueueAudio(deviceId, wavBuffer, wavLength);
	SDL_PauseAudioDevice(deviceId, 0);

SDL_QueueAudio is a handy function available since SDL 2.0.4 (at the time of writing this article, the current stable version is 2.0.5) that lets you send WAV (audio) data to the audio device without having to register callback functions (which is what you’d otherwise have to do).

SDL_PauseAudioDevice() is used to pause/unpause audio playback on the audio device (depending on the value of the second parameter). By passing 0 as the second parameter, we are enabling playback (i.e. unpausing the audio device), and this allows the sound to be played.

Let’s add a small delay so that we can hear the sound before the application exits:

	// keep application running long enough to hear the sound

	SDL_Delay(3000);

Finally, let’s remember to clean up after ourselves before exiting the application:

	// clean up

	SDL_CloseAudioDevice(deviceId);
	SDL_FreeWAV(wavBuffer);
	SDL_Quit();

	return 0;

We can now run the application, and should hear the sound play if everything is set up correctly. If not, then:

  • Remember to have both SDL2.dll (if running under Windows) and the WAV file in the output directory.
  • Make sure the path to the WAV file is set correctly. If running under Visual Studio, you may also need to change the Working Directory project setting. See the last part of “Setting up SDL2 with Visual Studio 2015” for instructions on how to do this.
  • Add error handling logic, as suggested at the beginning of this article.

Multi-Targeting .NET Standard Class Libraries

The .NET family has grown quite a bit, and to be honest, it’s a bit of a confusing mess. As I already explained in “Migrating Dandago.Finance to .NET Core“, there are now several different types of class library you can choose from (including different kinds of portable class libraries), different ideas of cross-platform (.NET Core vs Universal Windows Platform), different frameworks, and .NET Standard.

Let’s consider the following image, which shows three different .NET-based frameworks in relation to .NET Standard:

Image credit: .NET Core, .NET Framework, Xamarin – The “WHAT and WHEN to use it”

Your applications will typically be built for one of the frameworks on top (e.g. .NET Framework). But when you create a class library, you can choose to have it target a specific framework, or .NET Standard. Just as a quick recap from “Migrating Dandago.Finance to .NET Core“, targeting a particular framework (e.g. .NET Core) will not let you use the class library on others (e.g. .NET Framework), but targeting .NET Standard keeps it compatible with all of them.

This means that class libraries that target .NET Standard have maximum compatibility, but there’s a cost: not all APIs are available for .NET Standard, and targeting .NET Standard is only compatible with certain recent versions of those frameworks. If you take a look at the compatibility chart, you’ll notice for instance that .NET Standard 1.3  supports .NET Framework 4.6 and onwards.

For the most part, this is okay. But sometimes, you may want to combine .NET Standard compatibility with specific features in a particular framework, or perhaps target .NET Standard but still support older versions of a framework because you have some legacy code you can’t upgrade yet.

Multi-Targeting

When you create a new .NET Standard Class Library, its .csproj file will look something like this:

<Project Sdk="Microsoft.NET.Sdk">

  <PropertyGroup>
    <TargetFramework>netstandard1.4</TargetFramework>
  </PropertyGroup>

</Project>

It is now actually possible to target multiple frameworks, by changing the <TargetFramework> element to <TargetFrameworks> (just add an ‘s’) and putting in different target framework monikers separated by semicolons. For instance, the .csproj file for my .NET Settings Framework looks like this:

<Project Sdk="Microsoft.NET.Sdk">

  <PropertyGroup>
    <TargetFrameworks>netstandard1.2;net452</TargetFrameworks>
    <!-- ... -->
  </PropertyGroup>

  <ItemGroup Condition="'$(TargetFramework)' == 'net452'">
    <Reference Include="System.Configuration" />
  </ItemGroup>

  <ItemGroup Condition="'$(TargetFramework)' == 'netstandard1.2'">
    <PackageReference Include="System.ComponentModel.TypeConverter" Version="4.3.0" />
  </ItemGroup>

  <ItemGroup>
    <PackageReference Include="Microsoft.Extensions.Configuration" Version="1.1.1" />
    <PackageReference Include="Microsoft.Extensions.Configuration.Binder" Version="1.1.1" />
  </ItemGroup>

</Project>

In this project, I’m targeting .NET Standard to provide as much compatibility as possible, but I’m also using framework-specific assets from the .NET Framework (namely System.Configuration, which is used to work with App.config/Web.config files). Thus, I am targeting both .NET Standard 1.2+ and .NET 4.5.2+. This has the effect of creating separate builds for each framework.

I have dependencies in there that are applicable for both targets (the section at the end with no conditions), but I also have specific dependencies needed for each framework. For instance, the functionality that needs System.Configuration will only be available for the build that targets the full .NET Framework, and will not be usable in the .NET Standard build. Such functionality will have to be written within preprocessor directives to prevent them from breaking the other builds:

#if NET452

using System.Configuration;

// ...

#endif

Unfortunately, as of now, you have to edit the .csproj by hand if you want to do multi-targeting, because the Visual Studio tooling hasn’t quite caught up with it yet. In fact, the project settings will only allow you to target a specific version of .NET Standard from a dropdown:

And after you’ve edited the .csproj by hand, it won’t let you change it from the GUI:

Summary

  • Targeting .NET Core lets you go cross platform, but you can’t use that functionality with other frameworks.
  • Targeting .NET Standard is compatible with any framework that supports that version of .NET Standard.
  • You can multi-target a .NET Standard library to include framework-specific functionality (guarded with preprocessor directives) while keeping the rest of the library compatible with all the relevant frameworks.

Split Code Window in Visual Studio

This is another of those little things that are right there and yet many people seem to not know about them.

There’s a little handle at the top-right corner of the code window:

When you drag it down, it will split your code window into two parts:

This is very useful when you want to look at two different places within the same code file (e.g. while examining one method, check another one declared earlier in the same file).

At any time, you can drag the splitter in the middle all the way to the top to go back to single view.

The Broken Web of March 2017

This article is the March 2017 issue of the monthly series that started with “The Sorry State of the Web in 2016“, showing all kinds of blunders on websites ranging from the silly to the insecure and illegal. While I spot a good number of these myself, many are brought to my attention by contributors, and I would like to thank them all.

JobsPlus

JobsPlus, which is the ridiculous new name for what used to be ETC, had launched a new website as part of their rebranding.

Despite that, their content still can’t handle apostrophes, not to mention basic formatting such as bulleted lists:

At least, it was built with internationalisation in mind. In fact, you can choose a language…

…with a single selection of English. That’s very useful indeed!

JobsPlus also have a service where they send a daily email with all new vacancies. Typically there are no new vacancies during weekends, but they still send an empty email. This has been going on for around 10 years if not more (formerly as ETC, of course).

Henley Malta

The Henley MBA might teach you many useful things, but building a basic website is definitely not one of these!

In fact, here are two basic things you should never have on your website:

  1. Broken images
  2. Misleading links that unexpectedly open your email application.

Just Some Coding

The only thing worse than a misleading link is something that looks like a link but is not, as you can see on Just Some Coding Ltd‘s website.

There are many ways to emphasise text on the web, but underlining is not a good one. Underlining is usually associated with a link, so when you see big green underlined text like “art” or “functional”, the typical user might try to click on it, only to realise that it’s not actually a link.

Maypole

Maypole is yet another website insecurely accepting credit card information:

Secured by Thawte indeed, but there’s no padlock. We’ve been through this several times before and I won’t bore you by repeating the details, but refer back to “The Sorry State of the Web in 2016” if you don’t understand why this is bad.

MFSA Registry

Let’s also welcome the MFSA Registry into the the realm of oft-repeated security issues, in this case that of having an untrusted SSL certificate:

As if that wasn’t enough, the same website also accepts login details over an insecure connection:

Bank Cross-Origin Issue

I recently caught some functionality in a local bank’s webite that was completely broken because of this cross-origin problem:

That’s not nice to have in a production environment.

Owner’s Best

Owner’s Best recently launched a new website, and not without issues. Until the time of writing this article, you can still see “Error: Rows Not Set” at the bottom of the page:

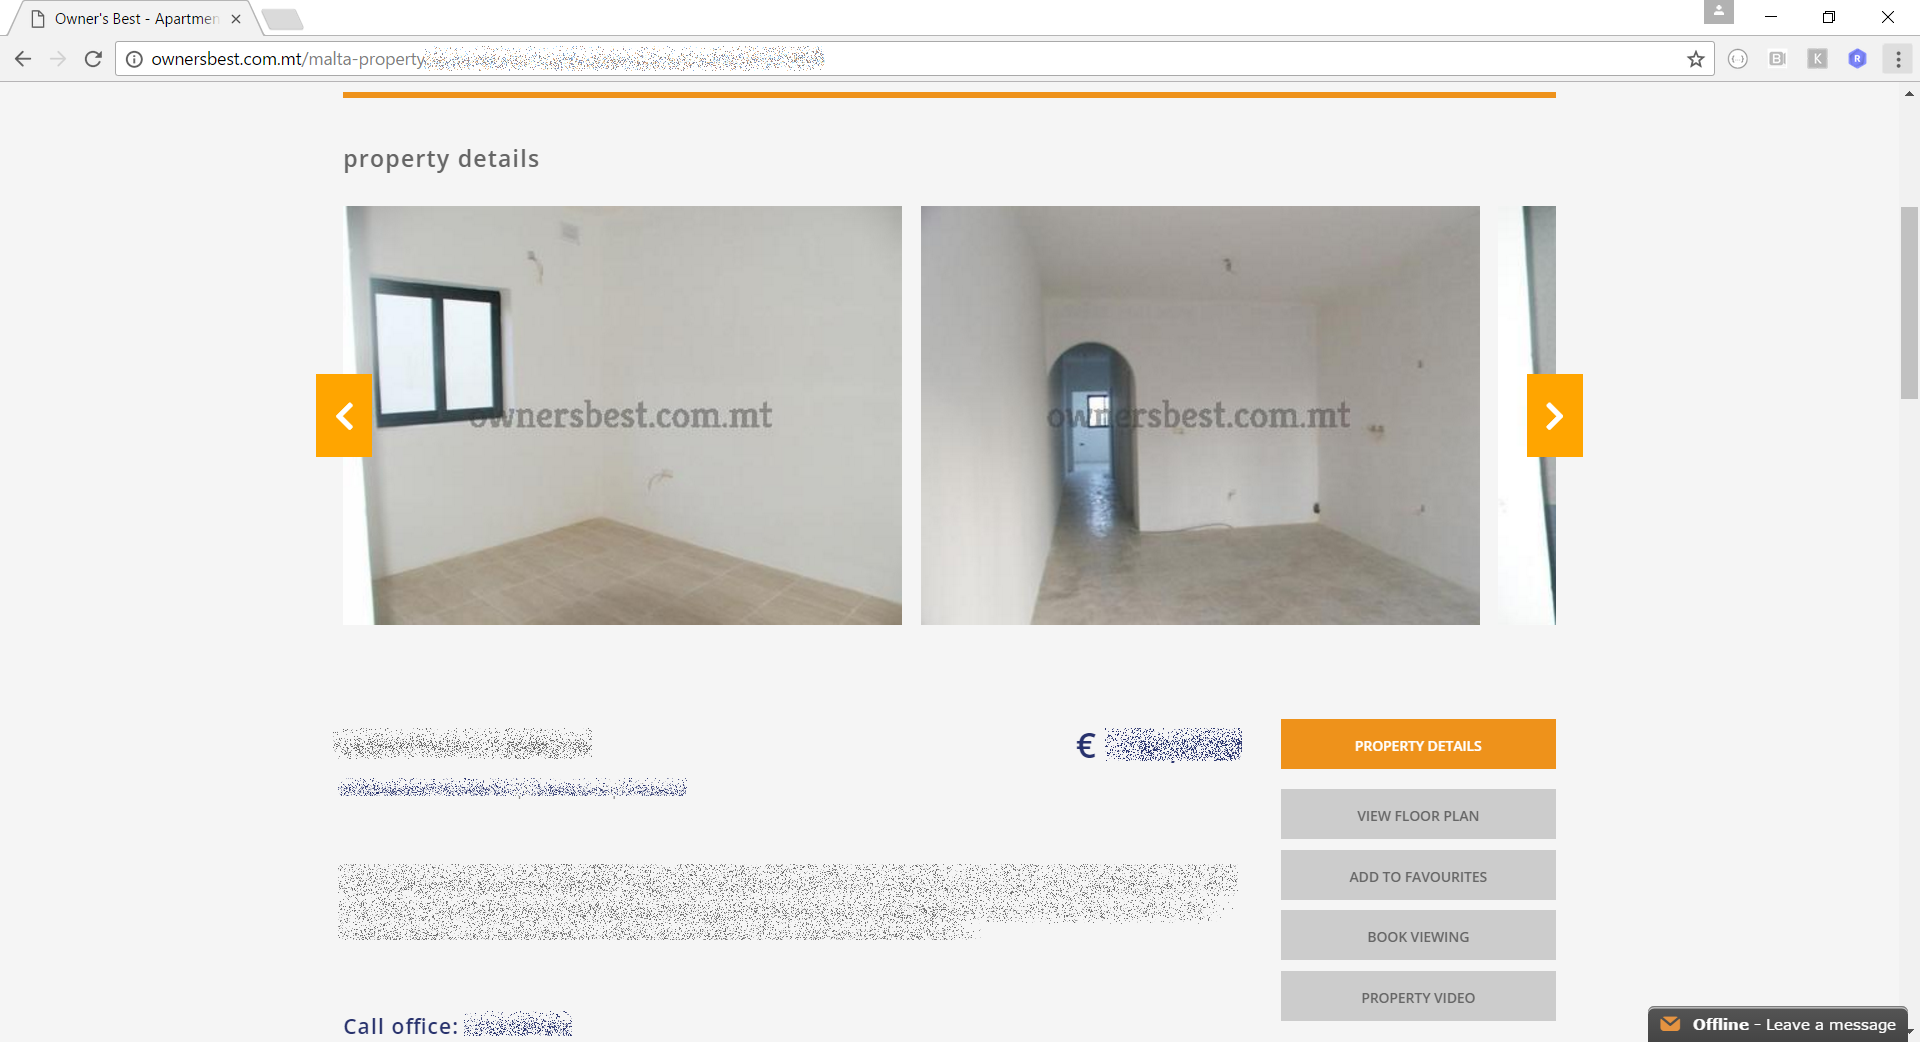
At one time, I was checking out a particular property, and they have these buttons on the side where you can see the floor plan and other details:

When clicking one of these buttons, however, I was taken to this contact form:

I was really confused by the fact that this contact form came up instead of the floor plan I was expecting, and the back button wasn’t working either.

What actually happened was this: the contact form is actually right below the property detail shown in the earlier screenshot, so properties that don’t have additional info will cause those buttons to link to an empty anchor, which has the side effect of bringing the contact form to the top of the page. The least they could have done is hide the buttons if the relevant detail is not there for the current property.

Roller Blades Malta

There’s one important lesson we can take away from Roller Blades Malta: don’t enter website content when you’re drunk.

Star Web Malta

Woe be upon thee, if thou hast an invalid WoeID:

Transport Malta

We all love Transport Malta, and for those who want to actually communicate their love, they have a contact form (note also the messed up action / social media list on the side):

Unfortunately, however, they don’t want to receive your love. The contact form goes to this page:

Transport Malta also joins the list of websites that accept login details on an insecure channel:

TVM

TVM‘s website, unlike that of JobsPlus, is in both English and Maltese. However, they forgot to translate “Sign In / Register” in the Maltese version:

WhatsOn

whatson.com.mt is another website accepting login details over an insecure channel:

Before you can login or register, though, you have to get past the cookie-acceptance text that comes up in front of the login/register form. This text tells you that you have to accept cookie usage to proceed, but the site has already set cookies regardless of your acceptance.

Xamarin University

When you sign up for Xamarin University, you have to consent to Microsoft to spam you.

While they say that you can unsubscribe at any time, I don’t want Microsoft sending me trash in the first place.

I also was unable to access some of the site’s functionality, because their JavaScript was broken:

Summary

We’ve seen quite a few bad things in this article, and I have even more lined up for the April issue. As always, feel free to bring to my attention any blunders you have experienced and feel should be included.

I have summarised various points to improve upon in earlier articles, and feel there would be little benefit by repeating them in this one.

However, I just want to remind everyone why I am writing these articles: it’s not to put shame on any particular website, but to learn about the bad things on the web today and avoid repeating them in the future. These experiences are painful to visitors of such websites, and embarrassing for the website developers and the companies commissioning them. Let’s all learn from our mistakes and create a better web for all!

"You don't learn to walk by following rules. You learn by doing, and by falling over." — Richard Branson