Automating a WinForms login form using SendKeys

This article describes how you can fill in form fields and invoke buttons from code using SendKeys, without directly interacting with the UI. The initial examples do this from the same application, but it is later shown how to do this UI automation from a separate application.

sendkeys-login-initial2

In this article, we’re going to use a simple login form as an example. It contains what you’d normally expect: fields to enter the username and password, and a Login button. Additionally, it contains an Automate button at the top which we’ll use to execute our automation code.

You’ll notice that I already have something in the Automate button’s click event handler:

            SendKeys.Send("username");

If you try this, you might expect that something gets written in the username field. But alas, nothing happens. That’s because SendKeys is limited to sending keystrokes to the focused control on the currently active application. Therefore, to actually send text to the username field, we first have to focus it.

We can try forcing focus on the username field:

            this.usernameField.Focus();
            SendKeys.Send("username");

…and indeed that works. But that won’t quite work if we’re automating the UI from a second application, since it has no idea about the fields present in our login form.

Therefore, another way is to actually send TAB keys to navigate to the desired control, before sending actual text. Special keys such as TAB and ENTER are represented by special codes such as {TAB} and {ENTER} (refer to the SendKeys documentation for a full list). Thus we can achieve the same effect like this:

            SendKeys.Send("{TAB}username");

And likewise, we can fill in the whole form, and finally invoke the Login button by first giving it focus and then sending an ENTER key:

            SendKeys.Send("{TAB}username{TAB}password{TAB}{ENTER}");

So you can see that the result is just what we expected:

sendkeys-login-loggedin

Naturally, keep in mind that tabbing to the desired control is entirely dependent on the tab index of the controls. If that changes, your automation code will have to change accordingly. It might not be an ideal approach, but it’s just about the best you can do for SendKeys if you want an application to send keystrokes to another.

Speaking of which, so far we’ve taken the shortcut of doing everything within the same application, in which case giving focus to controls directly is just fine. Let us now create a second Windows Forms application, and see how we can use it to automate our login form’s UI.

Actually, all we need is a simple form with a button, whose Click event handler will execute our automation code:

sendkeys-login-automatorstub

Now as I said before, SendKeys works only with the currently active application. If we want to automate our login form, we’ll need some code to find it from the list of running applications, and activate it. This StackOverflow answer has some code that takes care of this.

The first thing we need to do is find the process we want to automate. For that we need the name of the process. If it’s already running, you can find it in the Task Manager:

sendkeys-login-taskmanager

Notice how if you’re running directly from Visual Studio, the process will contain a “.vshost” before the file extension.

We can now get the process we want (Process is in the System.Diagnostics namespace):

            Process p = Process.GetProcessesByName("WinFormsLogin.vshost").FirstOrDefault();

Note that we omit the .exe extension from the process name above.

Once that is done, we need to bring that process to the foreground using some code from the answer linked above. So first, import the Win32 SetForegroundWindow() function (DllImport requires the System.Runtime.InteropServices namespace):

[DllImport ("User32.dll")]
static extern int SetForegroundWindow(IntPtr point);

Once we have this, we bring the process to the foreground, and send any keystrokes we need:

            Process p = Process.GetProcessesByName("WinFormsLogin.vshost").FirstOrDefault();

            if (p != null)
            {
                IntPtr h = p.MainWindowHandle;
                SetForegroundWindow(h);
                SendKeys.SendWait("{ENTER}");
            }

And there you go, the Automator application invokes the automation button on the Login application:

sendkeys-login-acrossapps

Now you’ll notice I’m kind of cheating here: I’m just sending the ENTER key to activate the Automate button in the Login form (which happens to have a tab index of zero, i.e. it’s the first thing to be focused). The applications you want to automate won’t normally have an Automate button. But just as you can send an ENTER key from one application to another, you can send other keys. We can thus do our automation anyway:

            Process p = Process.GetProcessesByName("WinFormsLogin.vshost").FirstOrDefault();

            if (p != null)
            {
                IntPtr h = p.MainWindowHandle;
                SetForegroundWindow(h);
                SendKeys.Send("{TAB}username{TAB}password{TAB}{ENTER}");
            }

Great! You can use SendKeys for simple automation of Windows Forms applications by sending keystrokes – even across applications. If you want to automate Microsoft Word or anything of the sort, this won’t work, although there are alternatives. If you’re doing more serious stuff (e.g. WPF) there are entire APIs you can look at.

Update the updater to update

update-windows-update

I formatted one of my laptops and reinstalled Windows the other day. Whilst reinstalling software and bringing it up to date, Windows update gave me this ridiculous message:

“To check for updates, you must first install an update for Windows Update.”

I guess software has become so complex that even updates require various levels of abstraction. 🙂

C# 6 Preview: Changes in VS2015 CTP 5

C# 6 and Visual Studio 2015 are both prerelease software at the moment, and thus they are subject to change at any time.

There have indeed been some changes in C# 6 that came out in CTP 5 but which don’t seem to have been mentioned anywhere.

String interpolation

If you’ve read my original article on string interpolation, you’ll know that the syntax was expected to change. Well, that has happened, and the expected syntax is now in place. So now, you can use string interpolation to write special formatted strings as follows:

            var name = "Chuck";
            var surname = "Norris";

            string message = $"The man is {name} {surname}";

The placeholders in the curly brackets no longer require a prefixing backslash, but a dollar sign is necessary at the start of the string to allow them to be interpreted properly.

Just like before, the placeholders are not restricted to simple variables. They may contain arbitrary expressions including properties and methods:

            var numbers = new int[] { 1, 2, 3, 4, 5 };

            string message = $"There are {numbers.Length} numbers, and their average is {numbers.Average()}";

You can use format strings in placeholders. Unlike in the original implementation, they don’t need to be enclosed in quotes if they contain operators (e.g. dashes which normally represent minus signs). However you need to be a little precise with them, as any extra space after the colon (:) appears in the output:

            var dateOfBirth = DateTime.Now;
            string message = $"It's {dateOfBirth:yyyy-MM-dd}!";

using static

I’ve also written about the using static feature before, which lets you declare a static class among the using statements and then omit the class prefix when using static methods.

The syntax has changed, and you will need to prefix the static class with the keyword “static” in the declaration. This is a good thing because it eliminates the confusion between which using statements are namespaces and which are static classes.

    using static System.Console;

    class Program
    {
        static void Main(string[] args)
        {   
            WriteLine("Hello Lilly!");

            ReadLine();
        }
    }

VS2015 Preview: Layout Management

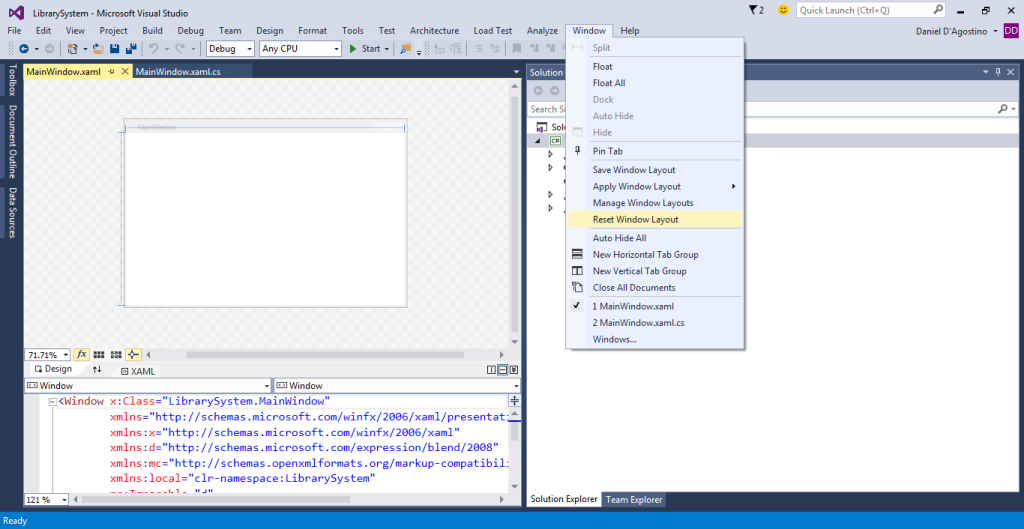
In earlier versions of Visual Studio, if you happened to mess up your window layout in Visual Studio, you could reset it back to the default layout by using the appropriate item in the Window menu:

vs2015-windowlayouts-duringreset

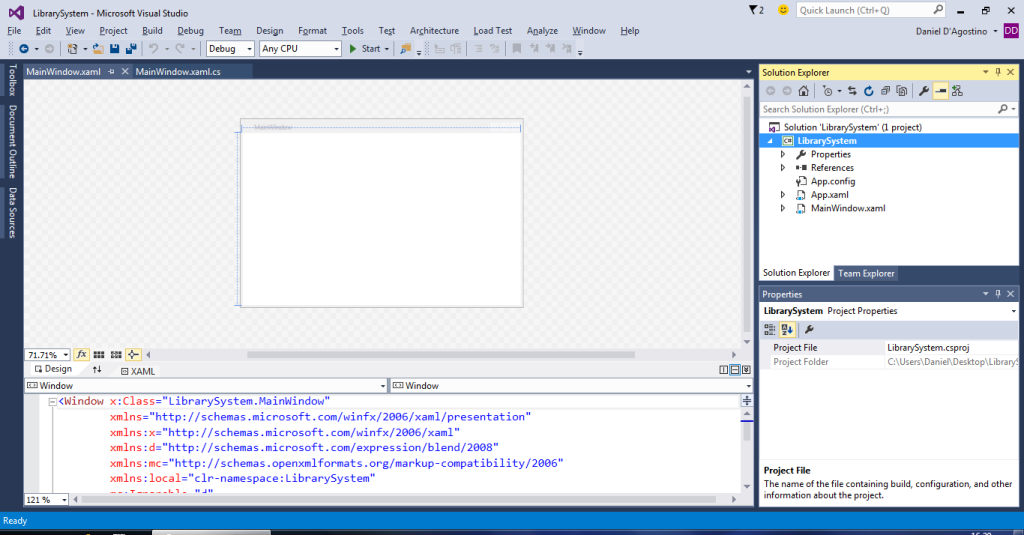
This rearranges the docked windows to whatever you originally had when Visual Studio was installed:

vs2015-windowlayouts-afterreset

That’s nice and all. But you may have noticed some new items above “Reset Window Layout” in the Window menu which are pretty handy when it comes to managing your window layouts.

For instance, when developing a new WPF application, the toolbox can sometimes come in handy for those without much experience with XAML. So, after introducing the Toolbox window, you can save the current layout:

vs2015-windowlayouts-duringsave

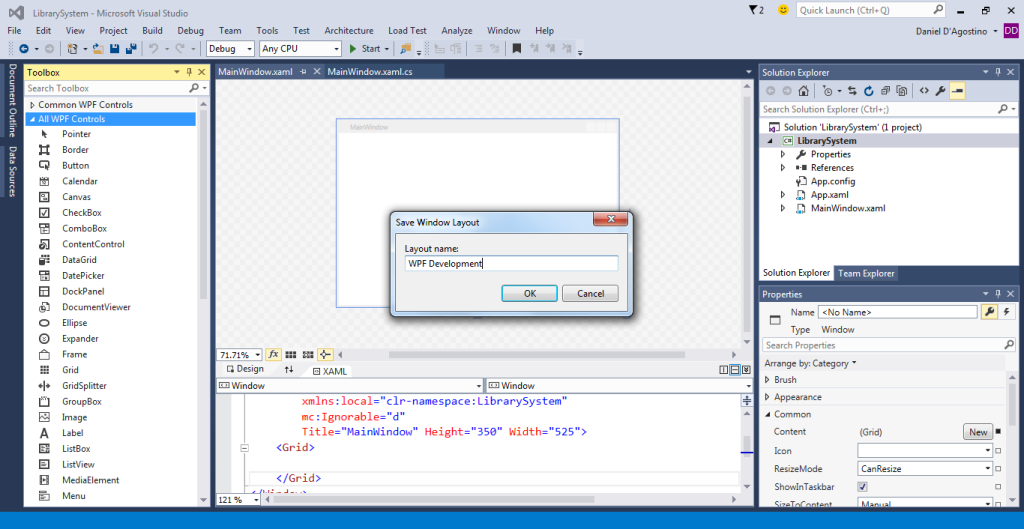
To save a layout, you need to give it a name:

vs2015-windowlayouts-promptsave

…and if that name happens to already exist, you’re asked whether you want to replace it (this is how you update saved layouts):

vs2015-windowlayouts-promptsaveexisting

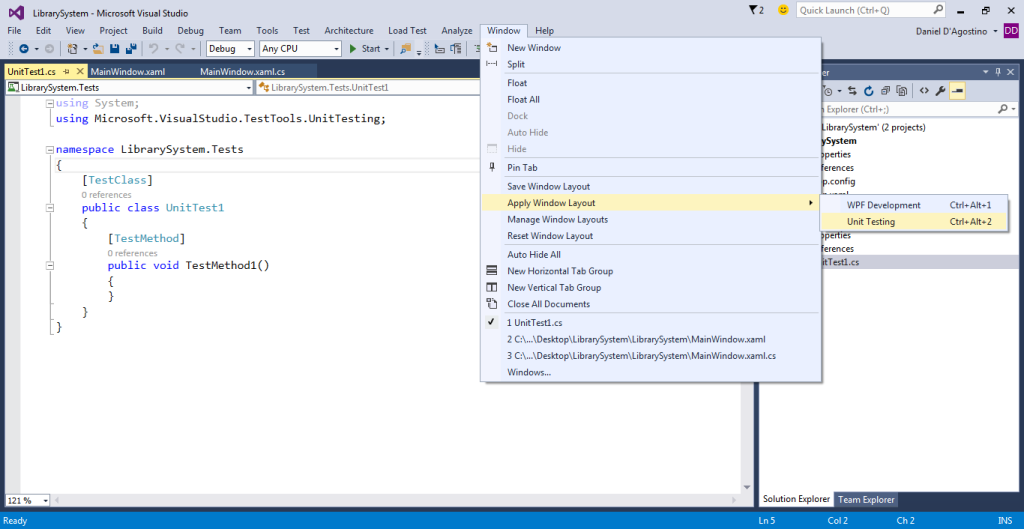
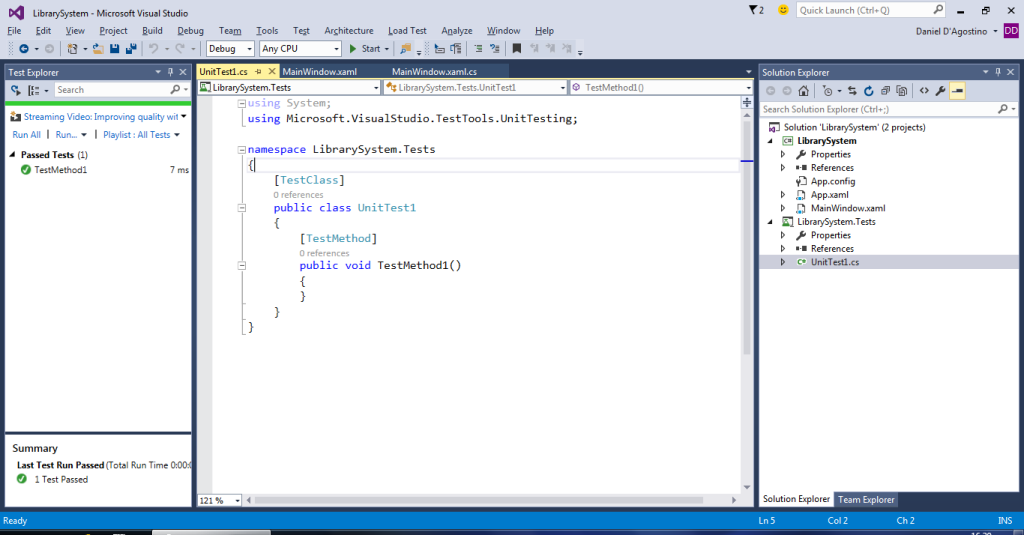
You can then load (apply) these layouts by selecting them from the list in the Window menu, or by using the appropriate shortcut key (available for the first nine layouts in order). For instance, I saved this alternate layout suitable for unit tests, and I can apply it like this:

vs2015-windowlayouts-duringapply

…and then, like magic, the selected layout is applied:

vs2015-windowlayouts-afterapply

There’s also a menu item for management of these layouts:

vs2015-windowlayouts-managemenuitem

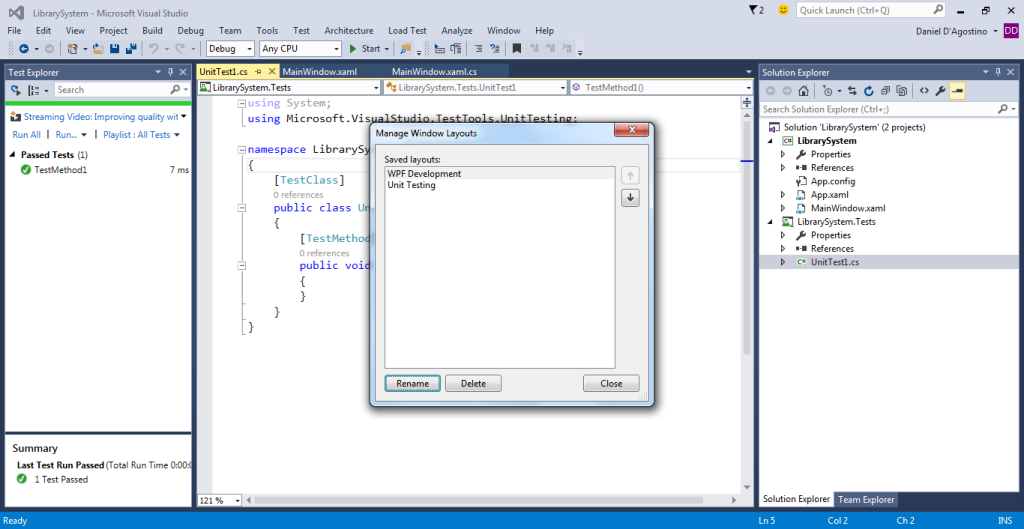
This opens a dialog which allows you to rename, delete, or reorder layouts.

vs2015-windowlayouts-managedialog

Reordering layouts has the effect of reassigning their keyboard shortcuts, since they are assigned in order to the first nine (from Ctrl+Alt+1 to Ctrl+Alt+9).

So, there you have it! Window layout management is yet another new feature in Visual Studio 2015 to improve your productivity.

VS2015 Preview: Live Static Code Analysis

In Visual Studio 2015, the new C# and VB .NET compilers are based on the .NET Compiler Platform known as Roslyn. This allows third-party tools to use the compiler itself to query the structure of code, rather than having to redo the compiler’s job. It also provides the ability to fix the code by modifying its structure.

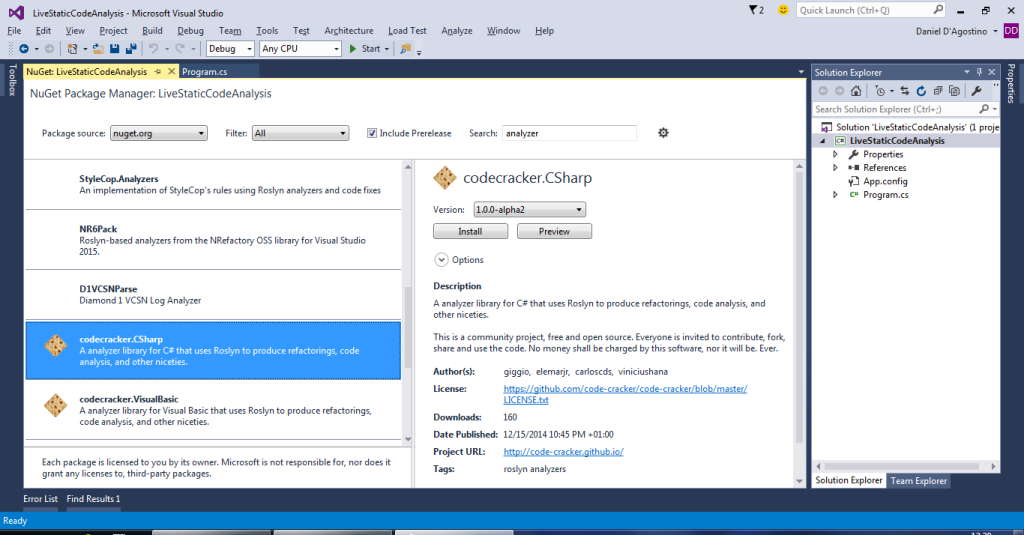
You can use the NuGet Package Manager in VS2015 to install analyzers. At the moment there are very few available, and they’re still prerelease software. For this demonstration we’ll use the CodeCracker C# analyzer:

vs2015-analyzers-nuget

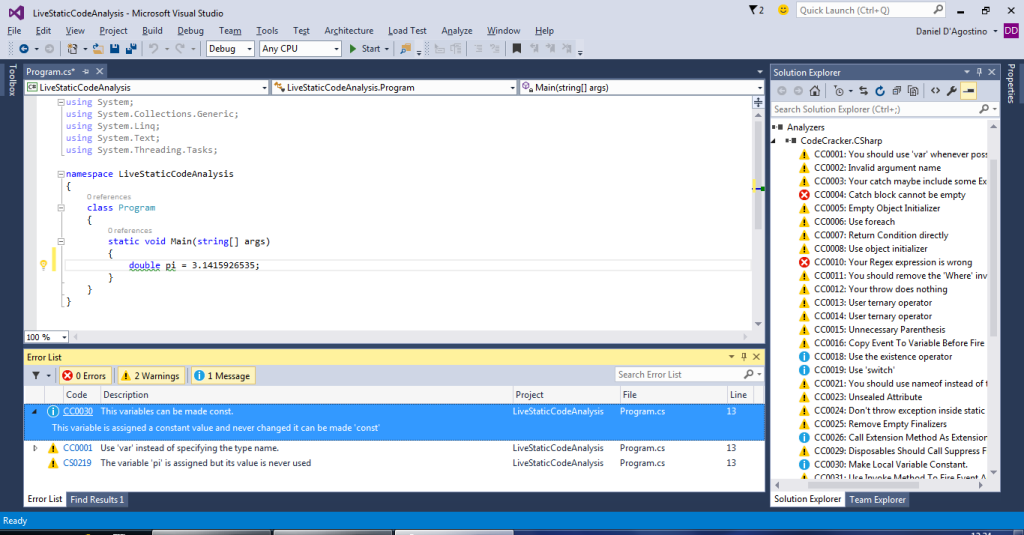
Once you install the package, you’ll see that the analyzer has been added under a special Analyzers node under the References in Solution Explorer. If you expand the analyzer, you can see all the rules that it enforces:

vs2015-analyzers-solution-explorer

As you can see, the code analysis rules may be enforced at various levels. Those marked as errors will result in actual compiler errors, and obviously cause the build to fail.

The rules that are broken by the code will then show up in the error list, which in VS2015 has been enhanced so that you can see more info about the error/rule and also click on the error code link to go to its online documentation (at the time of writing this article, the CodeCracker’s error code links are broken):

vs2015-analyzers-error-list

The best thing about live static code analysis is that they’re live: the rules will be checked as you’re writing your code, and you don’t even need to build for them to be evaulated.

Warnings may be sorted out by moving the caret within the relevant code and pressing Ctrl+. (Control Dot), after which the Quick Actions become available. See, code analyzers don’t need to limit themselves to complaining. If a fix is available, you’ll have the option to apply it, and you can preview the changes as with any other refactoring:

vs2015-analyzers-fix

If you know better than the code analyzer, you can opt to suppress the warning instead:

vs2015-analyzers-suppress

Code analysis allows rules to be enforced on your team’s code. Roslyn facilitates this by making it easy to plug in different code analyzers (and hopefully in future there will be a wider range to choose from) and by running code analysis live, without the need to build the project.

Note: this demonstration used the CodeCracker C# analyzer in order to show the different levels of rules (e.g. warnings, errors, etc), since the StyleCop analyzer’s rules are all warnings. The CodeCracker C# analyzer is in quite a mess at the time of writing, with missing fixes, broken rule documentation links, and countless grammatical errors. But it’s prerelease, so we’ll pretend that’s a good excuse and forgive it for its sins.

"You don't learn to walk by following rules. You learn by doing, and by falling over." — Richard Branson