All posts by Gigi

Calculating String Similarity with Levenshtein Distance

The source code for this article is available at the Gigi Labs BitBucket repository.

Levenshtein distance or edit distance is a metric used to measure the similarity between two strings. It works by calculating the number of edits needed to go from the first string to the second. For example:

  • To go from kitten to mitten, we need to replace the first letter. That’s just one edit.
  • To go from barrel to bard, we need to remove the last two letters, and replace an ‘r’ with a ‘d’. That’s three edits.
  • To go from bled to bleeding, we need to insert an ‘e’ in the middle and “ing” at the end. That’s four edits.
  • Transposition of characters also a valid operation.

To perform this calculation in code, there’s a simple algorithm. It starts off by initialising a matrix and setting initial values for the top row and left column. Let’s see how this looks in code.

We’ll start off with a simple prompt for the two strings to be compared:

            // input

            Console.Write("Input first string: ");
            string s = Console.ReadLine().ToLowerInvariant();
            Console.Write("Input second string: ");
            string t = Console.ReadLine().ToLowerInvariant();

Next, we create our matrix and set initial values for the top row and left column:

            // init

            var matrix = new int[s.Length + 1, t.Length + 1];

            for (int i = 0; i < s.Length + 1; i++)
                matrix[i, 0] = i;

            for (int j = 0; j < t.Length + 1; j++)
                matrix[0, j] = j;

Rather than explaining what this does in words, it’s better if we just draw the matrix in the console window so you can see for yourself. To do that, we’ll need a helper function. This might look like a lot of code, but it’s basically just drawing the matrix with one string at the top and the other at the side:

        static void DrawMatrix(string s, string t, int[,] matrix)
        {
            Console.WriteLine();
            Console.Write("   ");

            for (int i = 0; i < t.Length; i++)
                Console.Write("{0}", t[i]);
            Console.WriteLine();

            for (int i = 0; i < s.Length + 1; i++)
            {
                Console.Write("{0} ", i > 0 ? s[i - 1] : ' ');

                for (int j = 0; j < t.Length + 1; j++)
                    Console.Write(matrix[i, j]);

                Console.WriteLine();
            }

            Console.WriteLine();
        }

Back in our Main() method, we can now call this helper function to draw the matrix:

            // visualise

            DrawMatrix(s, t, matrix);

Here’s the output:

levenshtein-init

As you can see, the initialisation code we wrote earlier is creating a matrix based on the length of the strings. There’s an extra row and column at the beginning, which we fill with incrementing values.

Now the heart of the Levenshtein distance algorithm is made up of a calculation that starts with those initial values and uses them to populate the rest of the matrix. For each cell, we look at the value to its left, top and top left. We adjust that in a specific way defined by the algorithm (either adding 1 or adding a cost, which is based on comparing a character from each string), and take their minimum. The resulting code looks something like this:

            // calculate

            for (int i = 1; i <= s.Length; i++)
            {
                for (int j = 1; j <= t.Length; j++)
                {
                    int cost = s[i - 1] == t[j - 1] ? 0 : 1;

                    int topPlus1 = matrix[i - 1, j] + 1;
                    int leftPlus1 = matrix[i, j - 1] + 1;
                    int topLeftPlusCost = matrix[i - 1, j - 1] + cost;

                    var min = Math.Min(topPlus1, leftPlus1);
                    min = Math.Min(min, topLeftPlusCost);
                    matrix[i, j] = min;
                }
            }

With that done, the Levenshtein distance is the value in the bottom right of the matrix:

            int levenshteinDistance = matrix[s.Length, t.Length];
            Console.WriteLine("Levenshtein distance = {0}", levenshteinDistance);
            Console.WriteLine();

Here’s the final output:

levenshtein-calculation

As you can see, Levenshtein Distance gives us a way to measure the similarity (or difference) between two strings. This lends itself well to various text-related applications such as validation, spell checking and error correction.

RabbitMQ String Headers Received As Byte Arrays

I ran into a strange issue today with RabbitMQ. When adding custom headers, I found that things like integers would get through to the other end just fine. But when it came to strings, they ended up as byte arrays in the receiving end.

To illustrate this issue, I’ve written a very simple example. The publisher, below, sets two custom headers: a string and an integer:

        static void Main(string[] args)
        {
            Console.Title = "Publisher";

            var factory = new ConnectionFactory();

            using (var connection = factory.CreateConnection())
            {
                using (var channel = connection.CreateModel())
                {
                    // prepare payload and headers

                    var body = Encoding.UTF8.GetBytes("Hello");
                    var props = channel.CreateBasicProperties();
                    props.Headers = new Dictionary<string, object>();
                    props.Headers["Name"] = "Bob";
                    props.Headers["Age"] = 21;

                    // set up queue and exchange

                    channel.QueueDeclare("testqueue", true, false, false, null);
                    channel.ExchangeDeclare("testexchange", "direct");
                    channel.QueueBind("testqueue", "testexchange", "");

                    // publish message

                    channel.BasicPublish("testexchange", "", props, body);

                    Console.ReadLine();
                }
            }
        }

As you can see, this is set correctly in the Headers collection:

rabbitmq-quirkystring-publish-debug

Now that we’ve published a message, we can consume it using the following code (practically the same as that in “Getting Started with RabbitMQ with .NET“, except that it also writes out the two custom headers):

        static void Main(string[] args)
        {
            Console.Title = "Consumer";

            var factory = new ConnectionFactory();

            using (var connection = factory.CreateConnection())
            {
                using (var channel = connection.CreateModel())
                {
                    channel.QueueDeclare("testqueue", true, false, false, null);

                    var consumer = new EventingBasicConsumer(channel);
                    consumer.Received += Consumer_Received;
                    channel.BasicConsume("testqueue", true, consumer);

                    Console.ReadLine();
                }
            }
        }

        private static void Consumer_Received(object sender, BasicDeliverEventArgs e)
        {
            var body = e.Body;
            var content = Encoding.UTF8.GetString(body);
            var name = e.BasicProperties.Headers["Name"];
            var age = e.BasicProperties.Headers["Age"];

            Console.WriteLine("{0} {1} {2}", name, age, content);
        }

The output, however, is not quite what one would expect:

rabbitmq-quirkystring-bytearray-output

In fact, what we received in the consumer is not a string but a byte array, even if the bytes correspond to what we actually sent:

rabbitmq-quirkystring-consume-debug

The integer header, however, did not have this problem.

A quick search showed that I’m not the first person to encounter this, as someone pointed out this odd behaviour back in 2012, and it appears there’s a similar issue in the Python implementation.

All I can suggest based on these two links is: if you have a header which you know is a string, just do the byte-to-string conversion yourself:

        private static void Consumer_Received(object sender, BasicDeliverEventArgs e)
        {
            var body = e.Body;
            var content = Encoding.UTF8.GetString(body);
            var nameBytes = (byte[]) e.BasicProperties.Headers["Name"];
            var name = Encoding.UTF8.GetString(nameBytes);
            var age = e.BasicProperties.Headers["Age"];

            Console.WriteLine("{0} {1} {2}", name, age, content);
        }

As you would expect, this sorts out the problem:

rabbitmq-quirkystring-string-output

How to use the C++ STL Priority Queue

This article was originally posted at Gigi’s Computer Corner on 19th January 2013.

Overview

A priority queue is a queue data structure that has the particular property of being sorted by priority. You can decide what priority to give items depending on the data type – more on this in a minute.

The C++ Standard Template Library (STL) includes a convenient std::priority_queue class template in the queue header file.

A simple priority queue of integers

The following code sample illustrates how to implement a priority queue of integers. The integer value is used by default as a priority. The queue is sorted automatically as new entries are added.

#include <iostream>
#include <queue>

int main(int argc, char ** argv)
{
	std::priority_queue<int> queue;

	queue.push(100);
	queue.push(300);
	queue.push(50);
	queue.push(150);

	while (!queue.empty())
	{
		std::cout << queue.top() << std::endl;
		queue.pop();
	}

	system("pause");

	return 0;
}

The output of the above program is as follows:

300
150
100
50
Press any key to continue . . .

A priority queue with a custom class

In practical situations, it is often not very useful to simply maintain a priority queue of just integers. We often have some particular class, and we want to give each instance a priority (computed based on some internal state).

Let’s say we have a class called Toast, composed of a certain amount of bread and butter:

class Toast
{
public:
	int bread;
	int butter;

	Toast(int bread, int butter)
		: bread(bread), butter(butter)
	{

	}
};

It is easy to sort integers, but how do you sort Toast? We need to offer C++ a way to compare one Toast instance to another. This is done by creating a structure implementing an operator() and effectively doing a less-than comparison. A StackOverflow question and answer shows how it’s done, and the code needed for sorting our Toast is below.

struct ToastCompare
{
	bool operator()(const Toast &t1, const Toast &t2) const
	{
		int t1value = t1.bread * 1000 + t1.butter;
		int t2value = t2.bread * 1000 + t2.butter;
		return t1value < t2value;
	}
};

We can now pass the TestCompare class to the priority_queue to tell it how to sort the Toast. Sample code is below.

#include <iostream>
#include <queue>
#include <vector>

#include "Toast.h"

using std::priority_queue;
using std::vector;
using std::cout;
using std::endl;

int main(int argc, char ** argv)
{
	Toast toast1(2, 200);
	Toast toast2(1, 30);
	Toast toast3(1, 10);
	Toast toast4(3, 1);
	
	//priority_queue<Toast> queue;
	priority_queue<Toast, vector<Toast>, ToastCompare> queue;

	queue.push(toast1);
	queue.push(toast2);
	queue.push(toast3);
	queue.push(toast4);

	while (!queue.empty())
	{
		Toast t = queue.top();
		cout << "bread " << t.bread << " butter " << t.butter << std::endl;
		queue.pop();
	}

	system("pause");

	return 0;
}

If we used the simple priority_queue declaration (the line that is commented out), we would end up with a bunch of errors because of C++ not knowing how to compare theToast instances.

Instead, we pass three template arguments: the Toast itself, a vector of Toast, and theToastCompare class to tell C++ how to compare Toast instances. The second template argument (the vector) is there because the C++ STL priority queue is actually a container adapter – it uses an underlying data structure to store elements, and the default is a vector.

The output for the above program is given below:

bread 3 butter 1
bread 2 butter 200
bread 1 butter 30
bread 1 butter 10
Press any key to continue . . .

Further reading

Scope Bound Resource Management in C#

This article explains how we can use scope to localize resource lifetime as well as other arbitrary user code effects within a method. The article starts with background from C++, because that’s where this technique comes from.

Update 5th November 2016: Some of the utility classes described here have been incorporated in my Dandago.Utilities NuGet package.

The RAII Pattern

Despite their power, pointers in C/C++ have been the cause of much outrage. Using them incorrectly typically leads to disastrous effects, from memory leaks to segmentation faults. While newer languages such as Java and C# have imposed damage control by taking control of the lifetime of objects allocated on the heap (via garbage collection), there are techniques even in C++ that make pointers a lot less messy to use.

In fact, the problem here is not even about pointers. Pointers belong to a family of resources, along with file handles, sockets, and many other things. These are typically allocated on the heap and must be released after use; otherwise bad things happen.

Scott Meyers’ excellent book Effective C++: 55 Specific Ways to Improve Your Programs and Designs has an entire section dedicated to safely working with resources. One of the first things he suggests in that section is to encapsulate a resource within an object. For example:

class MyResource
{
public:
    MyResource() // constructor
    {
        this->ptr = new int[1000]; // allocate memory on heap
    }

    ~MyResource() // destructor
    {
        delete[] this->ptr; // free memory
    }

private:
    int * ptr; // pointer encapsulated within class
};

This encapsulation is called Resource Acquisition Is Initialization (RAII), or Scope-Bound Resource Management. Apart from constructors, C++ classes can have destructors. These get called either explicitly from application code, or automatically when an object allocated on the stack goes out of scope. Let’s see how this works in practice:

int main(int argc, char ** argv)
{
    // create instance of MyResource on stack
    MyResource resource;

    return 0;
} // we went out of scope; destructor gets called

Just like declaring an int variable allocates it on the stack, the same thing happens with class types. When that object goes out of scope (i.e. reaches the next } brace), its destructor gets called. This is great because you can’t really forget to dispose of the encapsulated resource. If you return early, throw an exception, etc, the destructor will get called when control leaves the current execution block.

The IDisposable Pattern

In C#, objects allocated on the heap (via the new keyword) are typically killed by the garbage collector when it determines that they are no longer in use. While C# code typically doesn’t face the problems C++ code has with pointers, managing resources is no less important. Just like C++, C# has to deal with file handles, databases, sockets, unmanaged libraries and other stuff that must be disposed as carefully as they are initialized.

For this reason, C# provides two tools to essentially do the work of C++ destructors: the IDisposable pattern, and finalizers. Using these correctly is non-trivial and depends on the situation, but they are also pretty standard and well-documented. Check out this CodeProject article for an in-depth treatment of the topic.

For convenience, C# also provides an overloaded using keyword that works hand-in-hand with the IDisposable pattern:

            using (var fs = File.OpenWrite("file.txt"))
            using (var sw = new StreamWriter(fs))
            {
                sw.WriteLine("Hello!");
            } // automatically calls Dispose() for both

A using block, wrapping an object that implements IDisposable, will automatically call that object’s Dispose() method when it goes out of scope (and using blocks can be stacked, as above). This is essentially equivapent to:

            FileStream fs = null;
            StreamWriter sw = null;
            try
            {
                fs = File.OpenWrite("file.txt");
                sw = new StreamWriter(fs);

                sw.WriteLine("Hello!");
            }
            finally
            {
                sw.Dispose();
                fs.Dispose();
            }

Abusing the IDisposable Pattern

While IDisposable is meant to be used to safely dispose of resources, we can extend its usefulness to other scenarios that relate to a particular scope.

One example where I’ve used this idea before is to log the beginning and end of a method:

    public class ScopedLog : IDisposable
    {
        private string name;

        public ScopedLog(string name)
        {
            this.name = name;
            Console.WriteLine("Begin {0}", name);
        }

        public void Dispose()
        {
            Console.WriteLine("End {0}", this.name);
        }
    }

This pattern doesn’t really add anything, but gives you an elegant way to do scope-related stuff without that getting in the way of your application logic:

        static void Main(string[] args)
        {
            using (var log = new ScopedLog("Main"))
            {
                Console.WriteLine("Hello!");
            }

            Console.ReadLine();
        }

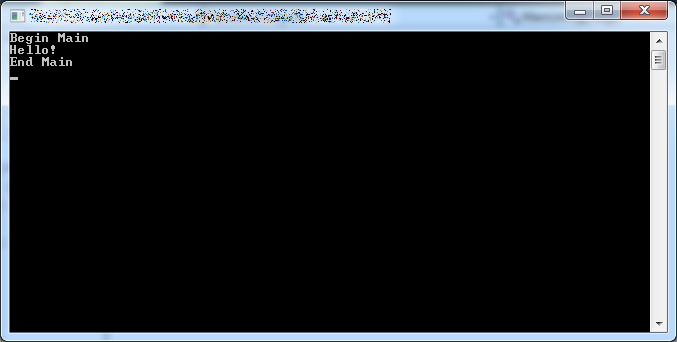
Here’s the output:

scope-logging

Another example is when you want to benchmark your code. Code can get really messy when you’re doing logging, benchmarking and other stuff in the same method. Instead, we can make a dedicated class:

    public class ScopedTimer : IDisposable
    {
        private string name;
        private DateTime startTime;

        public ScopedTimer(string name)
        {
            this.name = name;
            this.startTime = DateTime.Now;
        }

        public void Dispose()
        {
            var endTime = DateTime.Now;
            var elapsed = endTime - this.startTime;

            Console.WriteLine("{0} took {1}", this.name, elapsed);
        }
    }

…and then put it neatly in a using block:

        static void Main(string[] args)
        {
            using (var timer = new ScopedTimer("Main"))
            using (var log = new ScopedLog("Main"))
            {
                Console.WriteLine("Hello!");
            }

            Console.ReadLine();
        }

Here’s the output:

scope-benchmarking

A final example is changing the console colour. It’s very easy to save the old colour, set a new one, and then revert back to the old colour when going out of scope:

    public class ScopedConsoleColour : IDisposable
    {
        private ConsoleColor oldColour;

        public ScopedConsoleColour(ConsoleColor newColour)
        {
            this.oldColour = Console.ForegroundColor;

            Console.ForegroundColor = newColour;
        }

        public void Dispose()
        {
            Console.ForegroundColor = this.oldColour;
        }
    }

Note: you could use Console.ResetColor(), but then you can’t nest colour changes.

Here’s the updated Main() code for this example:

        static void Main(string[] args)
        {
            using (var timer = new ScopedTimer("Main"))
            using (var log = new ScopedLog("Main"))
            {
                Console.WriteLine("Hello!");

                using (var colour = new ScopedConsoleColour(ConsoleColor.Yellow))
                {
                    Console.WriteLine("Howdy?");
                }

                Console.WriteLine("Bye!");
            }

            Console.ReadLine();
        }

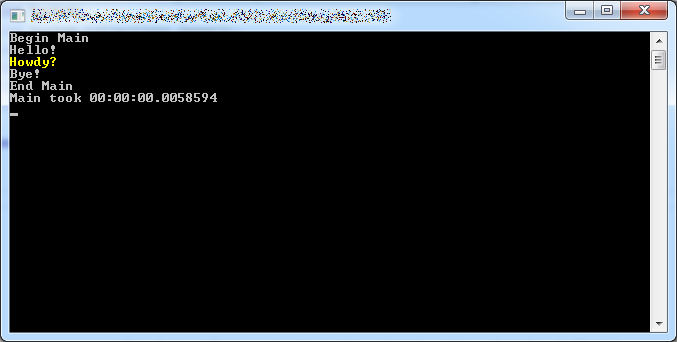
Here’s the output:

scope-colour

Other Applications in C++

The RAII pattern is awesome. Not only does it allow you to safely manage the lifetime of resources, but it enables a whole class of scope-based applications. Aside from the C# examples in the previous section, RAII enables things like smart pointers in C++ (e.g. unique_ptr) and scoped locks.

A Multilevel Cache Retrieval Design for .NET

Caching data is vital for high-performance web applications. However, cache retrieval code can get messy and hard to test without the proper abstractions. In this article, we’ll start an ugly multilevel cache and progressively refine it into something maintainable and testable.

The source code for this article is available at the Gigi Labs BitBucket repository.

Naïve Multilevel Cache Retrieval

A multilevel cache is just a collection of separate caches, listed in order of speed. We typically try to retrieve from the fastest cache first, and failing that, we try the second fastest; and so on.

For the example in this article we’ll use a simple two-level cache where:

We’re going to build a Web API method that retrieves a list of supported languages. We’ll prepare this data in Redis (e.g. using the command SADD languages en mt) but will leave the MemoryCache empty (so it will have to fall back to the Redis cache).

A simple implementation looks something like this:

    public class LanguagesController : ApiController
    {
        // GET api/languages
        public async Task<IEnumerable<string>> GetAsync()
        {
            // retrieve from MemoryCache

            var valueObj = MemoryCache.Default.Get("languages");

            if (valueObj != null)
                return valueObj as List<string>;
            else
            {
                // retrieve from Redis

                var conn = await ConnectionMultiplexer.ConnectAsync("localhost:6379");
                var db = conn.GetDatabase(0);
                var redisSet = await db.SetMembersAsync("languages");

                if (redisSet == null)
                    return null;
                else
                    return redisSet.Select(item => item.ToString()).ToList();
            }
        }
    }

Note: this is not the best way to create a Redis client connection, but is presented this way for the sake of simplicity.

Data Access Repositories and Multilevel Cache Abstraction

The controller method in the previous section is having to deal with cache fallback logic as well as data access logic that isn’t really its job (see Single Responsibility Principle). This results in bloated controllers, especially if we add additional cache levels (e.g. fall back to database for third-level cache).

To alleviate this, the first thing we should do is move data access logic into repositories (this is called the Repository pattern). So for MemoryCache we do this:

    public class MemoryCacheRepository : IMemoryCacheRepository
    {
        public Task<List<string>> GetLanguagesAsync()
        {
            var valueObj = MemoryCache.Default.Get("languages");
            var value = valueObj as List<string>;
            return Task.FromResult(value);
        }
    }

…and for Redis we have this instead:

    public class RedisCacheRepository : IRedisCacheRepository
    {
        public async Task<List<string>> GetLanguagesAsync()
        {
            var conn = await ConnectionMultiplexer.ConnectAsync("localhost:6379");
            var db = conn.GetDatabase(0);
            var redisSet = await db.SetMembersAsync("languages");

            if (redisSet == null)
                return null;
            else
                return redisSet.Select(item => item.ToString()).ToList();
        }
    }

The repositories each implement their own interfaces, to prepare for dependency injection which is one of our end goals (we’ll get to that later):

    public interface IMemoryCacheRepository
    {
        Task<List<string>> GetLanguagesAsync();
    }

    public interface IRedisCacheRepository
    {
        Task<List<string>> GetLanguagesAsync();
    }

For this simple example, the interfaces look almost identical. If your caches are going to be identical then you can take this article further and simplify things even more. However, I’m not assuming that this is true in general; you might not want to have a multilevel cache everywhere.

Let’s also add a new class to abstract the fallback logic:

    public class MultiLevelCache
    {
        public async Task<T> GetAsync<T>(params Task<T>[] tasks) where T : class
        {
            foreach(var task in tasks)
            {
                var retrievedValue = await task;

                if (retrievedValue != null)
                    return retrievedValue;
            }

            return null;
        }
    }

Basically this allows us to pass in a number of tasks, each corresponding to a cache lookup. Whenever a cache lookup returns null, we know it’s a cache miss, which is why we need the where T : class restriction. In that case we try the next cache level, until we finally run out of options and just return null to the calling code.

This class is async-only to encourage asynchronous retrieval where possible. Synchronous retrieval can use Task.FromResult() (as the MemoryCache retrieval shown earlier does) to conform with this interface.

We can now refactor our controller method into something much simpler:

        public async Task<IEnumerable<string>> GetAsync()
        {
            var memoryCacheRepository = new MemoryCacheRepository();
            var redisCacheRepository = new RedisCacheRepository();
            var cache = new MultiLevelCache();

            var languages = await cache.GetAsync(
                memoryCacheRepository.GetLanguagesAsync(),
                redisCacheRepository.GetLanguagesAsync()
            );

            return languages;
        }

The variable declarations will go away once we introduce dependency injection.

Multilevel Cache Repository

The code looks a lot neater now, but it is still not testable. We’re still technically calling cache retrieval logic from the controller. A cache depends on external resources (e.g. databases) and also potentially on time (if expiry is used), and that’s not good for unit tests.

A cache is not very different from the more tangible data sources (such as Redis or a database). With them it shares the function of retrieving data and the nature of relying on resources external to the application, which makes it incompatible with unit testing. A multilevel cache has the additional property that it is an abstraction for the underlying data sources, and is thus itself a good candidate for the repository pattern:

multilevel-cache-repository

We can now move all our cache retrieval logic into a new MultiLevelCacheRepository class:

    public class MultiLevelCacheRepository : IMultiLevelCacheRepository
    {
        public async Task<List<string>> GetLanguagesAsync()
        {
            var memoryCacheRepository = new MemoryCacheRepository();
            var redisCacheRepository = new RedisCacheRepository();
            var cache = new MultiLevelCache();

            var languages = await cache.GetAsync(
                memoryCacheRepository.GetLanguagesAsync(),
                redisCacheRepository.GetLanguagesAsync()
            );

            return languages;
        }
    }

Our controller now needs only talk to this repository, and carry out any necessary logic after retrieval (in this case we don’t have any):

        public async Task<IEnumerable<string>> GetAsync()
        {
            var repo = new MultiLevelCacheRepository();
            var languages = await repo.GetLanguagesAsync();
            return languages;
        }

Dependency Injection

Our end goal is to be able to write unit tests for our controller methods. A prerequisite for that is to introduce dependency injection.

Follow the instructions in “ASP .NET Web API Dependency Injection with Ninject” to set up Ninject, or use any other dependency injection framework you prefer.

In your dependency injection configuration class (NinjectWebCommon if you’re using Ninject), set up the classes and interfaces you need:

        private static void RegisterServices(IKernel kernel)
        {
            kernel.Bind<IMemoryCacheRepository>().To<MemoryCacheRepository>()
                .InSingletonScope();
            kernel.Bind<IRedisCacheRepository>().To<RedisCacheRepository>()
                .InSingletonScope();
            kernel.Bind<IMultiLevelCacheRepository>().To<MultiLevelCacheRepository>()
                .InSingletonScope();
            kernel.Bind<MultiLevelCache>().To<MultiLevelCache>()
                .InSingletonScope();
        }

Note: you can also set up an interface for MultiLevelCache if you want. I didn’t do that out of pure laziness.

Next, refactor MultiLevelCacheRepository to get the classes it needs via constructor injection:

    public class MultiLevelCacheRepository : IMultiLevelCacheRepository
    {
        private IMemoryCacheRepository memoryCacheRepository;
        private IRedisCacheRepository redisCacheRepository;
        private MultiLevelCache cache;

        public MultiLevelCacheRepository(
            IMemoryCacheRepository memoryCacheRepository,
            IRedisCacheRepository redisCacheRepository,
            MultiLevelCache cache)
        {
            this.memoryCacheRepository = memoryCacheRepository;
            this.redisCacheRepository = redisCacheRepository;
            this.cache = cache;
        }

        public async Task<List<string>> GetLanguagesAsync()
        {
            var languages = await cache.GetAsync(
                memoryCacheRepository.GetLanguagesAsync(),
                redisCacheRepository.GetLanguagesAsync()
            );

            return languages;
        }
    }

Do the same with the controller:

    public class LanguagesController : ApiController
    {
        private IMultiLevelCacheRepository repo;

        public LanguagesController(IMultiLevelCacheRepository repo)
        {
            this.repo = repo;
        }

        // GET api/languages
        public async Task<IEnumerable<string>> GetAsync()
        {
            var languages = await repo.GetLanguagesAsync();
            return languages;
        }
    }

…and make sure it actually works:
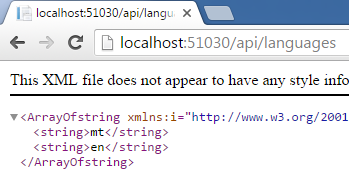
multilevel-cache-verify

Unit Test

Thanks to this design, we can now write unit tests. There is not much to test for this simple example, but we can write a simple (!) test to verify that the languages are indeed retrieved and returned:

        [TestMethod]
        public async Task GetLanguagesAsync_LanguagesAvailable_Returned()
        {
            // arrange

            var languagesList = new List<string>() { "mt", "en" };

            var memCacheRepo = new Mock<MemoryCacheRepository>();
            var redisRepo = new Mock<RedisCacheRepository>();
            var cache = new MultiLevelCache();
            var multiLevelCacheRepo = new MultiLevelCacheRepository(
                memCacheRepo.Object, redisRepo.Object, cache);
            var controller = new LanguagesController(multiLevelCacheRepo);

            memCacheRepo.Setup(repo => repo.GetLanguagesAsync())
                        .ReturnsAsync(null);
            redisRepo.Setup(repo => repo.GetLanguagesAsync())
                        .ReturnsAsync(languagesList);

            // act

            var languages = await controller.GetAsync();
            var actualLanguages = new List<string>(languages);

            // assert

            CollectionAssert.AreEqual(languagesList, actualLanguages);
        }

Over here we’re using Moq’s Mock objects to help us with setting up the unit test. In order for this to work, we need to make our GetLanguagesAsync() method virtual in the data repositories:

public virtual Task<List<string>> GetLanguagesAsync()

Conclusion

Caching makes unit testing tricky. However, in this article we have seen how we can treat a cache just like any other repository and hide its retrieval implementation details in order to keep our code testable. We have also seen an abstraction for a multilevel cache, which makes cache fallback straightforward. Where cache levels are identical in terms of data, this approach can probably be simplified even further.