Tag Archives: Unit Testing

Data-Driven Tests with NUnit

This article shows how you can run the same unit test multiple times with different input data, using NUnit.

A Simple Scenario

Before we can learn about data-driven testing using NUnit, we need some actual logic to test. Let’s use the following class for this purpose:

    public class PriceCalculator
    {
        private decimal adultPrice;

        public PriceCalculator(decimal adultPrice)
        {
            this.adultPrice = adultPrice;
        }

        public decimal CalculatePrice(int age)
        {
            decimal multiplier = 0.0m;

            if (age >= 5 && age < 16) // 5 to 15: half price
                multiplier = 0.5m;
            else if (age >= 16 && age < 60) // 16 to 59: full price
                multiplier = 1.0m;
            else if (age >= 60) // 60+: half price
                multiplier = 0.5m;

            return this.adultPrice * multiplier;
        }
    }

So, here we have a scenario where we have something to sell (whatever it is), and certain age ranges get discounts. Kids under 5 years of age are free; older kids under 16 pay half price, as do senior citizens from age 60 onwards.

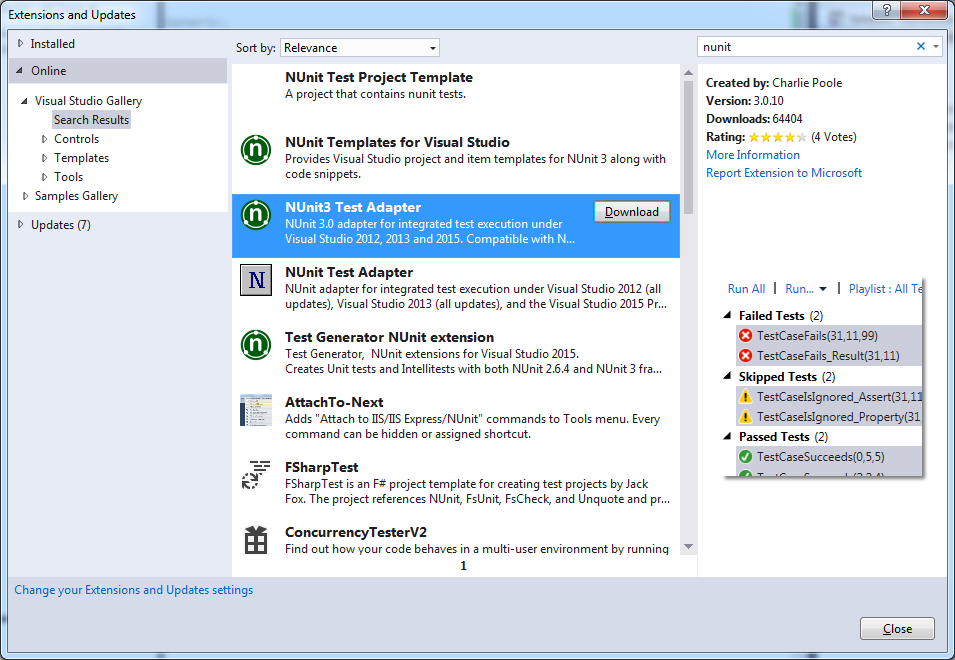
If you want to run NUnit unit tests from within Visual Studio, make sure you have the NUnit Test Adapter. You can get it from Tools menu -> Extensions and Updates…:

nunit-test-adapter

Plain Old Unit Tests

To test this, you’d have to write several unit tests. One of them could look like this:

        [Test]
        public void CalculatePriceTest()
        {
            // arrange

            const decimal adultPrice = 10m;
            var priceCalculator = new PriceCalculator(adultPrice);
            const int age = 10;

            // act

            decimal actualPrice = priceCalculator.CalculatePrice(age);

            // assert

            const decimal expectedPrice = 5m;

            Assert.AreEqual(expectedPrice, actualPrice);
        }

You’d have to write other similar tests to cover the various age ranges and edge cases (e.g. making sure that age boundaries are inclusive or exclusive as needed).

Copying this test code and varying the input data is a bit of a hassle and not quite DRY. An alternative could be to set up a list with the input data and expected result and iterate over it. That’s not necessary, because NUnit gives us a way to do this out of the box.

The TestCase Attribute

NUnit provides a feature called Parameterized Tests. These provide two mechanisms that allow you to easily run the same test with multiple input data.

The first of these is the [TestCase] attribute. This replaces the [Test] attribute we used before, and provides input data to pass to the test method via parameters:

        [TestCase(1, 0)]
        [TestCase(10, 5)]
        [TestCase(20, 10)]
        [TestCase(70, 5)]
        public void CalculatePriceTest(int age, decimal expectedPrice)
        {
            // arrange

            const decimal adultPrice = 10m;
            var priceCalculator = new PriceCalculator(adultPrice);

            // act

            decimal actualPrice = priceCalculator.CalculatePrice(age);

            // assert

            Assert.AreEqual(expectedPrice, actualPrice);
        }

This can actually be simplified further by using the ExpectedResult named parameter, and replacing the Assert with a simple return statement:

        [TestCase(1, ExpectedResult = 0)]
        [TestCase(10, ExpectedResult = 5)]
        [TestCase(20, ExpectedResult = 10)]
        [TestCase(70, ExpectedResult = 5)]
        public decimal CalculatePriceTest(int age)
        {
            // arrange

            const decimal adultPrice = 10m;
            var priceCalculator = new PriceCalculator(adultPrice);

            // act

            decimal actualPrice = priceCalculator.CalculatePrice(age);

            // assert

            return actualPrice;
        }

Note: technically we should declare the expected results as decimals in this case, such as ExpectedResult = 0m. However, the attribute doesn’t seem to allow it. Integers work just fine.

The TestCaseSource Attribute

The [TestCase] attribute works great when you want to run the same test against a few different combinations of input data and expected results. However, it can still get very tedious for very exhaustive tests with a lot of input data.

A more fitting technique for such scenarios is to use the [TestCaseSource] attribute:

        [TestCaseSource("TestCases")]
        public decimal CalculatePriceTest(int age)
        {
            // arrange

            const decimal adultPrice = 10m;
            var priceCalculator = new PriceCalculator(adultPrice);

            // act

            decimal actualPrice = priceCalculator.CalculatePrice(age);

            // assert

            return actualPrice;
        }

The [TestCaseSource] attribute takes the name of a public static property which will provide the input data (i.e. the same data that we passed in to the [TestCase] attribute earlier). You can use this to load the data from arbitrary sources such as databases, files, etc.

There are a number of ways of working with the [TestCaseSource] attribute (refer to the documentation), but a straightforward way to work with it is to use the TestCaseData class. You can provide it with any input data as well as an expected result. For instance, say we have the following CSV file mapping age to expected price, for ages between 0 and 99:

0,0
1,0
2,0
3,0
4,0
5,5
6,5
7,5
8,5
9,5
10,5
11,5
12,5
13,5
14,5
15,5
16,10
17,10
18,10
...

We can write a property that reads this and provides the necessary test case data as follows:

        public static List<TestCaseData> TestCases
        {
            get
            {
                var testCases = new List<TestCaseData>();

                using (var fs = File.OpenRead(@"C:\test.csv"))
                using (var sr = new StreamReader(fs))
                {
                    string line = string.Empty;
                    while (line != null)
                    {
                        line = sr.ReadLine();
                        if (line != null)
                        {
                            string[] split = line.Split(new char[] { ',' },
                                StringSplitOptions.None);

                            int age = Convert.ToInt32(split[0]);
                            decimal expectedPrice = Convert.ToDecimal(split[1]);

                            var testCase = new TestCaseData(age).Returns(expectedPrice);
                            testCases.Add(testCase);
                        }
                    }
                }

                return testCases;
            }
        }

You can see the power of this approach when you run a hundred tests in the bat of an eyelid:

nunit-hundred-tests

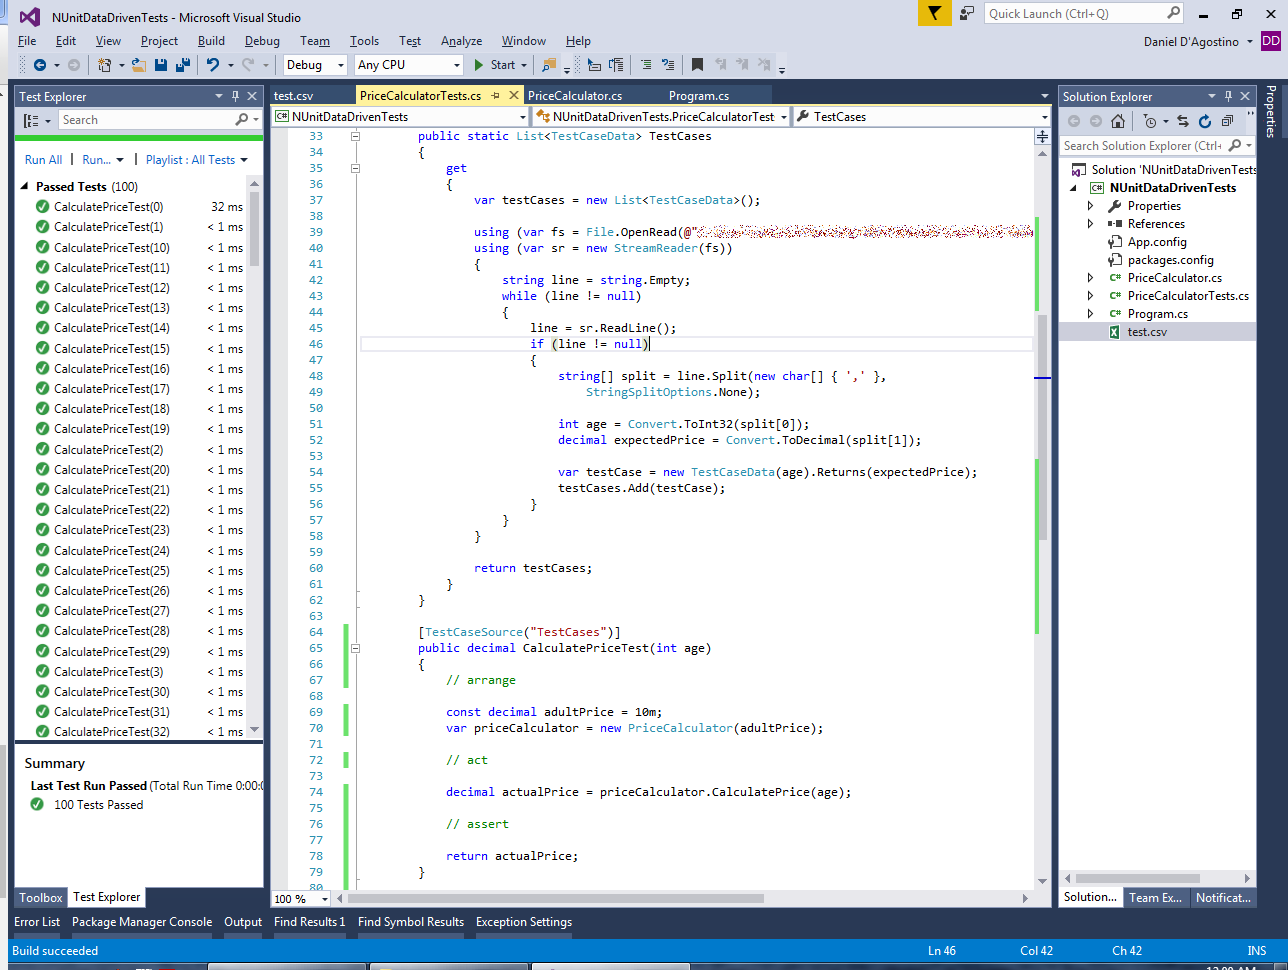
The first test takes a small performance penalty as the test data is loaded. But that’s a small price to pay for the development time saved in writing unit tests.

A Multilevel Cache Retrieval Design for .NET

Caching data is vital for high-performance web applications. However, cache retrieval code can get messy and hard to test without the proper abstractions. In this article, we’ll start an ugly multilevel cache and progressively refine it into something maintainable and testable.

The source code for this article is available at the Gigi Labs BitBucket repository.

Naïve Multilevel Cache Retrieval

A multilevel cache is just a collection of separate caches, listed in order of speed. We typically try to retrieve from the fastest cache first, and failing that, we try the second fastest; and so on.

For the example in this article we’ll use a simple two-level cache where:

We’re going to build a Web API method that retrieves a list of supported languages. We’ll prepare this data in Redis (e.g. using the command SADD languages en mt) but will leave the MemoryCache empty (so it will have to fall back to the Redis cache).

A simple implementation looks something like this:

    public class LanguagesController : ApiController
    {
        // GET api/languages
        public async Task<IEnumerable<string>> GetAsync()
        {
            // retrieve from MemoryCache

            var valueObj = MemoryCache.Default.Get("languages");

            if (valueObj != null)
                return valueObj as List<string>;
            else
            {
                // retrieve from Redis

                var conn = await ConnectionMultiplexer.ConnectAsync("localhost:6379");
                var db = conn.GetDatabase(0);
                var redisSet = await db.SetMembersAsync("languages");

                if (redisSet == null)
                    return null;
                else
                    return redisSet.Select(item => item.ToString()).ToList();
            }
        }
    }

Note: this is not the best way to create a Redis client connection, but is presented this way for the sake of simplicity.

Data Access Repositories and Multilevel Cache Abstraction

The controller method in the previous section is having to deal with cache fallback logic as well as data access logic that isn’t really its job (see Single Responsibility Principle). This results in bloated controllers, especially if we add additional cache levels (e.g. fall back to database for third-level cache).

To alleviate this, the first thing we should do is move data access logic into repositories (this is called the Repository pattern). So for MemoryCache we do this:

    public class MemoryCacheRepository : IMemoryCacheRepository
    {
        public Task<List<string>> GetLanguagesAsync()
        {
            var valueObj = MemoryCache.Default.Get("languages");
            var value = valueObj as List<string>;
            return Task.FromResult(value);
        }
    }

…and for Redis we have this instead:

    public class RedisCacheRepository : IRedisCacheRepository
    {
        public async Task<List<string>> GetLanguagesAsync()
        {
            var conn = await ConnectionMultiplexer.ConnectAsync("localhost:6379");
            var db = conn.GetDatabase(0);
            var redisSet = await db.SetMembersAsync("languages");

            if (redisSet == null)
                return null;
            else
                return redisSet.Select(item => item.ToString()).ToList();
        }
    }

The repositories each implement their own interfaces, to prepare for dependency injection which is one of our end goals (we’ll get to that later):

    public interface IMemoryCacheRepository
    {
        Task<List<string>> GetLanguagesAsync();
    }

    public interface IRedisCacheRepository
    {
        Task<List<string>> GetLanguagesAsync();
    }

For this simple example, the interfaces look almost identical. If your caches are going to be identical then you can take this article further and simplify things even more. However, I’m not assuming that this is true in general; you might not want to have a multilevel cache everywhere.

Let’s also add a new class to abstract the fallback logic:

    public class MultiLevelCache
    {
        public async Task<T> GetAsync<T>(params Task<T>[] tasks) where T : class
        {
            foreach(var task in tasks)
            {
                var retrievedValue = await task;

                if (retrievedValue != null)
                    return retrievedValue;
            }

            return null;
        }
    }

Basically this allows us to pass in a number of tasks, each corresponding to a cache lookup. Whenever a cache lookup returns null, we know it’s a cache miss, which is why we need the where T : class restriction. In that case we try the next cache level, until we finally run out of options and just return null to the calling code.

This class is async-only to encourage asynchronous retrieval where possible. Synchronous retrieval can use Task.FromResult() (as the MemoryCache retrieval shown earlier does) to conform with this interface.

We can now refactor our controller method into something much simpler:

        public async Task<IEnumerable<string>> GetAsync()
        {
            var memoryCacheRepository = new MemoryCacheRepository();
            var redisCacheRepository = new RedisCacheRepository();
            var cache = new MultiLevelCache();

            var languages = await cache.GetAsync(
                memoryCacheRepository.GetLanguagesAsync(),
                redisCacheRepository.GetLanguagesAsync()
            );

            return languages;
        }

The variable declarations will go away once we introduce dependency injection.

Multilevel Cache Repository

The code looks a lot neater now, but it is still not testable. We’re still technically calling cache retrieval logic from the controller. A cache depends on external resources (e.g. databases) and also potentially on time (if expiry is used), and that’s not good for unit tests.

A cache is not very different from the more tangible data sources (such as Redis or a database). With them it shares the function of retrieving data and the nature of relying on resources external to the application, which makes it incompatible with unit testing. A multilevel cache has the additional property that it is an abstraction for the underlying data sources, and is thus itself a good candidate for the repository pattern:

multilevel-cache-repository

We can now move all our cache retrieval logic into a new MultiLevelCacheRepository class:

    public class MultiLevelCacheRepository : IMultiLevelCacheRepository
    {
        public async Task<List<string>> GetLanguagesAsync()
        {
            var memoryCacheRepository = new MemoryCacheRepository();
            var redisCacheRepository = new RedisCacheRepository();
            var cache = new MultiLevelCache();

            var languages = await cache.GetAsync(
                memoryCacheRepository.GetLanguagesAsync(),
                redisCacheRepository.GetLanguagesAsync()
            );

            return languages;
        }
    }

Our controller now needs only talk to this repository, and carry out any necessary logic after retrieval (in this case we don’t have any):

        public async Task<IEnumerable<string>> GetAsync()
        {
            var repo = new MultiLevelCacheRepository();
            var languages = await repo.GetLanguagesAsync();
            return languages;
        }

Dependency Injection

Our end goal is to be able to write unit tests for our controller methods. A prerequisite for that is to introduce dependency injection.

Follow the instructions in “ASP .NET Web API Dependency Injection with Ninject” to set up Ninject, or use any other dependency injection framework you prefer.

In your dependency injection configuration class (NinjectWebCommon if you’re using Ninject), set up the classes and interfaces you need:

        private static void RegisterServices(IKernel kernel)
        {
            kernel.Bind<IMemoryCacheRepository>().To<MemoryCacheRepository>()
                .InSingletonScope();
            kernel.Bind<IRedisCacheRepository>().To<RedisCacheRepository>()
                .InSingletonScope();
            kernel.Bind<IMultiLevelCacheRepository>().To<MultiLevelCacheRepository>()
                .InSingletonScope();
            kernel.Bind<MultiLevelCache>().To<MultiLevelCache>()
                .InSingletonScope();
        }

Note: you can also set up an interface for MultiLevelCache if you want. I didn’t do that out of pure laziness.

Next, refactor MultiLevelCacheRepository to get the classes it needs via constructor injection:

    public class MultiLevelCacheRepository : IMultiLevelCacheRepository
    {
        private IMemoryCacheRepository memoryCacheRepository;
        private IRedisCacheRepository redisCacheRepository;
        private MultiLevelCache cache;

        public MultiLevelCacheRepository(
            IMemoryCacheRepository memoryCacheRepository,
            IRedisCacheRepository redisCacheRepository,
            MultiLevelCache cache)
        {
            this.memoryCacheRepository = memoryCacheRepository;
            this.redisCacheRepository = redisCacheRepository;
            this.cache = cache;
        }

        public async Task<List<string>> GetLanguagesAsync()
        {
            var languages = await cache.GetAsync(
                memoryCacheRepository.GetLanguagesAsync(),
                redisCacheRepository.GetLanguagesAsync()
            );

            return languages;
        }
    }

Do the same with the controller:

    public class LanguagesController : ApiController
    {
        private IMultiLevelCacheRepository repo;

        public LanguagesController(IMultiLevelCacheRepository repo)
        {
            this.repo = repo;
        }

        // GET api/languages
        public async Task<IEnumerable<string>> GetAsync()
        {
            var languages = await repo.GetLanguagesAsync();
            return languages;
        }
    }

…and make sure it actually works:

multilevel-cache-verify

Unit Test

Thanks to this design, we can now write unit tests. There is not much to test for this simple example, but we can write a simple (!) test to verify that the languages are indeed retrieved and returned:

        [TestMethod]
        public async Task GetLanguagesAsync_LanguagesAvailable_Returned()
        {
            // arrange

            var languagesList = new List<string>() { "mt", "en" };

            var memCacheRepo = new Mock<MemoryCacheRepository>();
            var redisRepo = new Mock<RedisCacheRepository>();
            var cache = new MultiLevelCache();
            var multiLevelCacheRepo = new MultiLevelCacheRepository(
                memCacheRepo.Object, redisRepo.Object, cache);
            var controller = new LanguagesController(multiLevelCacheRepo);

            memCacheRepo.Setup(repo => repo.GetLanguagesAsync())
                        .ReturnsAsync(null);
            redisRepo.Setup(repo => repo.GetLanguagesAsync())
                        .ReturnsAsync(languagesList);

            // act

            var languages = await controller.GetAsync();
            var actualLanguages = new List<string>(languages);

            // assert

            CollectionAssert.AreEqual(languagesList, actualLanguages);
        }

Over here we’re using Moq’s Mock objects to help us with setting up the unit test. In order for this to work, we need to make our GetLanguagesAsync() method virtual in the data repositories:

public virtual Task<List<string>> GetLanguagesAsync()

Conclusion

Caching makes unit testing tricky. However, in this article we have seen how we can treat a cache just like any other repository and hide its retrieval implementation details in order to keep our code testable. We have also seen an abstraction for a multilevel cache, which makes cache fallback straightforward. Where cache levels are identical in terms of data, this approach can probably be simplified even further.

On Unit Testing Private Methods

Unit tests are easy to write for methods that are publicly accessible. However, when it becomes necessary to test methods with modifiers other than public, things tend to get rather complicated. This article presents a brief overview of some of the techniques involved in achieving this.

Breaking Encapsulation

What does the book say about this particular problem? The Art of Unit Testing essentially says that it is okay to break your class’s encapsulation and expose its inner members if it makes the class testable. Quoting from Chapter 3:

“By now, you may be thinking to yourself that adding all these constructors, setters, and factories for the sake of testing is problematic. It breaks some serious object-oriented principles, especially the idea of encapsulation, which says, “Hide everything that the user of your class doesn’t need to see.” That’s our next topic. (Appendix A also deals with testability and design issues.)

“Some people feel that opening up the design to make it more testable is a bad thing because it hurts the object-oriented principles the design is based on. I can wholeheartedly say to those people, “Don’t be silly.” Object-oriented techniques are there to enforce some constraints on the end user of the API (the end user being the programmer who will use your object model) so that the object model is used properly and is protected from unforeseen ways of usage. Object orientation also has a lot to do with reuse of code and the single-responsibility principle (which requires that each class has only a single responsibility).

“When we write unit tests for our code, we are adding another end user (the test) to the object model. That end user is just as important as the original one, but it has different goals when using the model. The test has specific requirements from the object model that seem to defy the basic logic behind a couple of object-oriented principles, mainly encapsulation. Encapsulating those external dependencies somewhere without allowing anyone to change them, having private constructors or sealed classes, having nonvirtual methods that can’t be overridden: all these are classic signs of overprotective design. (Security-related designs are a special case that I forgive.) The problem is that the second end user of the API, the test, needs them as a feature in the code. I call the design that emerges from designing with testability in mind testable object-oriented design (TOOD), and you’ll hear more about TOOD in Appendix A.”

So the guy who wrote the book is basically telling us: “Don’t be silly. It’s okay to piss on the several-decade-old discipline of Object Oriented Programming if it lets us test our classes. In fact, I’m going to invent my own design that allows it.”

A twist on publicly exposing a class’s internals (which the book also mentions) is to make them internal and use InternalsVisibleTo. Although more restrictive, this practice is no less dangerous.

Breaking a class’s encapsulation and opening it up for public access defies the whole point of encapsulation: to restrict the access to certain data so that (a) it can be changed only via well-defined channels and is protected against corruption, and (b) it can be refactored without affecting lots of code that relies on it (“client code”). If a test can gain access to those internals, then so can regular code that shouldn’t be able to see it.

Update 30th January 2016: Roy Osherove, author of The Art of Unit Testing, pointed out on Twitter and in the comments below that the above-quoted information is based on the original 2006 edition of the book. From his Twitter comment:

“In the 2nd edition I strongly advise against testing private methods. This blog is based on a book from 2006.”

His comment at the bottom of this article further elaborates on this and provides a link to a list of things that have changed since the first edition.

Reflection

On the other end of the spectrum, there are those who don’t want to break encapsulation, but because of some religious obligation towards [insert test-related methodology here] they have to have 100% unit test coverage, including public methods, protected, internal, private, and even those written by Chuck Norris Jon Skeet which are pointless to test because they can be axiomatically taken to be correct.

Such people often go to great lengths in order to test their private methods, and their approach of choice usually involves Reflection. (A more recent variant is to use dynamic.) Here are some approaches I’ve seen:

While these approaches will allow you to test the internals of a class without breaking encapsulation per se, they are pretty messy and will make your tests hard to maintain.

More importantly, however, the very fact that the private members of a class need to be manipulated in order to write unit tests is often the sign of a flawed design, which brings us to…

Refactoring

So why do we need to test these class internals anyway? Actually, in principle, it’s fairly reasonable. Your class has a private helper method, say, to validate an email address. So why not write unit tests to ensure that that particular code is behaving correctly, before testing the class as a whole?

This is where the book quoted earlier kind of has a point. It is right in suggesting that sometimes our designs may be overprotective. This does not mean we should break encapsulation; it only means we should reconsider our design to ensure that we are following object oriented principles correctly.

So when we go back and look at our private email-validating method, is there really any reason why it should be locked up in a class? Is it so unreasonable for it to be taken out into its own EmailValidator class and used in other parts of the software? Does it really belong in the original class in the first place? Think Single Responsibility Principle. There’s a reason why serialization logic is usually not encapsulated in model classes, for example.

In general it should be sufficient to write unit tests against only the public interfaces of our classes, and careful design often enables this. This allows us to maintain encapsulation where it makes sense while at the same time making it unnecessary to resort to unorthodox techniques to test every last line of code, private or otherwise.

Naturally, there are exceptions to this, and sometimes particular use cases will mandate the need to unit test private methods. That’s okay, and that’s why it’s important to evaluate methodologies according to the need you have at the time. Software engineering is too young an industry for there to be hard-and-fast rules.