Category Archives: Software development

Block Selection and Column Editing

We’re all very much used to selecting text by clicking and dragging the mouse. But by pressing the Alt key while doing that, you can select a rectangular block. This feature has been around since Visual Studio 2010 – part of it even since Visual Studio 2008 – and it’s available in most modern text editors such as Notepad++. However, most people seem not to be aware of this, which is why I’m writing this article.

Let’s say you created a new Console Application in Visual Studio, and added a few variables within the Program class:

    class Program
    {
        int name;
        int age;
        int address;

        static void Main(string[] args)
        {
            
        }
    }

Oops. Main() can’t access them, because it is static, and they are not. We’re going to have to make them static as well.

Now we can add the static keyword to each variable, one by one. Or, we can place the cursor before the first int, press Alt, click and drag downwards to create a sort of blue cursor that spans multiple lines. It’s a bit hard to see, so I’ve zoomed in a bit here:

column-editing-1

With that, we’ve enabled column editing. This means that whatever you type will now be written in multiple lines:

column-editing-2

You can use this to comment lines in bulk (similar to the Ctrl+K+C or Ctrl+E+C shortcuts, depending on your editor settings):

column-editing-3

Now, column editing is actually a special case of block selection with a width of zero. To see how block editing works, let’s change our variable names to the following:

        static int personName;
        static int personAge;
        static int personAddress;

Now, due to changing requirements, we decided that these shouldn’t be called person*, but customer*. Given that the variable names are nicely aligned underneath each other, we can press Alt, click and drag around person on all three lines, and we’ve made a block selection:

block-selection-1

Press Backspace to remove person from all three lines. The block collapses to zero width, so we’re back to column editing, and we can now easily write customer on all three lines:

block-selection-2

So there you go. Block selection and column editing are nothing new, but they’re very handy and good to know about.

A Gentle Introduction to Gulp

We’re at the end of 2015, and web technology has changed quite  a bit since I started in 2002. Nowadays, for the front end stuff, there is a whole family of tools based on the node.js package manager (npm) that you can use to streamline and automate your workflow.

In this article (based on Windows), we’ll learn to use Gulp to do routine tasks such as concatenating and minifying JavaScript tasks. There’s another tool called Grunt with a similar purpose, and you’ll find all sorts of discussions on the internet comparing Grunt vs Gulp. Basically, Grunt is the older of the two and has a bigger community – an important factor considering that these tools are plugin-driven. However, I’m covering Gulp here as I felt it was more intuitive. For this small demonstration it has all the plugins we need, and performance (a common point of comparison) isn’t even a factor.

Setting up Gulp

The first thing we need is to install node.js:

install-nodejs

There’s a chance you might already have node.js, if you installed it with Visual Studio 2015.

Once you have installed node.js, you should have npm in your path. Open a command prompt, and install Gulp using the following command:

npm install gulp -g

-g means globally, and thanks to this, gulp should now be in your path.

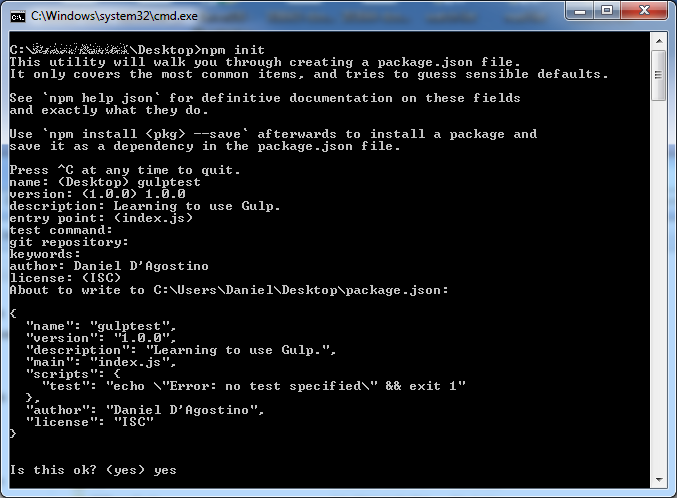
Next, we want to create a package.json file. This is a kind of project file for node.js-related stuff. We can use npm for this too:

npm init

npm will ask a bunch of questions in order to set up the package.json file, suggesting possible answers where it makes sense to do so. name and version are required, but you can leave the rest empty if you like:

npm-init

Next, we need to install Gulp locally in our project:

npm install gulp --save-dev

This installs Gulp; –save-dev updates the package.json with a devDependencies field:

{
  "name": "gulptest",
  "version": "1.0.0",
  "description": "Learning to use Gulp.",
  "main": "index.js",
  "scripts": {
    "test": "echo \"Error: no test specified\" && exit 1"
  },
  "author": "Daniel D'Agostino",
  "license": "ISC",
  "devDependencies": {
    "gulp": "^3.9.0"
  }
}

Plugins and the Gulp file

Gulp itself doesn’t do anything; it is just configured to run tasks. Its capabilities come from the plugins you install, and you configure it to do stuff using a Gulp file. For this simple example, we’re just going to use a few plugins:

npm install gulp-concat gulp-uglify --save-dev

Once again, –save-dev updates your devDependencies in package.json:

  "devDependencies": {
    "gulp": "^3.9.0",
    "gulp-concat": "^2.6.0",
    "gulp-uglify": "^1.5.1"
  }

Next, create a file called gulpfile.js, and put the following code in it:

var gulp = require('gulp'),
    uglify = require('gulp-uglify'),
    concat = require('gulp-concat');
    
gulp.task('default', function() {
  return gulp.src('js/*.js')
    .pipe(concat('all.js'))
    .pipe(gulp.dest('dist/'));
});

To test this out, I downloaded jquery and jquery-ui, and put the uncompressed Javascript files in a “js” folder. Having created the Gulpfile above, all you need is to run Gulp:

gulp

You should find a folder called dist, with a file called all.js in it, containing the contents of the files originally in the js folder:

gulp-concat

Concatenating JavaScript is good for performance because the browser only needs to make a single request, rather than having to retrieve several small files. But we can do even better by minifying the JavaScript (using the gulp-uglify plugin). Just add the following line:

var gulp = require('gulp'),
    uglify = require('gulp-uglify'),
    concat = require('gulp-concat');
    
gulp.task('default', function() {
  return gulp.src('js/*.js')
    .pipe(concat('all.js'))
    .pipe(uglify())
    .pipe(gulp.dest('dist/'));
});

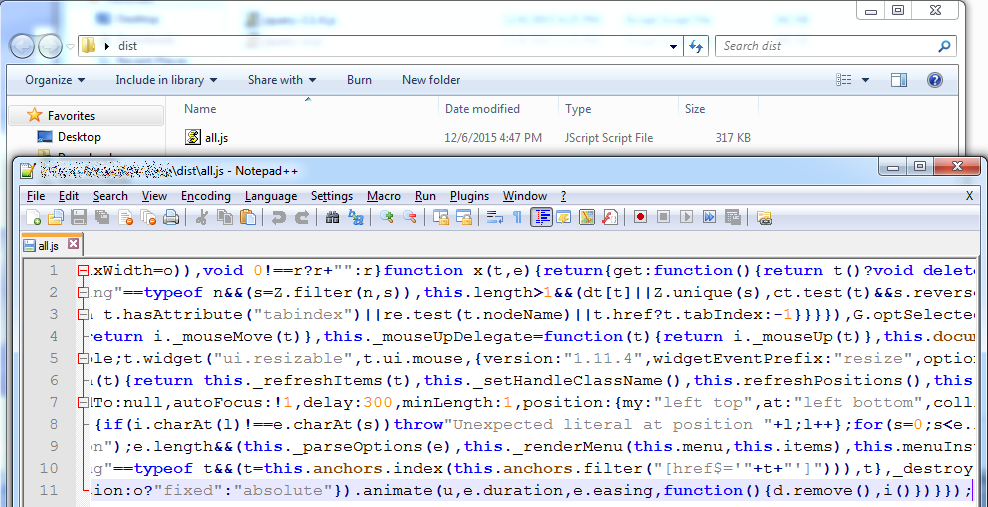
Run Gulp again, and you’ll find that all.js has been updated. In fact, it’s much smaller now, and it’s completely illegible:

gulp-uglify

Conclusion and Further Reading

The purpose of this article was to get you set up with Gulp, and see something working with the least possible hassle. Mark Goodyear’s article (on which this article is partly based) covers a lot of other common operations to carry out with Gulp. If you need to do anything particular – linting your JavaScript files, minifying your CSS, using Less, etc, there’s probably a plugin for it.

Beyond that, all you need to know is how to use Gulp effectively as part of your build process.

  • Running Gulp without arguments makes it look for the “default” task. You can pass the name of a task to run as an argument, allowing you to run a variety of operations.
  • How do you debug your minified JavaScript? You don’t. Use separate tasks for development and for release, and minify only in your release task.
  • Ideally these tasks should be run automatically as part of your continuous integration.
  • An ASP .NET 5 (formerly known as vNext) project in Visual Studio 2015 can easily integrate with npm tools, and you can configure it to run your tasks when you build.
  • Not using Windows? These command line tools are easy to use on other platforms (although installing npm will obviously be different).

Update 8th January 2016: Check out “More Gulp in Practice“, the followup to this article.

ASP .NET Web API Dependency Injection with Ninject

In this article, we’re going to set up dependency injection in a new ASP .NET Web API project, using Ninject as our IoC container.

For starters, do the following:

  1. Create a new Web API project.
  2. Install the Ninject.Web.WebApi NuGet package.
  3. Install the Ninject.Web.WebApi.WebHost NuGet package.

Since I need an injectable service to demonstrate this with, I’m also going to install my very own .NET Settings Framework via the Dandago.Settings NuGet package.

When you installed Ninject.Web.WebApi.WebHost, it added a NinjectWebCommon.cs class under the App_Start folder:

ninjectwebapi-ninjectwebcommon

Ignore the boilerplate crap and look for the RegisterServices() method. There, you can set up your dependencies. In my case, it looks like this (needs namespace Dandago.Settings):

        /// <summary>
        /// Load your modules or register your services here!
        /// </summary>
        /// <param name="kernel">The kernel.</param>
        private static void RegisterServices(IKernel kernel)
        {
            kernel.Bind<IConfigKeyReader>().To<AppSettingReader>();
            kernel.Bind<IConfigKeyProvider>().To<ConfigKeyProvider>();
        }     

Great! Now, let’s test it. Find ValuesController and at the following code at the beginning:

        private int x;

        public ValuesController(IConfigKeyProvider configKeyProvider)
        {
            this.x = configKeyProvider.Get<int>("x", 5);
        }

Run it, and we should hit the breakpoint when going to /api/values:

ninjectwebapi-breakpointhit

It’s working, and that’s all you need.

In case it wasn’t that smooth, however, here are a couple of things that might have gone wrong.

ninjectwebapi-parameterless-constructor

If you’re getting the above error complaining about not having a parameterless public constructor, then you probably forgot to install the Ninject.Web.WebApi.WebHost package.

ninjectwebapi-activationexception

If on the other hand you went ahead and installed Ninject.Web.WebApi.WebHost first, that brings in an older version of the Ninject.Web.WebApi package, causing the above ActivationException. The solution is to upgrade Ninject.Web.WebApi.

Unity3D: Moving an Object with Keyboard Input

This is an updated version of the article originally posted on 24th May 2013 at Programmer’s Ranch. The original article used Unity 4.1.3f3, MonoDevelop, and 3D settings (2D in Unity didn’t exist back then), on Windows XP. This updated article uses Unity 5.2.2f1, Visual Studio 2015, and 2D settings, on Windows 10. Parts of the article have been rewritten, and syntax highlighting has been added.

The Unity3D game development engine has gained a lot of popularity in recent years. It supports various target operating systems, can be scripted in various languages, has a large community, and is always evolving. In this article, we’ll see how we can set up a simple project and have the player move an object by pressing the arrow keys on the keyboard.

The first thing you will need to do is to download and install Unity from their website. Once you’ve installed it and gone through the initial registration screens, you can opt to create a new project:

unity3d-input-startup

Click on the “New” button (shown in the image above). Here, you can choose the name and location of your new project, as well as whether to use 3D or 2D settings. For this particular article it doesn’t matter; the original article used 3D settings, while for this updated version I’ve done everything using 2D settings.

unity3d-input-newproject

Once you click “Create project“, your project will open in the Unity IDE.

From the GameObject menu, select 3D Object -> Cube to place a cube into the game world:

unity3d-input-create-cube

The cube will now be listed in the Hierarchy section – this section shows you a list of objects in your game world. You can also see the objects in the game world itself, in the left portion of the screen. If you click on the cube, you can see and manipulate its properties (e.g. position in the game world) in the Inspector:

unity3d-input-cube-properties

Right click on the Assets panel inside the Project section, and create a new C# script:

unity3d-input-create-cs-script

The script appears under Assets. Call the script “Movement“. Then, double-click the script to edit it. This will launch an external editor, probably MonoDevelop or Visual Studio:

unity3d-input-visual-studio

In the Update() method, add the following code:

if (Input.GetKeyDown(KeyCode.LeftArrow))
{
    Vector3 position = this.transform.position;
    position.x--;
    this.transform.position = position;
}

What are we doing here? In Unity, you can attach scripts to objects in order to make them do stuff. In our case, we will attach this script to the cube to be able to move it with the arrow keys.

The “this” in a Unity script refers to the object that the script is attached to (e.g. the cube). Each object has a transform property, which contains stuff like its position in the world. The position consists of a Vector3 which contains the x-, y- and z-coordinates of the object in the world.

The code above simply makes the object move left when the left arrow key is pressed, by varying the x-coordinate of the object’s position. While it would normally make sense to modify x directly, you can’t do that in Unity.

In the external editor, build the project to make sure it compiles (F8 in MonoDevelop, or Ctrl+Shift+B in Visual Studio). Then, switch back to Unity. Drag the Movement script onto the Cube object in the Hierarchy section. Once you click on the Cube in the Hierarchy section, you should see the Movement script in the Inspector:

unity3d-input-attached-script

Now, Press the Play button at the top of the Unity interface to start playing. The world view changes into an interactive rendering of the game:

unity3d-input-run-start

Test the game by pressing the Left Arrow key. Doing this should move the cube to the left:

unity3d-input-run-moved

Press the Play button again to stop the game. In the external editor, update the code to handle movement in all four directions:

if (Input.GetKeyDown(KeyCode.LeftArrow))
{
    Vector3 position = this.transform.position;
    position.x--;
    this.transform.position = position;
}
if (Input.GetKeyDown(KeyCode.RightArrow))
{
    Vector3 position = this.transform.position;
    position.x++;
    this.transform.position = position;
}
if (Input.GetKeyDown(KeyCode.UpArrow))
{
    Vector3 position = this.transform.position;
    position.y++;
    this.transform.position = position;
}
if (Input.GetKeyDown(KeyCode.DownArrow))
{
    Vector3 position = this.transform.position;
    position.y--;
    this.transform.position = position;
}

Press Play again in Unity to test it. Note that the cube returned to its original position. That is because each time you press Play, a new session is started with all objects having their default values.

So in this article, we have learned a few things about the Unity IDE, and we wrote a small script to move a cube in the game world. The intention was to get something working as quickly as possible, giving the reader a feel of working with Unity3D, while leaving details for other articles.

Pasting JSON/XML as Classes in Visual Studio

Note: This feature is available as from Visual Studio 2015.

REST and JSON together have revolutionised the way we expose and consume data in recent years. For this reason it has become increasingly common to need to integrate with REST services, and data itself is provided in either XML or JSON format. This typically involves creating a set of classes that match the data provided by the service, so that the application may take care of serialisation and deserialisation, and work with structured data.

Although you can create these data classes manually, Visual Studio provides a shortcut to generate classes from XML or JSON data. For instance, let’s say that we want to work with the data from the GitHub API:

github-api

We can easily generate a class for this by copying that data, and in Visual Studio going into Edit -> Paste Special -> Parse JSON As Classes:

paste-json-as-classes

And as if by magic, the following class gets generated:

        public class Rootobject
        {
            public string current_user_url { get; set; }
            public string current_user_authorizations_html_url { get; set; }
            public string authorizations_url { get; set; }
            public string code_search_url { get; set; }
            public string emails_url { get; set; }
            public string emojis_url { get; set; }
            public string events_url { get; set; }
            public string feeds_url { get; set; }
            public string followers_url { get; set; }
            public string following_url { get; set; }
            public string gists_url { get; set; }
            public string hub_url { get; set; }
            public string issue_search_url { get; set; }
            public string issues_url { get; set; }
            public string keys_url { get; set; }
            public string notifications_url { get; set; }
            public string organization_repositories_url { get; set; }
            public string organization_url { get; set; }
            public string public_gists_url { get; set; }
            public string rate_limit_url { get; set; }
            public string repository_url { get; set; }
            public string repository_search_url { get; set; }
            public string current_user_repositories_url { get; set; }
            public string starred_url { get; set; }
            public string starred_gists_url { get; set; }
            public string team_url { get; set; }
            public string user_url { get; set; }
            public string user_organizations_url { get; set; }
            public string user_repositories_url { get; set; }
            public string user_search_url { get; set; }
        }

Now, the class and property names might not be exactly the way you want them, and you might need to change some things, but this will still save you a lot of typing.

If you’re still not convinced, try it with a more complex example that involves nested data structures. For instance, let’s say we have this JSON data:

{
	"name" : "John Smith",
	"summary" : "Wannabe Superhero",
	"workexperience" : [{
			"title" : "Insurance Guy",
			"company" : "ABC Ltd.",
			"start" : "Feb 2015",
			"description" : "Current job, very bad"
		}, {
			"title" : "Cleaning Guy",
			"company" : "Super Clean Ltd.",
			"start" : "Jan 2013",
			"end" : "Jan 2015",
			"description" : "Dirty work",
			"recommendations" : [{
					"name" : "Boss guy",
					"position" : "Boss"
				}, {
					"name" : "Colleague girl",
					"position" : "Cleaning Girl"
				}
			]
		}
	]
}

With no effort whatsoever, you can get these classes generated for you:

        public class Rootobject
        {
            public string name { get; set; }
            public string summary { get; set; }
            public Workexperience[] workexperience { get; set; }
        }

        public class Workexperience
        {
            public string title { get; set; }
            public string company { get; set; }
            public string start { get; set; }
            public string description { get; set; }
            public string end { get; set; }
            public Recommendation[] recommendations { get; set; }
        }

        public class Recommendation
        {
            public string name { get; set; }
            public string position { get; set; }
        }

And there’s a similar function for XML.

You’re welcome.