Category Archives: Software development

ASP .NET 5 Application Configuration, Part 1

ASP .NET 5 moves away from the traditional web.config for storing application configuration. Instead, the configuration itself is configurable, and developers may use a combination of different sources. Support for JSON, XML, INI, environment variables, command-line arguments and in-memory configuration are all available. It is also possible to specify custom configuration sources.

Using JSON Configuration

ASP .NET 5 supports a number of different formats for application settings. The preferred format is JSON. In Visual Studio, you can add a new ASP.NET Configuration File, which by default is called appsettings.json:

aspnet5-add-appsettings.json

Let’s keep things simple for now, so throw out the default contents of appsettings.json and replace them with the following instead:

{
  "title": "My Brand New Website",
  "subtitle": "The one and only"
}

In Startup.cs, we need to set up our configuration. We do this thanks to ConfigurationBuilder as follows:

        private IConfiguration Configuration { get; set; }

        public void ConfigureServices(IServiceCollection services)
        {
            var configurationBuilder = new ConfigurationBuilder();
            configurationBuilder.AddJsonFile("appsettings.json");
            Configuration = configurationBuilder.Build();
        }

We’ll see more about the capabilities of ConfigurationBuilder shortly, but for now, all we need is JSON support. In this simple example, since we’re going to use configuration directly within the Startup class, we’re putting our configuration in a Configuration property within the same class. Normally, however, we would set up our configuration in the application’s dependency injection so that it can be used elsewhere. We’ll see how to do that later, too.

Now, we just have to actually use that configuration:

        public void Configure(IApplicationBuilder app)
        {
            app.UseIISPlatformHandler();

            app.Run(async (context) =>
            {
                var title = this.Configuration["title"];
                var subtitle = this.Configuration["subtitle"];
                string output = $"<h1>{title}</h1><h2>{subtitle}</h2>";

                await context.Response.WriteAsync(output);
            });
        }

Don’t understand the funny $ syntax? That’s string interpolation, a new feature in C# 6.

Here’s the output:

aspnet5-example-json-config

Using XML Configuration

XML configuration isn’t going away anytime soon. And although it’s supported by official packages, it’s not so out-of-the-box as many sources claim. To enable XML configuration support, you need to add a NuGet package to your project.json dependencies:

  "dependencies": {
    "Microsoft.AspNet.IISPlatformHandler": "1.0.0-rc1-final",
    "Microsoft.AspNet.Server.Kestrel": "1.0.0-rc1-final",
    "Microsoft.Extensions.Configuration.Xml": "1.0.0-rc1-final"
  },

Once that is done, a new extension method is available for ConfigurationBuilder that you can use:

        public void ConfigureServices(IServiceCollection services)
        {
            var configurationBuilder = new ConfigurationBuilder();
            configurationBuilder.AddXmlFile("appsettings.xml");
            Configuration = configurationBuilder.Build();
        }

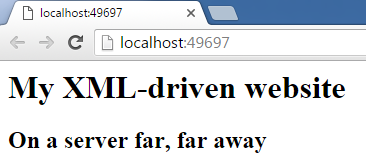
As an example, I’m going to use the following XML file, named appsettings.xml:

<root>
  <title>My XML-driven website</title>
  <subtitle>On a server far, far away</subtitle>
</root>

Without changing the code we added to Configure() in the previous section, here’s the result:

aspnet5-example-xml-config

Using INI Configuration

ASP .NET 5 also supports a simple, medieval configuration format called INI files. Like with XML, these don’t come right out of the box, and you need to add the necessary NuGet package to your project.json‘s dependencies to support them:

  "dependencies": {
    "Microsoft.AspNet.IISPlatformHandler": "1.0.0-rc1-final",
    "Microsoft.AspNet.Server.Kestrel": "1.0.0-rc1-final",
    "Microsoft.Extensions.Configuration.Xml": "1.0.0-rc1-final",
    "Microsoft.Extensions.Configuration.Ini": "1.0.0-rc1-final"
  },

To see this in action, we need an example INI file, which we will call appsettings.ini, and which will contain the following:

title=Another format!
subtitle=They never end

And as with XML, we need to slightly change our configuration code:

        public void ConfigureServices(IServiceCollection services)
        {
            var configurationBuilder = new ConfigurationBuilder();
            configurationBuilder.AddIniFile("appsettings.ini");
            Configuration = configurationBuilder.Build();
        }

Once again, this works wonderfully:

aspnet5-example-ini-config

Environment Variables

Environment variables can also be used as a source for application settings. We can set things up to actually get our application settings from the environment variables:

        public void ConfigureServices(IServiceCollection services)
        {
            var configurationBuilder = new ConfigurationBuilder();
            configurationBuilder.AddEnvironmentVariables();
            Configuration = configurationBuilder.Build();
        }

For demonstration purposes, we’ll use an existing environment variable. Adding new ones probably requires a restart. Let’s modify our serving code a little:

        public void Configure(IApplicationBuilder app)
        {
            app.UseIISPlatformHandler();

            app.Run(async (context) =>
            {
                var dnxHome = this.Configuration["DNX_HOME"];
                string output = $"<p>{dnxHome}</p>";

                await context.Response.WriteAsync(output);
            });
        }

Here’s the output:

aspnet5-example-env-config-1

If you don’t want all your environment variables to be accessible to the application, you can specify a prefix that environment variables need to start with. For instance, if I specify “DNX_” as the prefix, then I should get access to “DNX_HOME”, but not to “TMP”. In this case, we specify the prefix in AddEnvironmentVariables(), but omit it when accessing the application setting:

        public void ConfigureServices(IServiceCollection services)
        {
            var configurationBuilder = new ConfigurationBuilder();
            configurationBuilder.AddEnvironmentVariables("DNX_");
            Configuration = configurationBuilder.Build();
        }

        public void Configure(IApplicationBuilder app)
        {
            app.UseIISPlatformHandler();

            app.Run(async (context) =>
            {
                var dnxHome = this.Configuration["HOME"];
                string output = $"<p>{dnxHome}</p>";

                await context.Response.WriteAsync(output);
            });
        }

The output is still the same as before:

aspnet5-example-env-config-2

But this time, the application doesn’t have access to all the environment variables in the system:

aspnet5-example-env-config-4

The contents of the above screenshot are a bit of a surprise, actually. On my system, “DNX_HOME” is the only environment variable starting with “DNX_”. I assume all the rest are created as part of the DNX runtime environment when the application is run.

In-Memory Configuration

At the time of writing this article, the official docs about ASP .NET 5 Configuration show a MemoryConfigurationSource class which can be used to get and set application settings on the fly in code. The page says it requires Microsoft.Framework.ConfigurationModel.

My guess is that the documentation is out of date, because the latest packages are all like Microsoft.Extensions.* and the latest version of Microsoft.Framework.ConfigurationModel is beta 4. I haven’t been able to locate the replacement package for this.

Update 10th January 2016: The ASP .NET documentation has been updated just a few days ago for RC1 (about time), and it turns out that what used to be MemoryConfigurationSource is now called MemoryConfigurationProvider. The rest of this section has been added in light of this.

It is possible to create configuration settings entirely in memory. For this, we create a MemoryConfigurationProvider, and either pass initial configuration data in the constructor or call its Set() method to add a key/value pair. Here’s a simple example:

        public void ConfigureServices(IServiceCollection services)
        {
            var configurationBuilder = new ConfigurationBuilder();

            var memConfig = new MemoryConfigurationProvider();
            memConfig.Set("name", "Joe");

            configurationBuilder.Add(memConfig);
            Configuration = configurationBuilder.Build();
        }

We can test this as follows:

        public void Configure(IApplicationBuilder app)
        {
            app.UseIISPlatformHandler();

            app.Run(async (context) =>
            {
                await context.Response.WriteAsync($"Hello {Configuration["name"]}!");
            });
        }

Here’s the result:

aspnet5-config-memory

Command-Line Arguments

ConfigurationBuilder provides a method which can be used to build configuration based on command-line arguments:

            configurationBuilder.AddCommandLine(args);

This is demonstrated in the ASP .NET 5 Configuration official documentation using a console application.

It is not clear how this would work for a web application. Whenever I try to run the web application, whether from VS2015 or using the command line tools, Main() does not get invoked, and control goes directly to ConfigureServices(), which knows nothing about the command line arguments.

Hierarchical Retrieval

One of the advantages of the new ASP .NET 5 Configuration model is that you can organize your application settings into hierarchies. If we go back to the JSON example and add back the default appsettings.json file generated by Visual Studio, we get this:

{
    "Data": {
        "DefaultConnection": {
            "ConnectionString": "Server=(localdb)\\MSSQLLocalDB;Database=_CHANGE_ME;Trusted_Connection=True;"
        }
    }
}

We can retrieve inner settings using a colon syntax such as this:

                var connStr = this.Configuration["Data:DefaultConnection:ConnectionString"];

Let’s change our Configure() code to use the new setting:

        public void Configure(IApplicationBuilder app)
        {
            app.UseIISPlatformHandler();

            app.Run(async (context) =>
            {
                var connStr = this.Configuration["Data:DefaultConnection:ConnectionString"];
                string output = $"<pre>{connStr}</pre>";

                await context.Response.WriteAsync(output);
            });
        }

And here’s the result:aspnet5-example-hierarchical-config

Combining Configurations

So far we have seen one configuration source at a time to keep things simple. But as a matter of fact, you can specify multiple sources for your application settings. The order is important, because sources specified later will override settings also found in sources specified earlier. For example, let’s say we have:

        public void ConfigureServices(IServiceCollection services)
        {
            var configurationBuilder = new ConfigurationBuilder();
            configurationBuilder.AddIniFile("appsettings.ini")
                                .AddEnvironmentVariables("DNX_");
            Configuration = configurationBuilder.Build();
        }

        public void Configure(IApplicationBuilder app)
        {
            app.UseIISPlatformHandler();

            app.Run(async (context) =>
            {
                var home = this.Configuration["HOME"];
                var work = this.Configuration["WORK"];
                string output = $"<p>Home: {home}</p><p>Work: {work}</p>";

                await context.Response.WriteAsync(output);
            });
        }

Our environment variables contain a “DNX_HOME”. As before, since we’re using a “DNX_” prefix, getting the “HOME” setting actually retrieves “DNX_HOME”. Now, let’s say our appsettings.ini file contains the following:

HOME=Where the heart is
WORK=Where the fun is

Here’s what we get:

aspnet5-configuration-combined-example

What happened here? The “HOME” setting taken from our environment variables has overwritten that in the INI file. However, the “WORK” setting was taken from the INI file because there is none specified in the environment variables.

Summary

In this article, we have seen how we can work with simple application settings in ASP .NET 5. JSON, XML, INI and environment variables are all viable configuration sources to use. In-memory configuration and command-line parameters are a bit more obscure at the time of writing this article.

Additionally, thanks to a more complex configuration model, we can retrieve settings from a hierarchy, and we can combine settings from various sources. Remember: the later ones take precedence!

In Part 2, we will go beyond simple setting retrieval, and learn more complex ways to work with settings in a real-world application.

ASP .NET 5 Preview: Serving Static Files

One of the most basic features of just about any non-trivial web application is that of serving static files.  Typically, a browser will request all kinds of files: HTML documents, JavaScript files, images, etc.

In ASP .NET 5, the root of the website is (by default) a folder called wwwroot. Any files to be served by the web application should be placed within this folder. However, the ability to serve static files doesn’t come out of the box. To support static files, you need to add the Microsoft.AspNet.StaticFiles NuGet package to your project.json:

  "dependencies": {
    "Microsoft.AspNet.IISPlatformHandler": "1.0.0-rc1-final",
    "Microsoft.AspNet.Server.Kestrel": "1.0.0-rc1-final",
    "Microsoft.AspNet.StaticFiles": "1.0.0-rc1-final",
  },

Then, in your Configure() method (Startup.cs), call UseStaticFiles():

        public void Configure(IApplicationBuilder app)
        {
            app.UseIISPlatformHandler();
            
            app.UseStaticFiles();

            app.Run(async (context) =>
            {
                await context.Response.WriteAsync("Hello World!");
            });
        }

Rebuild and run your application:

dnu restore
dnu build
dnx web

…and you can now retrieve files:

aspnet5-staticfiles-text

If you go to the root of the URL, though, you’ll notice that your index.html doesn’t get retrieved unless you request it explicitly:

aspnet5-staticfiles-nodefault

That “Hello World” is coming from the end of the pipeline we defined in Configure(), because UseStaticFiles() doesn’t know what to return if we don’t specify a file that exists. We can sort this out by calling UseDefaultFiles():

        public void Configure(IApplicationBuilder app)
        {
            app.UseIISPlatformHandler();
            
            app.UseDefaultFiles();
            app.UseStaticFiles();

            app.Run(async (context) =>
            {
                await context.Response.WriteAsync("Hello World!");
            });
        }

UseDefaultFiles() will look for typical default files such as index.html, default.html, etc. It must be declared before UseStaticFiles(), or it won’t work. We now get our default page:

aspnet5-staticfiles-withdefault

If you want to show a directory listing for folders with no such default files, call UseDefaultFiles() (note: again, order is important):

        public void Configure(IApplicationBuilder app)
        {
            app.UseIISPlatformHandler();
            
            app.UseDefaultFiles();
            app.UseDirectoryBrowser();
            app.UseStaticFiles();

            app.Run(async (context) =>
            {
                await context.Response.WriteAsync("Hello World!");
            });
        }

Our root still serves the default index.html, but when navigating to the images folder, we are presented with a directory listing:

aspnet5-staticfiles-dirlisting

You can also achieve what we have done so far using the UseFileServer() method. Refer to the official documentation on static files to learn how to use UseFileServer(), and for additional configuration options provided by the features we have seen so far.

ASP .NET 5 Preview: Hello World with Yeoman

ASP.NET 5 (formerly known as ASP .NET vNext) is the next generation of ASP .NET, still in a prerelease state. At the time of writing, the current runtime version is 1.0.0-rc1-update1, and ASP .NET 5 is set to launch in Q1 2016. The APIs seen here may change in the time leading up to that release; in fact, this article is written precisely to address recent API changes.

ASP .NET 5 is a game changer, and everything we’ve learned in ASP .NET so far no longer applies. In this article, we’ll see how to do a basic “Hello World” with ASP .NET 5. This usually sounds like something easy, but given that things are changing pretty quickly (even fundamental things such as the IIS hosting model), it’s not. In fact, I would have liked to say you can create a new project in Visual Studio and select the “Empty” ASP .NET 5 Preview Template:

aspnet5-empty-preview-template

Unfortunately, however, these templates are so outdated that they no longer work. Starting with these and getting them to work is an exercise in frustration. Fortunately, however, there’s an alternative way to easily set up an ASP .NET 5 project. And, surprise surprise, it does not involve Visual Studio.

Update 27th December 2015: If you do want to use the latest Visual Studio templates, install Visual Studio 2015 Update 1 as well as the latest ASP .NET 5 Release Candidate.

Yeoman provides a tool called yo, which allows you to create a new web application from various different templates. Nowadays, with so many tools and technologies, it is sometimes difficult to piece things together. You can use yo and its generators to set up a web application with the bits and pieces you need without much effort. For example:

  • Want to create an AngularJS Single-Page App (SPA)? No problem, there’s a generator for that.
  • Want to create an ASP .NET MVC application? No problem, there’s a generator for that.
  • Want to create an ASP .NET 5 empty application? No problem, there’s a generator for that too.
  • Want a full rack of barbecue ribs with fries? I don’t think there’s a generator for that, but perhaps someone may write one someday.

Like various other web tools, yo and its generators require npm, the node.js package manager. You will first need to install node.js, and npm comes packaged with it. You can then install yo by running the following command from the command prompt:

npm install -g yo

In order to generate a web application template, yo relies on plugins, called generators. At the time of writing, there are several generators for ASP .NET 5, but generator-aspnet is the only one that’s up to date. Let’s also install it using the following command:

npm install -g generator-aspnet

With that done, we can now generate our ASP .NET project. You can either invoke yo and do it interactively:

yeoman-interactive-2

…or just invoke the following command:

yo aspnet

You will then be asked a few questions that allow you to configure your ASP .NET 5 project. For starters, we’ll create an Empty Application:

aspnet5-yeoman-application-type

You will then be asked for the name of your application, after which the web app skeleton will be generated, and you will be told the commands you need to build and run it:

aspnet5-yeoman-application-generated

Before we run these commands, let’s take a second to see what our project actually contains. The files we care about are Startup.cs

using System;
using System.Collections.Generic;
using System.Linq;
using System.Threading.Tasks;
using Microsoft.AspNet.Builder;
using Microsoft.AspNet.Hosting;
using Microsoft.AspNet.Http;
using Microsoft.Extensions.DependencyInjection;

namespace myapp
{
    public class Startup
    {
        // This method gets called by the runtime. Use this method to add services to the container.
        // For more information on how to configure your application, visit http://go.microsoft.com/fwlink/?LinkID=398940
        public void ConfigureServices(IServiceCollection services)
        {
        }

        // This method gets called by the runtime. Use this method to configure the HTTP request pipeline.
        public void Configure(IApplicationBuilder app)
        {
            app.UseIISPlatformHandler();

            app.Run(async (context) =>
            {
                await context.Response.WriteAsync("Hello World!");
            });
        }

        // Entry point for the application.
        public static void Main(string[] args) => Microsoft.AspNet.Hosting.WebApplication.Run<Startup>(args);
    }
}

…and project.json:

{
  "version": "1.0.0-*",
  "compilationOptions": {
    "emitEntryPoint": true
  },
  "tooling": {
    "defaultNamespace": "myapp"
  },

  "dependencies": {
    "Microsoft.AspNet.IISPlatformHandler": "1.0.0-rc1-final",
    "Microsoft.AspNet.Server.Kestrel": "1.0.0-rc1-final"
  },

  "commands": {
    "web": "Microsoft.AspNet.Server.Kestrel"
  },

  "frameworks": {
    "dnx451": { },
    "dnxcore50": { }
  },

  "exclude": [
    "wwwroot",
    "node_modules"
  ],
  "publishExclude": [
    "**.user",
    "**.vspscc"
  ]
}

Now, in order to proceed, you need to have the DNX tools (dnu, dnvm and dnx). If you don’t have them, you can get them when you install Visual Studio 2015, or by following the instructions on the ASP .NET 5 Github page. You may also need to upgrade to the latest runtimes (use dnvm list to check what you’re using, dnvm upgrade to get the latest, and dnvm use <runtime> to switch to the latest) – learning to use the DNX tools is beyond the scope of this article.

Once you have DNX in place, you can run the commands suggested by the aspnet generator earlier. First, cd into the application directory:

cd myapp

Then, run the following command to restore packages (essentially works like NuGet):

dnu restore

You can now build the web application using the following command:

dnu build

Finally, the following command runs the application. You’ll notice that web is actually one of the commands defined in the project.json we saw earlier.

dnx web

aspnet5-dnx-web

As shown in the screenshot above, the web application is hosted at localhost:5000 by default. Indeed, we can confirm that this works by going there:

aspnet5-helloworld

The output we see comes from Startup.cs as we have seen earlier:

        public void Configure(IApplicationBuilder app)
        {
            app.UseIISPlatformHandler();

            app.Run(async (context) =>
            {
                await context.Response.WriteAsync("Hello World!");
            });
        }

The Configure() method allows us to set up our web application pipeline. In here, we define any middleware we need. For example, if we want to use MVC, then we set it up here; but ASP .NET 5 does not assume that any such infrastructure is required by default. In this case, we are always giving a fixed response.

This is as far as I’m going to go with this little “Hello World” setup for ASP .NET 5. We haven’t even begun to see how different ASP .NET 5 is from the ASP .NET we have known so far. But hopefully, this article will save you a lot of frustration in setting things up until the tooling in Visual Studio 2015 catches up.

Messing Around with Tesseract OCR in .NET

This article describes software I’m not really familiar with. Take this with a pinch of salt. For all I know, tomorrow I may realize the error of my ways and change my tune.

I recently found out that there’s this open-source OCR software called Tesseract, and decided to give it a try. I’m going to show you how you can set up something really quickly, and some initial results I’ve seen.

First, install Tesseract via NuGet:

tesseract-nuget

Second, to use Tesseract’s OCR facility, you need some language data, which Tesseract provides. Go to the tessdata project and download it. Technically, you only need the files starting with eng* if you’re going to OCR English text. If you download the whole repo, be patient – it’s a few hundred megabytes zipped. Make sure you put the files in a folder called tessdata, or it won’t work.

Third, get yourself some test images you can feed to the OCR. You can find some online, or scan something from a book.

Fourth, you’ll need to add a reference to System.Drawing, because the Tesseract package depends on the Bitmap class:

tesseract-system.drawing

Finally, we can get some code in. Let’s use this (needs using Tesseract;):

        static void Main(string[] args)
        {
            Console.Title = "Trying Tesseract";

            const string tessDataDir = @"tessdata";
            const string imageDir = @"image.png";

            using (var engine = new TesseractEngine(tessDataDir, "eng", EngineMode.Default))
            using (var image = Pix.LoadFromFile(imageDir))
            using (var page = engine.Process(image))
            {
                string text = page.GetText();
                Console.WriteLine(text);
                Console.ReadLine();
            }
        }

This is enough to set up Tesseract, load a file from disk, and OCR it (convert it from image to text). It may take a few seconds for the processing to happen. Now, you may be wondering what a Pix class is, or what is a page. And I’m afraid I can’t quite answer that, because there doesn’t seem to be any documentation available, so that doesn’t exactly help.

So, when trying this out, I first scanned a page from The Pragmatic Programmer and fed it to Tesseract. I can’t reproduce that for copyright reasons, but aside from some occasional incorrect character, the results were actually pretty good.

The next thing I did was feed it the Robertson image from this page. It looked okay at first glance, until I actually bothered to check the result:

tesseract-robertson

Good heavens. What on Earth is a “sriyialeeeurreneeseenu”? Shocked by these results, I read some tips about improving the quality of the output. Because it’s true, you can’t blame the OCR for mistaking a ‘c’ for an ‘e’ when they look very similar, and the image has some noise artifacts (see top of image, where there’s some faint print from another page).

To make sure I give it some nice, crisp text, I took a screenshot of the Emgu CV homepage (shown below), and fed it to the program.

tesseract-emgucv-source

See the results for yourself:

tesseract-emgucv

That’s quite an elaborate mess. It may be because I’m new to this software, but that doesn’t give me a very good impression. Maybe it’s my fault. But I can’t know that if there’s no documentation explaining how to use it.

Simulating Probabilistic Behaviour

The source code for this article is available at the Gigi Labs BitBucket repository.

Let’s say we have a game featuring in-game people (commonly referred to as NPCs). Any game worth its salt will have some form of artificial intelligence (AI) to bring those characters to life to some extent, even if they’re just aimlessly wandering around.

To do this in C# using plain ASCII art, we can start out with the following code, which shows a cutesy ASCII face in the middle of the console window:

            int x = 40;
            int y = 12;
            const char person = (char) 2;
            const int delay = 1000;

            Console.Title = "Probabilistic Behaviour";
            Console.CursorVisible = false;

            while (true)
            {
                Console.Clear();
                Console.SetCursorPosition(x, y);
                Console.Write(person); // show character

                // TODO movement code goes here

                Thread.Sleep(delay);
            }

This is what you should see after running the code:

probabilistic-behaviour-start

Now, to make our character wander around randomly is pretty easy. First, declare a Random instance near the top of the program:

            var random = new Random();

Then, just replace the “TODO” comment with the following:

                int direction = random.Next(0, 4); // [0, 3]

                switch(direction)
                {
                    case 1: x--; break;
                    case 2: x++; break;
                    case 3: y--; break;
                    case 4: y++; break;
                }

You should now see the ASCII guy going around randomly. That’s all well and good, but you should realise that this is a uniform distribution: each outcome is just as likely as any other.

Sometimes, that’s not what you want. For example, let’s say you want the following to happen:

  1. 20% of the time, the character will go left.
  2. 10% of the time, the character will go right.
  3. 20% of the time, the character will go up.
  4. 50% of the time, the character will go down.

We could represent the above with the following hardcoded logic:

                double direction = random.NextDouble(); // 0 <= direction < 1

                if (direction >= 0 && direction < 0.2)
                    x--;
                else if (direction >= 0.2 && direction < 0.3)
                    x++;
                else if (direction >= 0.3 && direction < 0.5)
                    y--;
                else
                    y++;

That works, and you’ll see the ASCII guy tend to move downwards more than any other direction. But how can we extend this into a generic utility that can accept various different configurations?

It helps if, rather than considering individual probabilities per action, we stack them on top of each other and consider a cumulative probability:

Action Probability Cumulative Probability
Left 0.2 < 0.2
Right 0.1 < 0.3
Up 0.2 < 0.5
Down 0.5 < 1

Stacked on top of each other by probability, the actions would look something like this:

probabilistic-behaviour-cumulative

In this case we only need to take a random sample between 0 and 1, and see where in the above stack it lands.

To facilitate this, let us first declare a ProbabilisticAction class, which represents the mapping between a probability and an action. I’m assuming we don’t need to return anything; if we do, it’s easy to turn this into a generic class.

    public class ProbabilisticAction
    {
        public double Probability { get; set; }
        public Action Action { get; set; }

        public ProbabilisticAction(double probability, Action action)
        {
            this.Probability = probability;
            this.Action = action;
        }
    }

Back in our Main(), we can declare a list of such mappings to represent the scenario we had earlier:

            var actions = new List<ProbabilisticAction>()
            {
                new ProbabilisticAction(0.2, new Action(() => x--)),
                new ProbabilisticAction(0.1, new Action(() => x++)),
                new ProbabilisticAction(0.2, new Action(() => y--)),
                new ProbabilisticAction(0.5, new Action(() => y++)),
            };

We then pass these mappings, along with our Random instance, into a new class we’ll declare next:

            var actor = new ProbabilisticActor(actions, random);

The ProbabilisticActor encapsulates the logic for determining the next action. First, we store the mappings and the Random passed in at the constructor:

    public class ProbabilisticActor
    {
        private List<ProbabilisticAction> probabilisticActions;
        private Random random;

        public ProbabilisticActor(List<ProbabilisticAction> probabilisticActions,
            Random random)
        {
            this.probabilisticActions = probabilisticActions;
            this.random = random;
        }
    }

To avoid confusion, we also want to ensure that the probabilities passed in actually add up to 1:

        public ProbabilisticActor(List<ProbabilisticAction> probabilisticActions,
            Random random)
        {
            if (probabilisticActions == null)
                throw new ArgumentNullException(nameof(probabilisticActions));
            if (probabilisticActions.Select(mapping => mapping.Probability).Sum() != 1.0)
                throw new ArgumentException("Probabilities must add up to 1!");

            this.probabilisticActions = probabilisticActions;
            this.random = random;
        }

Now, we can actually add the logic that picks the next action to execute. This is done by taking a random sample and seeing where it falls in the probability space:

        public void DoNextAction()
        {
            double sample = random.NextDouble();

            foreach(var mapping in probabilisticActions)
            {
                double probability = mapping.Probability;
                sample -= probability;

                if (sample <= 0)
                {
                    var action = mapping.Action;
                    action();
                    break;
                }
            }
        }

All we have left is to replace the logic in Main() with a call to this new method:

            while (true)
            {
                Console.Clear();
                Console.SetCursorPosition(x, y);
                Console.Write(person); // show character

                actor.DoNextAction();

                Thread.Sleep(delay);
            }

If we run the program now, we can see our ASCII guy just as southbound as before:

probabilistic-behaviour-southbound

But unlike before, we now have an abstraction of the logic we originally hardcoded, and we can reuse it for all sorts of random behaviours.

In fact, this approach is not really about game AI at all. I’ve found it really useful when writing test harnesses that needed to simulate a user randomly interacting with an application, where different actions weren’t equally as likely to occur. This is just a simple demonstration, but it is easy to build more sophisticated logic on top of this approach.