Category Archives: Software development

Displaying an Image in an SDL2 Window

This article was originally posted as “SDL2: Displaying an Image in the Window” on 17th November 2013 at Programmer’s Ranch. It has been updated, and the part about detecting and displaying errors has been removed as it is better addressed by configuring the project’s working directory. The source code for this article is available at the Gigi Labs BitBucket repository.

In this article we’re going to learn how to load a bitmap image from disk and display it in an SDL2 window. In order to follow along, you’ll need to set up a project to work with SDL2 (see Setting up SDL2 with Visual Studio 2015), and start off with the following basic empty window code, which is practically the same as what we did in Showing an Empty Window in SDL2:

#include <SDL.h>        

int main(int argc, char ** argv)
{
	bool quit = false;
	SDL_Event event;

	SDL_Init(SDL_INIT_VIDEO);

	SDL_Window * window = SDL_CreateWindow("SDL2 Displaying Image",
		SDL_WINDOWPOS_UNDEFINED, SDL_WINDOWPOS_UNDEFINED, 640, 480, 0);

	while (!quit)
	{
		SDL_WaitEvent(&event);

		switch (event.type)
		{
		case SDL_QUIT:
			quit = true;
			break;
		}
	}

	SDL_Quit();

	return 0;
}

OK, we can now create an SDL_Renderer:

SDL_Renderer * renderer = SDL_CreateRenderer(window, -1, 0);

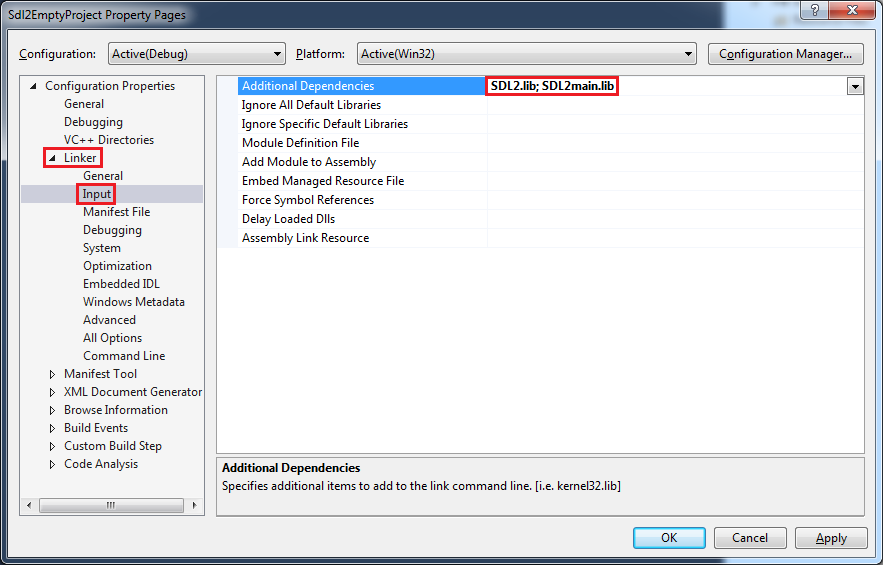
We use SDL_CreateRenderer() to get an instance of SDL_Renderer. This renderer represents the output device (usually your graphics card) to which your code will be drawing. In fact it’s the final destination of our image, because we’ll be following the steps below:

sdl2-displayimage-workflow

SDL_CreateRenderer() takes three parameters. The first is the window where we are drawing. The second allows us to select different rendering drivers; in our case we don’t care, and we can set it to -1 and get the default one. The last parameter allows us to set SDL_RendererFlags to control how the rendering occurs. We can set it to zero to default to hardware rendering. If any of this sounds confusing, don’t worry about it and just use SDL_CreateRenderer() as it is here.

We can now load the image from disk using the SDL_LoadBMP() function, which takes a path to a bitmap and loads it into an SDL_Surface:

SDL_Surface * image = SDL_LoadBMP("image.bmp");

I’m using the following photo of the Grand Harbour in Valletta, Malta, which I took back in 2005, and which has a width of 320 pixels and a height of 240 pixels:

sdl2-displayimage-image

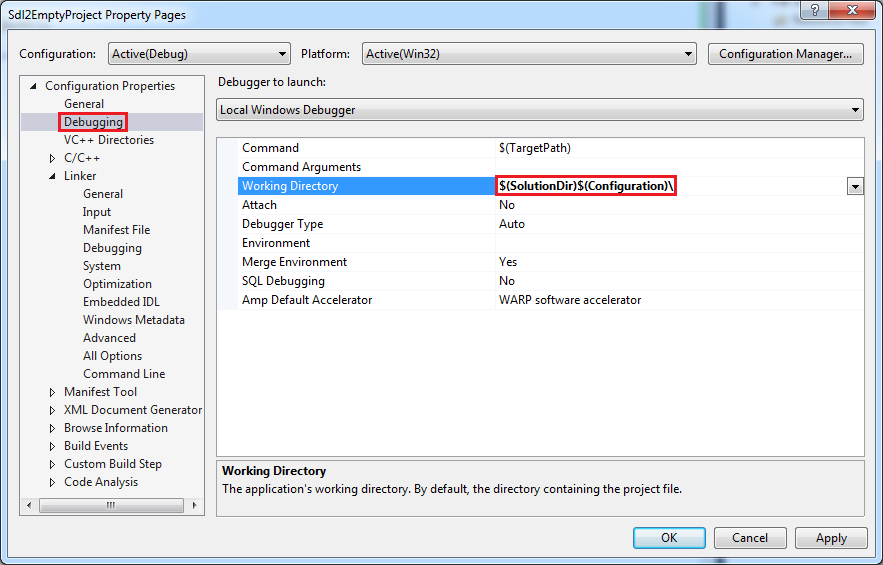
Place the image in your Debug folder, where your executable is located.

Next, we need to create a texture.

SDL_Texture * texture = SDL_CreateTextureFromSurface(renderer, image);

A texture is memory close to the graphics card (see image below), and we use SDL_CreateTextureFromSurface() to directly map our surface (which contains the image we loaded) to a texture.

sdl2-displayimage-surface-textures

Now that we have a texture, let’s display it in the window. At the end of the while loop, just after the switch statement, add the following:

		SDL_RenderCopy(renderer, texture, NULL, NULL);
		SDL_RenderPresent(renderer);

We use SDL_RenderCopy() to copy the texture to the output device. There are also a couple of other parameters that we’re setting to NULL – more on these in a minute. Finally, SDL_RenderPresent() is what commits the texture to the video memory, displaying the image.

Before we run the program, we must always remember to clean up every resource that we initialise. In our case, that means adding the following just before the call to SDL_Quit():

	SDL_DestroyTexture(texture);
	SDL_FreeSurface(image);
	SDL_DestroyRenderer(renderer);
	SDL_DestroyWindow(window);

If you now run the program from within Visual Studio, you should see the image in your window:

sdl2-displayimage-stretched

Fantastic! The image is right there in the window! But… can you see what happened? The image, which has dimensions 320×240, has been stretched to fill the window, which has dimensions 640×480. That’s sometimes convenient, because we get scaling for free. However, it makes photos look messy. Let’s change our call to SDL_RenderCopy() to fix this:

		SDL_Rect dstrect = { 5, 5, 320, 240 };
		SDL_RenderCopy(renderer, texture, NULL, &dstrect);

Remember those two parameters at the end of SDL_RenderCopy() that we were setting to NULL? If you look at the documentation for SDL_RenderCopy(), you’ll see that the last one defines a destination region (which part of the texture will the image be copied to). If it’s set to NULL, then the image is stretched to fill the texture – which is what happened above.

By setting dstrect (the last parameter), we can render to only a portion of the window. We set it to an SDL_Rect, with x and y set to 5, and width and height corresponding to the dimensions of the image. When we run the program, we get this:

sdl2-displayimage-original-size

Excellent! 🙂 In this article we looked at how to create renderers, surfaces and textures. We used these to load bitmaps and display them on the screen. We also saw the difference between copying the image to a region of the window, and making it fill the entire window.

Showing an Empty Window in SDL2

This article was originally posted as “SDL2: Empty Window” on 31st August 2013 at Programmer’s Ranch. It has been slightly updated and now enjoys syntax highlighting. The source code for this article is available at the Gigi Labs BitBucket repository.

Yesterday’s article dealt with setting up SDL2 in Visual Studio. Today we’re going to continue what we did there by showing an empty window and allowing the user to exit by pressing the X at the top-right of the window.

It takes very little to show an empty window. Use the following code:

#include <SDL.h>

int main(int argc, char ** argv)
{
	SDL_Init(SDL_INIT_VIDEO);

	SDL_Window * screen = SDL_CreateWindow("My SDL Empty Window",
		SDL_WINDOWPOS_UNDEFINED, SDL_WINDOWPOS_UNDEFINED, 640, 480, 0);

	SDL_Quit();

	return 0;
}

We use SDL_Init() to initialise SDL, and tell it which subsystems we need – in this case video is enough. At the end, we use SDL_Quit() to clean up. It is possible to set up SDL_Quit() with atexit(), as the SDL_Quit() documentation shows.

We create a window using SDL_CreateWindow(). This is quite different from how we used to do it in SDL 1.2.x. We pass it the window caption, initial coordinates where to put the window (not important in our case), window width and height, and flags (e.g. fullscreen).

If you try and run the code, it will work, but the window will flash for half a second and then disappear. You can put a call to SDL_Delay() to make it persist for a certain number of milliseconds:

SDL_Delay(3000);

Now, let’s make the window actually remain until it is closed. Use the following code:

#include <SDL.h>

int main(int argc, char ** argv)
{
	bool quit = false;
	SDL_Event event;

	SDL_Init(SDL_INIT_VIDEO);

	SDL_Window * screen = SDL_CreateWindow("My SDL Empty Window",
		SDL_WINDOWPOS_UNDEFINED, SDL_WINDOWPOS_UNDEFINED, 640, 480, 0);

	while (!quit)
	{
		SDL_WaitEvent(&event);

		switch (event.type)
		{
			case SDL_QUIT:
				quit = true;
				break;
		}
	}

	SDL_Quit();

	return 0;
}

The while (!quit) part is very typical in games and is in fact called a game loop. We basically loop forever, until the conditions necessary for quitting occur.

We use SDL_WaitEvent() to wait for an event (e.g. keypress) to happen, and we pass a reference to an SDL_Event structure. Another possibility is to use SDL_PollEvent(), which checks continuously for events and consumes a lot of CPU cycles (SDL_WaitEvent() basically just sleeps until an event occurs, so it’s much more lightweight).

The event type gives you an idea of what happened. It could be a key press, mouse wheel movement, touch interaction, etc. In our case we’re interested in the SDL_QUIT event type, which means the user clicked the window’s top-right X button to close it.

We can now run this code, and the window remains until you close it:

sdl2-empty-window

Wasn’t that easy? You can use this as a starting point to start drawing stuff in your window. Have fun, and come back again for more tutorials! 🙂

Setting up SDL2 with Visual Studio 2015

This article is based on “SDL2: Setting up SDL2 in Visual Studio (2013 or any other)“, which was published at Programmer’s Ranch on 10th February 2014. This article uses Visual Studio 2015 Community, and although the steps should mostly apply to any version of Visual Studio, I’ve included steps specific to VS2015 because of issues encountered. It also uses a more recent version of the SDL2 library. Finally, it adds a configuration step originally found in “SDL2: Displaying text with SDL_ttf” (Programmer’s Ranch, 29th March 2014). The source code for this article is available here at the Gigi Labs BitBucket repository

SDL2 is a great low-level library for developing games in C/C++ (other language bindings exist). It’s a little bit tedious to set up in Visual Studio the first time, so I’m going to guide you through the process.

For starters you’re going to want to head to the SDL2 download page and grab the latest Visual C++ Development Libraries (at the time of writing, that would be SDL2-devel-2.0.3-VC.zip):

sdl2-vs-devlib

Create a folder for your SDL2 libraries in a convenient location, say C:\sdl2. Extract the include and lib folders in the zip file here.

We can now create an empty Visual C++ project:

sdl2-vs-newproj

We now need to configure our project (via the project’s properties) so that it can work with SDL2.

First, we’ll tell Visual Studio where to look for the SDL2 header files, by adding the SDL2 include folder to the Include Directories in VC++ Directories:

sdl2-vs-include

In Linker -> General, set Additional Library Directories to the path to the SDL2 library – either x86 or x64:

sdl2-vs-library

Then in Linker -> Input, replace the value of Additional Dependencies with “SDL2.lib; SDL2main.lib“:

sdl2-vs-dependencies

Finally, in Linker -> System, set SubSystem to Windows (/SUBSYSTEM:WINDOWS):

sdl2-vs-subsystem

That should be all the configuration you need to get started.

Now, let’s add a new main.cpp file under Source Files, and add some code just to see whether it works:

#include <SDL.h>

int main(int argc, char ** argv)
{
    SDL_Init(SDL_INIT_VIDEO);

    // game code eventually goes here

    SDL_Quit();

    return 0;
}

Press Ctrl+Shift+B to build, and lo and behold…

sdl2-vs-failed

Crap.

Well, until VS2013, these steps used to work, as you can see from the Programmer’s Ranch article “SDL2: Setting up SDL2 in Visual Studio (2013 or any other)“.

Some insights as to the nature of the problem can be found in this StackOverflow thread and this gamedev.net thread. Quoting the latter:

VS2015 contains a completely rewritten CRT with many bug and conformance fixes. It’s not surprising that this kind of breakage happened; it’s not clear if this is a temporary bug with the CRT being incompatible or if all static libraries (like SDL2main) will have to be recompiled for VS2015’s runtime.

So basically, until this is resolved, throw out your C:\sdl2 folder, and instead make a new one from the latest SDL2 build for Visual Studio. Be sure to rename your lib\win32 folder to lib\x86 so that the earlier settings will apply (or change the path in the settings). Sorry, you can’t use this method for x64 just yet.

Try building again, and it should now succeed.

Press F5 to run the program, and you should get a nice runtime error message:

sdl2-vs-nosdldll

Fortunately, the error is pretty clear. Grab SDL.dll from C:\sdl2\lib\x86 and put it in your project’s Debug folder, where the executable is being generated:

sdl2-vs-copydll

You should now be able to run the program without errors. It doesn’t do anything, but you can use it as a basis for any SDL2 code you’ll write. You can find this empty project here at the Gigi Labs BitBucket repository, or else follow the steps in TwinklebearDev’s tutorial to export a Visual Studio template from the project.

Finally, there’s an additional configuration setting that you’ll find handy if you’re going to be loading resources from files (e.g. images, fonts, etc). In your project’s properties, go to the Debugging section and change the value of Working Directory from $(ProjectDir) to $(SolutionDir)$(Configuration)\:

sdl2-vs-wd

Why are we doing this? By default, the program will use a different working directory depending on whether you run it from Visual Studio or directly from the executable. So if it has to look for a particular file in the current directory, this won’t work in both scenarios unless you copy the same file into both the project folder and the output folder. With the above setting, we are telling Visual Studio to run the program with its working directory as the Debug folder, thus aligning the two scenarios.

C#: Metronome with Timers and Beeps

This article was originally posted here at Programmer’s Ranch on 24th July 2014.

Hey people! 🙂

When you’re learning to play an instrument, one thing you need to make sure of is that you’re playing in sync with a regular beat. A device that helps you by producing such a regular beat is a metronome. In this article, we’re going to write a simple metronome application. In doing so, we’ll learn how to use the Console‘s beeping functionality, and we’ll learn to use timers to fire events at regular intervals.

So let’s begin by creating a new Console Application, and adding the following using statement near the top, which will give us access to some of the classes we need:

using System.Threading;

Now, making a quick and dirty metronome is very easy. This is all it takes:

            while (true)
            {
                Console.Beep(4000, 100);
                Thread.Sleep(1000);
            }

That Console.Beep() takes the frequency of the sound as the first parameter (in this case 4000Hz), and the duration of the beep as the second parameter (in this case 100 milliseconds). You can omit the arguments entirely to use default settings.

Thread.Sleep() is used to suspend the program for a specified duration (specified in milliseconds in the parameter). In this case we’re using it to cause a delay between beeps of 1000 milliseconds (i.e. 1 second).

Now, suspending the program like this is not a very good thing. In fact, we can’t give the user an option to quit, and if we were using a GUI (e.g. WPF), then this kind of blocking would be even more problematic.

A better approach for our metronome application is to use Timers. Now there are many different Timer classes we can use, but the one we need in this case is this one. So before we see how we can use these mystical creatures to create a more awesome metronome, let us first add another using statement:

using System.Timers;

Now let’s create an instance of our Timer class:

Timer timer = new Timer();

Now you’re going to see Visual Studio complain about this line:

csmetronome-ambiguity

As Visual Studio is telling you, there is also a Timer class in System.Threading, so C# doesn’t know which one to use. You can resolve the ambiguity by using the fully qualified names instead (or in this particular case, just remove System.Threading since we don’t need it any more):

System.Timers.Timer timer = new System.Timers.Timer();

Next, assign a new event handler to the Elapsed event:

timer.Elapsed += timer_Elapsed;

Visual Studio offers to create the event handler for you as you type:

csmetronome-event-completion

Take it up on the offer, and have the following code generated for you:

        static void timer_Elapsed(object sender, ElapsedEventArgs e)
        {
            throw new NotImplementedException();
        }

Replace the contents of this event handler with our beeping functionality:

        static void timer_Elapsed(object sender, ElapsedEventArgs e)
        {
            Console.Beep(4000, 100);
        }

Back in the Main() method, set an Interval for the timer:

timer.Interval += 1000;

You should begin to understand what we’re doing here. Every time the interval passes (i.e. every second in this case), the Elapsed event will fire, and do whatever we specify in the event handler.

Now all we need to do is start the timer. In the code below, I am also waiting for the user to press ENTER, and once this is done, I am stopping the timer and exiting the application:

            timer.Start();
            Console.ReadLine();
            timer.Stop();

Since the timer runs on a separate thread, it does not interfere with user input. So we can have the timer running in the background while the program waits for user input – similar to what we did last year in “C# Threading: Bouncing Ball” (except that all the threading stuff is handled for you).

So there’s your metronome! Full code below. 🙂

        static void Main(string[] args)
        {
            System.Timers.Timer timer = new System.Timers.Timer();
            timer.Elapsed += timer_Elapsed;
            timer.Interval += 1000;

            timer.Start();
            Console.ReadLine();
            timer.Stop();
        }

        static void timer_Elapsed(object sender, ElapsedEventArgs e)
        {
            Console.Beep(4000, 100);
        }

In this article, we created a very simple metronome application. We first used a sleep-based delay, and learned about the dangers of having it block the program, limiting its interactivity. We then used a Timer from the System.Timers namespace in order to trigger beeps at regular intervals.

There are many ways in which this can be improved (e.g. distinct beep every four beats, configurable beats per minute, etc), but this is a fully functional metronome and a pretty simple demonstration of how to use timers.

The beeping functionality can also come in handy in a wide range of scenarios. One example is to supplement last year’s article “C# Basics: Morse Code Converter Using Dictionaries” with actual sounds to represent the dots and dashes in Morse Code.

I hope you found this useful. Thanks for reading! 🙂

Displaying a Volume Meter using NAudio

Windows 7 has this volume meter in the system tray. I’m sure you’re pretty familiar with it.

windows-volume-meter

It’s pretty cool. If you’re playing music, the green bar dances up and down, reflecting the volume of the music being played at the time.

If you’re developing an application that includes some form of multimedia, such as the ability to play music or listen to recorded phone calls, something simple like this is a great way to provide feedback to the user, showing that something is actually playing.

Typically, doing anything with sound in Windows is a messy business, as you’d have to play around with some pretty low-level APIs.To get an idea, just take a look at how many different ways there are to get master sound volume in C#.

Fortunately, there’s a managed library called NAudio which takes away a lot of the pain of dealing with this stuff. And quite conveniently, it’s available as a NuGet package.

After installing NAudio via NuGet, you can get a reference to your default audio output device using the following code:

            var enumerator = new MMDeviceEnumerator();
            var device = enumerator.GetDefaultAudioEndpoint(DataFlow.Render, Role.Console);

Note that there are three different values for Role, but they don’t seem to make any difference.

Put a breakpoint at the end and hover over the device variable to see that it’s bound to your actual output audio device:

naudio-device

From this, we can get a value that indicates the audio volume:

            while (true)
            {
                Console.Write("\r{0}", device.AudioMeterInformation.MasterPeakValue);
            }

I’m using the old \r trick to overwrite the value displayed in the same line with each iteration. You’ll see that the volume displayed is a float value:

naudio-volume-float

That’s nice, but it’s a bit hard to visually interpret how it’s changing. Let’s build a simple volume meter in the console instead.

            while (true)
            {
                var volume = device.AudioMeterInformation.MasterPeakValue;
                var scale = (int)Math.Floor(volume * 79);

                Console.Write("\r");

                var sb = new StringBuilder();
                sb.Append('-', scale);
                sb.Append(' ', 79 - scale);
                Console.Write(sb.ToString());
            }

We can represent the volume meter as a series of dashes in a line in the command line. Since NAudio gives us a value between 0 and 1, we can scale that to something between 0 and 79 (since 80 characters fit in a line in the command line by default).

With that done, we can then:

  1. Print a \r character. This starts writing at the beginning of the line, essentially overwriting the previously drawn meter.
  2. Print a number of dashes proportional to the scaled volume we just calculated. Since we’re using StringBuilder’s repeat ability, we don’t need loops.
  3. Print spaces for the rest of the line. This clears any leftover dashes from the previously drawn meter.

And there, you have it:

naudio-console-volume-meter

This screenshot doesn’t really do it justice. Since the meter is updating pretty much in real time, go ahead and run this program when you have music playing to see how nicely it dances. 🙂