Category Archives: Software development

Setting up a Connection with StackExchange.Redis

Update 25th October 2016: Just looking to quickly set up a Redis connection? Check out the followup article. Read on for a more detailed article on the topic.

StackExchange.Redis is a pretty good .NET client for Redis. Unfortunately, it can be a little bit tricky to use, and the existing documentation is far from comprehensive.

After installing StackExchange.Redis via NuGet, a Redis connection can be obtained via a special ConnectionMultiplexer object. Working with this is already tricky in itself, and many get this wrong. For instance, check out the implementation in this answer:

public static ConnectionMultiplexer RedisConnection;
public static IDatabase RedisCacheDb;

protected void Session_Start(object sender, EventArgs e)
    {
        if (ConfigurationManager.ConnectionStrings["RedisCache"] != null)
        {
            if (RedisConnection == null || !RedisConnection.IsConnected)
            {
                RedisConnection = ConnectionMultiplexer.Connect(ConfigurationManager.ConnectionStrings["RedisCache"].ConnectionString);
            }
            RedisCacheDb = RedisConnection.GetDatabase();
        }
    }

As I pointed out in my question, this is a bad form of lazy initialization because it lacks thread safety: multiple threads may get through the checks and initialize multiple connections, resulting in connection leaks.

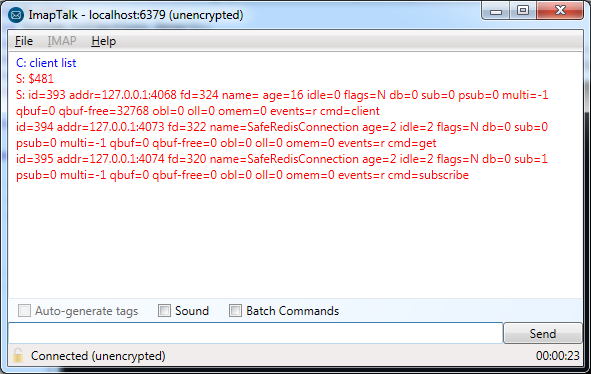
It is not hard to prove that this code is leaky in multithreaded environments. First, let’s set up the ConfigurationOptions with a client name so that we can identify connections coming from our program:

        private static Lazy<ConfigurationOptions> configOptions
            = new Lazy<ConfigurationOptions>(() => 
            {
                var configOptions = new ConfigurationOptions();
                configOptions.EndPoints.Add("localhost:6379");
                configOptions.ClientName = "LeakyRedisConnection";
                configOptions.ConnectTimeout = 100000;
                configOptions.SyncTimeout = 100000;
                return configOptions;
            });

Then, we provide a property with the faulty lazy initialization:

        private static ConnectionMultiplexer conn;

        private static ConnectionMultiplexer LeakyConn
        {
            get
            {
                if (conn == null || !conn.IsConnected)
                    conn = ConnectionMultiplexer.Connect(configOptions.Value);
                return conn;
            }
        }

Finally, we write some code that runs some Redis stuff in parallel:

        static void Main(string[] args)
        {
            for (int i = 0; i < 3; i++)
            {
                Task.Run(() =>
                    {
                        var db = LeakyConn.GetDatabase();
                        Console.WriteLine(i);

                        string key = "key" + i;

                        db.StringSet(key, i);
                        Thread.Sleep(10);
                        string value = db.StringGet(key);
                    }
                );
            }

            Console.WriteLine("Done");
            Console.ReadLine();
        }

When the program does its work, even with just 3 iterations, we get a total of six connections (when normally a single ConnectionMultiplexer should have at most 2 physical connections):

redis-leaky-connections

Another approach from this answer is to use an exclusive lock:

private static ConnectionMultiplexer _redis;
private static readonly Object _multiplexerLock = new Object();

private void ConnectRedis()
{
    try
    {
        _redis = ConnectionMultiplexer.Connect("...<connection string here>...");
    }
    catch (Exception ex)
    {
        //exception handling goes here
    }
}


private ConnectionMultiplexer RedisMultiplexer
{
    get
    {
        lock (_multiplexerLock)
        {
            if (_redis == null || !_redis.IsConnected)
            {
                ConnectRedis();
            }
            return _redis;
        }
    }
}

However, since Redis is often used as a cache in highly concurrent web applications, this approach essentially forces code to degrade into something sequential, and has obvious performance implications.

The correct approach to using ConnectionMultiplexer is described by this answer. It involves use of Lazy<T> for thread-safe lazy initialization (see Jon Skeet’s article on Singletons). Additionally:

  • It sets “abortConnect=false”, which means if the initial connect attempt fails, the ConnectionMultiplexer will silently retry in the background rather than throw an exception.
  • It does not check the IsConnected property, since ConnectionMultiplexer will automatically retry in the background if the connection is dropped.

With this info, we can now fix our code:

        private static Lazy<ConfigurationOptions> configOptions
            = new Lazy<ConfigurationOptions>(() => 
            {
                var configOptions = new ConfigurationOptions();
                configOptions.EndPoints.Add("localhost:6379");
                configOptions.ClientName = "SafeRedisConnection";
                configOptions.ConnectTimeout = 100000;
                configOptions.SyncTimeout = 100000;
                configOptions.AbortOnConnectFail = false;
                return configOptions;
            });

        private static Lazy<ConnectionMultiplexer> conn
            = new Lazy<ConnectionMultiplexer>(
                () => ConnectionMultiplexer.Connect(configOptions.Value));

        private static ConnectionMultiplexer SafeConn
        {
            get
            {
                return conn.Value;
            }
        }

        static void Main(string[] args)
        {
            for (int i = 0; i < 3; i++)
            {
                Task.Run(() =>
                    {
                        var db = SafeConn.GetDatabase();
                        Console.WriteLine(i);

                        string key = "key" + i;

                        db.StringSet(key, i);
                        Thread.Sleep(10);
                        string value = db.StringGet(key);
                    }
                );
            }

            Console.WriteLine("Done");
            Console.ReadLine();
        }

If you run this, you’ll find that there are now only two physical connections generated by the application, which is normal.

redis-safe-connections

Analyzing Live Process Memory with ClrMD

Update 29th December 2015: As noted in the comments, the API has changed since I wrote this article, and some methods have been deprecated. See the new section at the end for updated full source code. The rest of the article has not yet been updated.

There are many ways to debug and inspect a live process or a crash dump. Unfortunately, many of these are very low-level and can be a bit of a nightmare to use. However, a relatively new library called ClrMD, released in beta 2 years ago, provides a convenient abstraction and makes it much easier to do this kind of work.

You can install the ClrMD NuGet package from the NuGet package manager. However, since this is still prerelease software, you’ll need to enable the option to include prerelease packages:

clrmd-nuget

Once you have that installed, you can use ClrMD via the following namespace:

using Microsoft.Diagnostics.Runtime;

In this example, we’ll attach to a running process, but ClrMD also allows you to inspect a crash dump. In order to attach, we need the process id (PID). You can get this either from Task Manager…

clrmd-pid

…or by looking for the process in code (needs System.Diagnostics):

            var process = Process.GetProcessesByName("Dandago.Mail.ImapTalk").FirstOrDefault();

            if (process != null)
            {
                int pid = process.Id;

                // TODO rest of code goes here
            }
            else
                Console.WriteLine("Process not found!");

Once you have the PID, you can attach to the process as follows.

                const int timeout = 5000;

                using (var dataTarget = DataTarget.AttachToProcess(pid, timeout))
                {
                    // TODO rest of code goes here
                }

Before you can inspect objects in memory, you need to get your hands on the heap in the process you attached to. To do this, we need to go through the following steps:

  1. Get the CLR runtime version(s) loaded in the process.
  2. From that, get this library called DAC (Data Access Component, implemented in mscordacwks.dll), which provides debugging functionality.
  3. Based on this, we can create an instance of ClrRuntime.
  4. From ClrRuntime, we get a ClrHeap.

These steps are performed in the code below:

                    var clrVersion = dataTarget.ClrVersions.FirstOrDefault();
                    string dacLocation = clrVersion.TryGetDacLocation();
                    var runtime = dataTarget.CreateRuntime(dacLocation);
                    var heap = runtime.GetHeap();

ClrHeap gives us a handy EnumerateObjects() method that allows us to see all the objects in memory. If we want to just get a list of all of them, it’s a simple matter to iterate through them and write out their types:

                    foreach (var obj in heap.EnumerateObjects())
                    {
                        var type = heap.GetObjectType(obj).Name;
                        Console.WriteLine(type);
                    }

This gives us a long list of object types in memory:

clrmd-typelist

There are lots of things we can do with these objects. As a slightly more elaborate example, we can see a list of types ordered by the most common:

                    var types = heap.EnumerateObjects()
                        .GroupBy(obj => heap.GetObjectType(obj).Name)
                        .Select(group => new { Key = group.Key, Count = group.Count() })
                        .OrderBy(type => type.Count);

                    foreach(var type in types)
                        Console.WriteLine("{0} {1}", type.Key, type.Count);

The output is thus:

clrmd-mostcommontypes

Further Reading

Full Source Code

        static void Main(string[] args)
        {
            Console.Title = "ClrMD Live Process Analysis";

            var process = Process.GetProcessesByName("Dandago.Mail.ImapTalk").FirstOrDefault();

            if (process != null)
            {
                int pid = process.Id;
                const int timeout = 5000;

                using (var dataTarget = DataTarget.AttachToProcess(pid, timeout))
                {
                    var clrVersion = dataTarget.ClrVersions.FirstOrDefault();
                    string dacLocation = clrVersion.TryGetDacLocation();
                    var runtime = dataTarget.CreateRuntime(dacLocation);
                    var heap = runtime.GetHeap();

                    var types = heap.EnumerateObjects()
                        .GroupBy(obj => heap.GetObjectType(obj).Name)
                        .Select(group => new { Key = group.Key, Count = group.Count() })
                        .OrderBy(type => type.Count);

                    foreach (var type in types)
                        Console.WriteLine("{0} {1}", type.Key, type.Count);
                }
            }
            else
                Console.WriteLine("Process not found!");

            Console.ReadLine();
        }

Full Source Code after API Change

Update 29th December 2015: the API changed since this article was written, and some methods have been deprecated. The full code below is an updated version to work with version 0.8.31-beta of ClrMD.

        static void Main(string[] args)
        {
            Console.Title = "ClrMD Live Process Analysis";

            var process = Process.GetProcessesByName("Dandago.Mail.ImapTalk").FirstOrDefault();

            if (process != null)
            {
                int pid = process.Id;
                const int timeout = 5000;

                using (var dataTarget = DataTarget.AttachToProcess(pid, timeout))
                {
                    var clrVersion = dataTarget.ClrVersions.FirstOrDefault();
                    string dacLocation = dataTarget.SymbolLocator.FindBinary(clrVersion.DacInfo);
                    var runtime = clrVersion.CreateRuntime(dacLocation);
                    var heap = runtime.GetHeap();

                    var types = heap.EnumerateObjectAddresses()
                        .GroupBy(obj => heap.GetObjectType(obj).Name)
                        .Select(group => new { Key = group.Key, Count = group.Count() })
                        .OrderBy(type => type.Count);

                    foreach (var type in types)
                        Console.WriteLine("{0} {1}", type.Key, type.Count);
                }
            }
            else
                Console.WriteLine("Process not found!");

            Console.ReadLine();
        }

How to set up SDL2 on Linux

This article explains how to get started with SDL2 in Linux. For other SDL2 tutorials (including setting up on Windows), check out my SDL2 Tutorials at Programmer’s Ranch.

Using apt-get

If you’re on a Debian-based Linux distribution, you can use the APT package manager to easily install the SDL2 development libraries. From a terminal, install the libsdl2-dev package:

sudo apt-get install libsdl2-dev

Installing from source

If for whatever reason you can’t use a package manager, you’ll have to compile SDL2 from the source code. To do this, you first have to download SDL2:

sdl2linux-download

After extracting the archive to a folder, cd to that folder and run:

./configure

When it’s done, run:

make all

Finally, run:

sudo make install

Testing it out

To verify that you can compile an SDL2 program, use the following code (it’s the same used in my “SDL2: Setting up SDL2 in Visual Studio 2010” article at Programmer’s Ranch):

#include <SDL2/SDL.h>

int main(int argc, char ** argv)
{
    SDL_Init(SDL_INIT_EVERYTHING);
    SDL_Quit();

    return 0;
}

You can use vi or your favourite editor to create the source code:

sdl2linux-minimal

To compile this (assuming it’s called sdl2minimal.c), use the following command:

gcc sdl2minimal.c -lSDL2 -lSDL2main -o sdl2minimal

We need to link in the SDL2 libraries, which is why we add the -lSDL2 -lSDL2main. Be aware that those start with a lowercase L, not a 1. The program should compile. It won’t show you anything if you run it, but now you know that you’re all set up to write SDL2 programs on Linux.

sdl2linux-run

Converting to/from Unix Timestamp in C#

A few days ago, Visual Studio 2015 RC was released. Among the many updates to .NET Framework 4.6 with this release, we now have some new utility methods allowing conversion to/from Unix timestamps.

Although these were added primarily to enable more cross-platform support in .NET Core Framework, Unix timestamps are also sometimes useful in a Windows environment. For instance, Unix timestamps are often used to facilitate Redis sorted sets where the score is a DateTime (since the score can only be a double).

Unix Timestamp Conversion before .NET 4.6

Until now, you had to implement conversions to/from Unix time yourself. That actually isn’t hard to do. By definition, Unix time is the number of seconds since 1st January 1970, 00:00:00 UTC. Thus we can convert from a local DateTime to Unix time as follows:

            var dateTime = new DateTime(2015, 05, 24, 10, 2, 0, DateTimeKind.Local);
            var epoch = new DateTime(1970, 1, 1, 0, 0, 0, DateTimeKind.Utc);
            var unixDateTime = (dateTime.ToUniversalTime() - epoch).TotalSeconds;

We can convert back to a local DateTime as follows:

            var timeSpan = TimeSpan.FromSeconds(unixDateTime);
            var localDateTime = new DateTime(timeSpan.Ticks).ToLocalTime();

Update 7th May 2016: This approach gets most of the date right, but the year is wrong:

unix-timestamp-incorrect-year

So please use the following conversion instead:

            var timeSpan = TimeSpan.FromSeconds(unixDateTime);
            var localDateTime = epoch.Add(timeSpan).ToLocalTime();

Unix Timestamp Conversion in .NET 4.6

Quoting the Visual Studio 2015 RC Release Notes:

New methods have been added to support converting DateTime to or from Unix time. The following APIs have been added to DateTimeOffset:

  • static DateTimeOffset FromUnixTimeSeconds(long seconds)
  • static DateTimeOffset FromUnixTimeMilliseconds(long milliseconds)
  • long ToUnixTimeSeconds()
  • long ToUnixTimeMilliseconds()

So .NET 4.6 gives us some new methods, but to use them, you’ll first have to convert from DateTime to DateTimeOffset. First, make sure you’re targeting the right version of the .NET Framework:

csunixtime-frameworkversion

You can then use the new methods:

            var dateTime = new DateTime(2015, 05, 24, 10, 2, 0, DateTimeKind.Local);
            var dateTimeOffset = new DateTimeOffset(dateTime);
            var unixDateTime = dateTimeOffset.ToUnixTimeSeconds();

…and to change back…

var localDateTimeOffset = DateTimeOffset.FromUnixTimeSeconds(unixDateTime)
        .DateTime.ToLocalTime();

Diacritic-insensitive search in C#

When you’re dealing with multiple languages, searching for text can be a little tricky. Using normal string comparison techniques, a search for “Malmo” will not match “Malmö”. Technically it shouldn’t, because the characters are actually different, but it’s a great usability feature to allow people to search for text regardless of diacritics (accents and such).

The Normalization Method

The first idea I had was to strip off the diacritics and simply compare the simplified version of both the query and the text being searched. Using the same example, “Malmö” would become “Malmo” in the text, and so the query would match, since RemoveDiacritics(query) == RemoveDiacritics(text).

The RemoveDiacritics() method is defined in this StackOverflow answer:

static string RemoveDiacritics(string text) 
{
    var normalizedString = text.Normalize(NormalizationForm.FormD);
    var stringBuilder = new StringBuilder();

    foreach (var c in normalizedString)
    {
        var unicodeCategory = CharUnicodeInfo.GetUnicodeCategory(c);
        if (unicodeCategory != UnicodeCategory.NonSpacingMark)
        {
            stringBuilder.Append(c);
        }
    }

    return stringBuilder.ToString().Normalize(NormalizationForm.FormC);
}

As I pointed out in my followup question, this approach doesn’t work very well for search. If we run a simple test using the same words from my question…

            var words = new List<string>()
            {
                "Malmö",
                "München",
                "Åge",
                "Strømsgodset",
                "Kulħadd"
            };
            var simplifiedWords = words.Select(word => RemoveDiacritics(word)).ToList();

…you’ll notice that it works for basic accents that seem to be external to the base character, but not for others where it is embedded. Below is the output I got in the immediate window (since the Console can’t handle some of the characters with the default encoding):

simplifiedWords
Count = 5
    [0]: "Malmo"
    [1]: "Munchen"
    [2]: "Age"
    [3]: "Strømsgodset"
    [4]: "Kulħadd"

Apart from this, there is no way to simplify combined characters such as æ into a graphically similar ae.

This all makes sense, because technically æ and ae are different characters, as are ħ and h. But from a user’s perspective, it feels pretty natural to be able to interchange them when searching.

The Collation Method

The answer to my question shows that it is actually pretty easy to have diacritic-insensitive search in C#, even without doing any stripping operations. It is necessary only to specify CompareOptions.IgnoreNonSpace in string comparison methods. Here’s an example from that same answer:

int ix = CultureInfo.CurrentCulture.CompareInfo.IndexOf(
    "Ad aeternitatem", 
    "æter", 
    CompareOptions.IgnoreNonSpace); // 3

Here’s the same thing applied to one of my original examples:

            int ix = CultureInfo.CurrentCulture.CompareInfo.IndexOf(
                "Kulħadd",
                "hadd",
                CompareOptions.IgnoreNonSpace); // returns 3

This other answer shows the string.Compare() being used instead, using the same flag:

string s1 = "hello";
string s2 = "héllo";

if (String.Compare(s1, s2, CultureInfo.CurrentCulture,
    CompareOptions.IgnoreNonSpace) == 0)
{
    // both strings are equal
}

In either case, just add the CompareOptions.IgnoreCase flag to make it case insensitive as well.