Double Buffering in Redis

This article deals with a specific situation. You have a program that is continuously building a data structure from scratch. This data structure takes long (i.e. several seconds) to build, but is continuously accessed by clients. While it is being built, clients will end up retrieving partial data. This article explains how a well-known technique from computer graphics can be used in Redis to address this problem. The full source code is available at BitBucket.

The Problem

Like just about anything, this scenario is best demonstrated with an example. So we’ll first start with some code to set up a client connection to Redis:

        private static Lazy<ConnectionMultiplexer> LazyConnection
            = new Lazy<ConnectionMultiplexer>(() =>
            {
                var config = new ConfigurationOptions();
                config.EndPoints.Add("localhost:6379");
                config.AbortOnConnectFail = false;

                return ConnectionMultiplexer.Connect(config);
            }
        );

        public static ConnectionMultiplexer Connection
        {
            get
            {
                return LazyConnection.Value;
            }
        }

The code above is based on the feedback I received from this StackOverflow question and is the proper way to get a connection set up using StackExchange.Redis. You’ll need to install the StackExchange.Redis package via NuGet before you can use this code.

Our actual program code is extremely simple. We establish a connection (via the property above) and then continuously call a method that populates our data structure:

        static void Main(string[] args)
        {
            var connection = Connection;
            var database = connection.GetDatabase(0);

            while (true)
                PopulateAwesomeCompanies(database);
        }

We use this infinite loop because the nature of the data may be dynamic, for example items may be removed, and it may be hard to keep track of them. So the data structure is simply rebuilt regularly.

For this simple example, our data structure is going to be a Redis sorted set that stores the most awesome companies to work for, sorted by awesomeness. Here is the data we’re going to be using:

        private static string[] companies = new string[]
        {
            "Google",
            "Apple",
            "Amazon",
            "GFI",
            "Blizzard",
            "IBM"
        };

        private static int[] companyScores = new int[] { 95, 15, 80, 0, 100, 56 };

The method that builds the data structure is also very simple. It starts off by erasing the existing data, and then for each company, it calculates their awesomeness (simulated by a simple delay) and adds them to the sorted set:

        public static void PopulateAwesomeCompanies(IDatabase database)
        {
            var key = "awesomecompanies";

            Console.WriteLine("Starting afresh...");

            database.KeyDelete(key); // start with a fresh sorted set

            for (int i = 0; i < 6; i++)
            {
                Console.WriteLine("Calculating {0}", companies[i]);

                // simulate expensive computation
                Thread.Sleep(5000);

                // add company with respective score
                database.SortedSetAdd(key, companies[i], companyScores[i]);
            }
        }

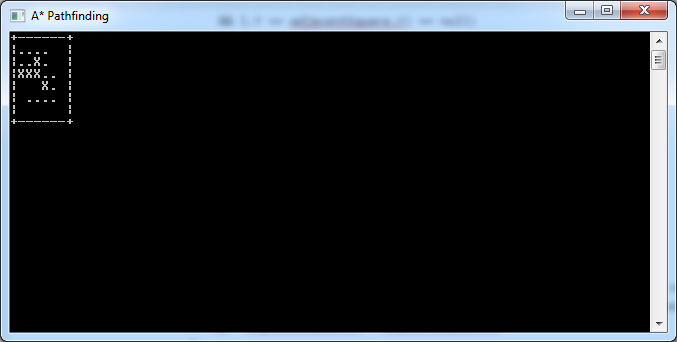
The problem with this approach is that anytime a client accesses this data structure while it’s still being built, they will get partial data:

redis-doublebuffering-partialdata

That sucks, because we want the data to be fresh, but we also want it to be complete when it is handed to clients.

Double Buffering in Computer Graphics

There is a technique in computer graphics called double buffering which solves a similar problem. Here’s some background from Wikipedia:

“In computer graphics, double buffering is a technique for drawing graphics that shows no (or less) flicker, tearing, and other artifacts.

“It is difficult for a program to draw a display so that pixels do not change more than once. For instance to update a page of text it is much easier to clear the entire page and then draw the letters than to somehow erase all the pixels that are not in both the old and new letters. However, this intermediate image is seen by the user as flickering. In addition computer monitors constantly redraw the visible video page (at around 60 times a second), so even a perfect update may be visible momentarily as a horizontal divider between the “new” image and the un-redrawn “old” image, known as tearing.

“A software implementation of double buffering has all drawing operations store their results in some region of system RAM; any such region is often called a “back buffer”. When all drawing operations are considered complete, the whole region (or only the changed portion) is copied into the video RAM (the “front buffer”); this copying is usually synchronized with the monitor’s raster beam in order to avoid tearing. Double buffering necessarily requires more memory and CPU time than single buffering because of the system memory allocated for the back buffer, the time for the copy operation, and the time waiting for synchronization.”

In short, double buffering involves the following steps:

  1. Draw the next frame (screen image) in a temporary location in memory that isn’t directly visible to the user (the back buffer)
  2. Swap the front buffer (the actual image on the screen) with the back buffer

That way, the change between the old image and the new one is instantaneous and the user will never notice the difference.

Double Buffering in Redis

We can apply a similar technique in Redis as follows:

  1. Build the new sorted set using a separate, temporary key
  2. Rename the temporary key to the existing key (implicitly deletes the temporary key)

This is how it works out in practice:

        public static void PopulateAwesomeCompanies(IDatabase database)
        {
            var tempKey = "awesomecompaniestemp";
            var key = "awesomecompanies";

            Console.WriteLine("Starting afresh...");

            for (int i = 0; i < 6; i++)
            {
                Console.WriteLine("Calculating {0}", companies[i]);

                // simulate expensive computation
                Thread.Sleep(5000);

                // add company with respective score
                database.SortedSetAdd(tempKey, companies[i], companyScores[i]);
            }

            // replace actual data in key with fresh data from tempKey
            database.KeyRename(tempKey, key);
        }

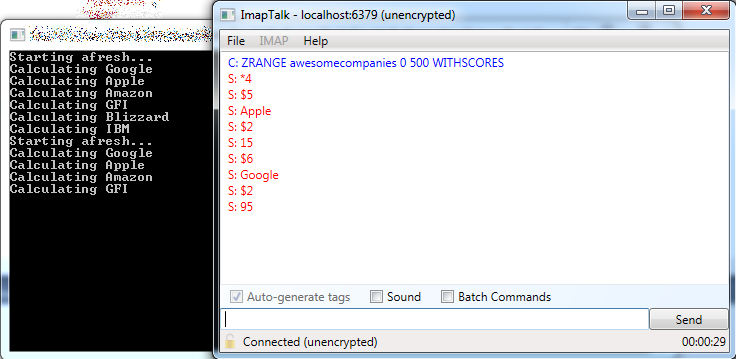
Here, we aren’t deleting any data structure before we begin, as we did before. Instead, we build our fresh sorted set using the temp key, and then copy it over to the actual key (the one that clients will be requesting). We do this using the Redis RENAME command, which copies the data from the temp key to the actual key, and implicitly also deletes the temp key. Since Redis is single-threaded, this operation is atomic and there is no race condition risk while the rename operation is happening.

The result of this is that the client will always have access to the latest complete data, even while the data structure is being rebuilt:

redis-doublebufferingfulldata

A* Pathfinding Example in C#

The A* pathfinding algorithm is one of the most popular ways of computing the shortest path between two points for game development. “Introduction to A* Pathfinding” by Johann Fradj illustrates the algorithm pretty nicely. I’ve written a C# implementation based on his example code, intended as nothing more than a learning exercise, and I am sharing it in this article. You can get the full source code directly from BitBucket; if you run it, you’ll see the algorithm run step by step.

Our A* algorithm will compute the shortest path between two points, A and B, on a small square grid of tiles. In order to really see it at work, we’ll introduce some obstacles, marked as X in the map below:

            string[] map = new string[]
            {
                "+------+",
                "|      |",
                "|A X   |",
                "|XXX   |",
                "|   X  |",
                "| B    |",
                "|      |",
                "+------+",
            };

The A* algorithm needs to keep track of the tiles it’s visited (closed list) and the ones it’s considering (open list). For this we define a Location class:

    class Location
    {
        public int X;
        public int Y;
        public int F;
        public int G;
        public int H;
        public Location Parent;
    }

Aside from the tile coordinates, each visited tile has three scores (F, G and H). The G score is the distance from the starting point, and the H score is the estimated distance from the destination (calculated as the city block distance). The F score is just G + H. For a full explanation of these values, read the reference article, “Introduction to A* Pathfinding“.

The H score is very simple to calculate – it’s just the horizontal and vertical distance from the current tile to the destination (ignoring any obstacles):

        static int ComputeHScore(int x, int y, int targetX, int targetY)
        {
            return Math.Abs(targetX - x) + Math.Abs(targetY - y);
        }

The Location class also has a Parent property. That’s used to store the previous tile, and it is needed to keep track of the path itself by the time the destination is reached.

Before we start the algorithm, we initialise some values:

            Location current = null;
            var start = new Location { X = 1, Y = 2 };
            var target = new Location { X = 2, Y = 5 };
            var openList = new List<Location>();
            var closedList = new List<Location>();
            int g = 0;

            // start by adding the original position to the open list
            openList.Add(start);

The g value is the G-score; remember it’s the distance from the starting location to the current tile. We keep track of this simply by incrementing its value each time we move to a new tile.

We add the starting location to the open list, so that the algorithm can begin working. The algorithm itself runs in a loop:

            while (openList.Count > 0)
            {
                // algorithm's logic goes here
            }

For each iteration, the A* algorithm will retrieve the tile with the lowest F-score:

                // get the square with the lowest F score
                var lowest = openList.Min(l => l.F);
                current = openList.First(l => l.F == lowest);

This is not necessarily the most efficient way of doing this, but works pretty well for this example. Also note that if there are multiple locations with the same F-score, it doesn’t really matter which is chosen (here we just take the first one) – again see “Introduction to A* Pathfinding” for details.

                // add the current square to the closed list
                closedList.Add(current);

                // remove it from the open list
                openList.Remove(current);

Here we add the current tile to the closed list, and remove it from the open list, to prevent it from being revisited in a subsequent iteration.

                // show current square on the map
                Console.SetCursorPosition(current.X, current.Y);
                Console.Write('.');
                Console.SetCursorPosition(current.X, current.Y);
                System.Threading.Thread.Sleep(1000);

The code above is not part of the A* algorithm. It simply marks the current tile with a dot and waits for a second so that you can follow the algorithm’s progress interactively.

                // if we added the destination to the closed list, we've found a path
                if (closedList.FirstOrDefault(l => l.X == target.X && l.Y == target.Y) != null)
                    break;

There are two conditions that allow the A* algorithm to terminate. One is that there are no more tiles in the open list to process, which would indicate that there is no path between A and B (we aren’t catering for this scenario in this example). The other is when the path is actually found, and that is catered for by the code above.

The rest of the algorithm evaluates adjacent tiles (i.e. the ones immediately one tile left, right, up and down from the current one):

                var adjacentSquares = GetWalkableAdjacentSquares(current.X, current.Y, map);
                g++;

GetWalkableAdjacentSquares() is defined thusly:

        static List<Location> GetWalkableAdjacentSquares(int x, int y, string[] map)
        {
            var proposedLocations = new List<Location>()
            {
                new Location { X = x, Y = y - 1 },
                new Location { X = x, Y = y + 1 },
                new Location { X = x - 1, Y = y },
                new Location { X = x + 1, Y = y },
            };

            return proposedLocations.Where(
                l => map[l.Y][l.X] == ' ' || map[l.Y][l.X] == 'B').ToList();
        }

So back in the algorithm’s loop, we then have a loop over adjacent squares, computing their scores and adding them to the open list when it makes sense to do so:

                foreach(var adjacentSquare in adjacentSquares)
                {
                    // if this adjacent square is already in the closed list, ignore it
                    if (closedList.FirstOrDefault(l => l.X == adjacentSquare.X
                            && l.Y == adjacentSquare.Y) != null)
                        continue;

                    // if it's not in the open list...
                    if (openList.FirstOrDefault(l => l.X == adjacentSquare.X
                            && l.Y == adjacentSquare.Y) == null)
                    {
                        // compute its score, set the parent
                        adjacentSquare.G = g;
                        adjacentSquare.H = ComputeHScore(adjacentSquare.X,
                            adjacentSquare.Y, target.X, target.Y);
                        adjacentSquare.F = adjacentSquare.G + adjacentSquare.H;
                        adjacentSquare.Parent = current;

                        // and add it to the open list
                        openList.Insert(0, adjacentSquare);
                    }
                    else
                    {
                        // test if using the current G score makes the adjacent square's F score
                        // lower, if yes update the parent because it means it's a better path
                        if (g + adjacentSquare.H < adjacentSquare.F)
                        {
                            adjacentSquare.G = g;
                            adjacentSquare.F = adjacentSquare.G + adjacentSquare.H;
                            adjacentSquare.Parent = current;
                        }
                    }
                }

There’s some duplicate code in the if/else statement above, but I preferred to leave it that way as it’s more readable (which is more important here), especially if you’re following along with “Introduction to A* Pathfinding“.

That’s the last thing in the algorithm itself. So once it’s done, you can see the locations that were examined thanks to the dots drawn on the map:

astar-pathfinding-1

When it’s done, the program will run the following code, tracing its way back from destination to start by following the Parent property:

            // assume path was found; let's show it
            while (current != null)
            {
                Console.SetCursorPosition(current.X, current.Y);
                Console.Write('_');
                Console.SetCursorPosition(current.X, current.Y);
                current = current.Parent;
                System.Threading.Thread.Sleep(1000);
            }

This illustrates the actual shortest path by transforming the dots to underscores:

astar-pathfinding-2

You’ll notice that there is in fact a location that was examined but not used in the final path. That’s pretty normal, as A* may need to backtrack at times.

On Redis Desktop Manager and Redis Keys

Update 11th August 2015: As from version 0.8.0 beta 1, Redis Desktop Manager now supports the SCAN command (rather than KEYS) for Redis 2.8 onwards. Although this limits the applicability of this article to older servers, I am more than happy that this shortcoming has been addressed. The original article below remains both for historical purposes and to warn developers of incorrect use of the KEYS command.

There’s a tool called Redis Desktop Manager which can sometimes be useful to inspect the keys in a Redis database. Indeed one of its features is that it presents a treeview showing a structured representation of the keys in the database:

redis-desktop-manager-treeview

But how is this treeview built? That’s easy to find out, by using the Redis MONITOR command to see the incoming commands:

redis-desktop-manager-keys


The first two commands are executed when Redis Desktop Manager connects to the Redis server, and the other two are executed when the database is expanded in the treeview, revealing the keys in that database.

You’ll notice that the last command is a KEYS command, which with its wildcard argument (*) is effectively retrieving every key in the database. We can see an example of what this gives us by running the KEYS command ourselves:

redis-desktop-manager-keys-response

Now, in this case I only have a handful of keys in my Redis database, but it’s pretty normal for real Redis databases to have very large numbers of keys. Retrieving all that data places a large burden on the Redis server, which due to its single-threaded nature will not be able to serve other requests while it is stuck retrieving every key in the database.

In fact, the KEYS command documentation particularly warns against its use in production environments:

“Warning: consider KEYS as a command that should only be used in production environments with extreme care. It may ruin performance when it is executed against large databases. This command is intended for debugging and special operations, such as changing your keyspace layout. Don’t use KEYS in your regular application code. If you’re looking for a way to find keys in a subset of your keyspace, consider using SCAN or sets.”

I understand why Redis Desktop Manager uses the KEYS command: it needs to retrieve all the keys in the database in order to determine how the tree structure will be displayed (since each delimited part of the key is rendered as a node). That’s the whole point of having a treeview.

However, what seems to be a useful feature can actually be very dangerous, especially when used on production servers. So do take care when using Redis Desktop Manager in such environments.

My recommendation to developers using Redis is to keep good documentation of your keys, so you won’t need any Redis command to tell you what keys are in the database. That’s not what Redis is for.

But if you do ever need to inspect your Redis keys on the server, at least follow the advice in the documentation and use SCAN instead. While this may still be expensive to retrieve the entire set of keys, it can be done in small batches, thus allowing other requests to be serviced in between iterations.

ImapTalk 2.1 beta released

Today, I released a beta of the next version of ImapTalk, which is 2.1. This new version brings a number of small enhancements and features, but the biggest new feature is that of batch commands. This allows you to send multiple commands at once by entering multiple lines of text – very handy when you prepare a text file full of commands and don’t want to execute them one by one.

Visit the ImapTalk project page to view the full release notes and download the beta.

Guitar Tab – Wish I by Jem

Here’s a peaceful and relaxing song by Jem:

There’s a melodic tune recurring in the background. This is how I play it:

e|-------------------------------------
B|----12----------------13--12---------
G|--------12--12--10-10----------------
D|-------------------------------------
A|-------------------------------------
E|-------------------------------------

If you check out the live performance of this song, you’ll notice it’s performed differently… but I think the version above sounds closer to the official video, which sounds nicer than the live performance.

"You don't learn to walk by following rules. You learn by doing, and by falling over." — Richard Branson