Category Archives: Software development

Ultima 1 Reverse Engineering: Decoding Savegame Files

This article was originally posted at Programmer’s Ranch on 29th August 2013. The version migrated here is mostly the same except for minor updates and a brand new screenshot of the latest GOG installer for Ultima 1.

It’s no secret that I’m a long-time fan of the Ultima series of games. My most significant contribution to the Ultima fan community was running Dino’s Ultima Page, a news and information hub for the community, for over a decade.

Ultima insipired such a great following that hundreds of fan-made remakes, tools and other projects appeared over the years. Many remakes were intended to be mods of games such as Dungeon Siege or Neverwinter Nights. Among other things, talented developers found ways to understand the data files of the games (including the graphics, savegames, maps, etc). This resulted in several useful tools (savegame editors, map viewers, etc), but more importantly, it allowed people to create new game engines using the original data files, with the intention of allowing the games to be played on modern operating systems. The first of these was Exult (an Ultima 7 engine), but over the years, projects appeared for most Ultimas – such as Pentagram for Ultima 8, or Nuvie for Ultima 6.

This article describes the process of reverse engineering, i.e. how to try to make sense of data files given the data files and nothing else. We will be looking at the savegame format of Ultima 1. Although Ultima 1 is not free, you can get the entire first Ultima trilogy from Good Old Games for a few bucks. Ultima 1 is a great choice to start reverse engineering because it’s relatively simple – the savegame file is only 820 bytes long and is uncompressed. This made sense for me as when I started this project I was still a budding programmer, and it also made sense because there was very little knowledge about the U1 formats around, whereas the later games had been studied in depth. Reverse engineering is a bit of an advanced topic so feel free to skip it if you feel lost, but it’s also a very interesting topic.

So first thing you need to do is install Ultima 1. If you got it off Good Old Games, it conveniently comes with DOSBox, allowing you to play it under modern operating systems:

u1revenge-install-u1-gog

After launching the game, you will find yourself in the main menu.

u1revenge-mainmenu

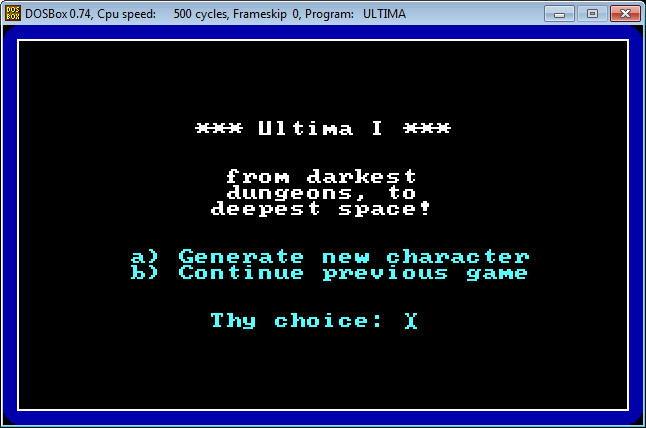
Press ‘a’ to go through the character creation process.

u1revenge-chargen-6

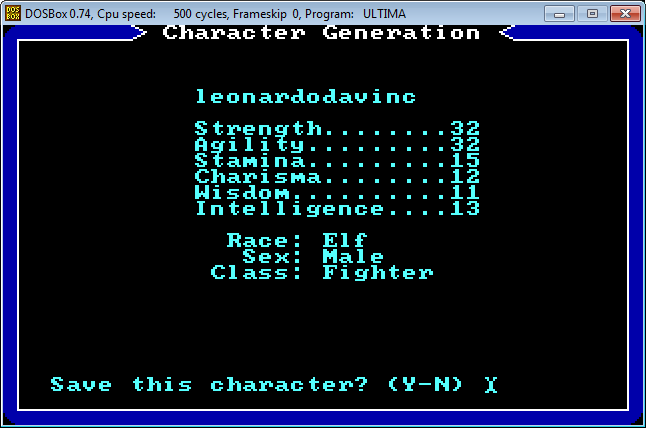
Once you have selected your attributes and saved your character, you find yourself back in the main menu. In the Ultima 1 folder, you should notice a new file called PLAYER1.U1:

u1revenge-mainmenu-savefile

That’s the savegame file we’ll be messing around with. You can use a hex editor to take a glimpse of its contents. Personally I like XVI32 because it’s pretty lightweight and even allows you to edit hex entries.

u1revenge-xvi32

This might look like gibberish, but you can already notice a few things. The first 14 bytes in the savegame file are reserved for the player’s name. Knowing the stats you chose during character creation (strength 32, agility 32, stamina 15, charisma 12, wisdom 11 and intelligence 13), you can also spot them in hex on the second line (20, 20, 0F, 0C, 0B, 0D). Windows Calculator has a Programmer mode that is quite useful for switching between decimal and hex:

u1revenge-wincalc

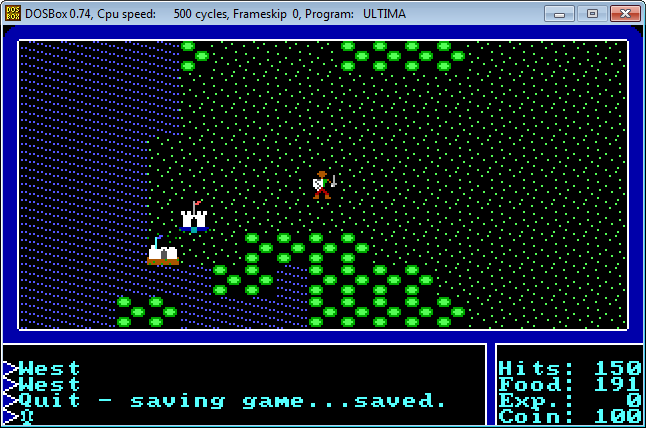
A good way of decoding more parts of the savegame file is interacting with the game itself. Start the game. The world view looks like this:

u1revenge-startworld

Keep a copy of your savegame file at this point. If you move around a bit and save the game, you should at the very least observe changes in your character’s X- and Y-coordinates:

u1revenge-u1moved

You can manually check which bytes in the savegame file changed. I found it more useful to write a hex diff tool that actually highlights the bytes that changed:

u1revenge-hexcompare

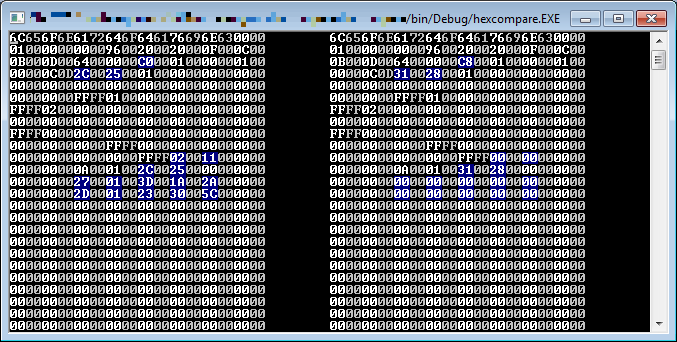
As you can see, it’s not so simple: there are many things that might change, including food. However, you can choose your moves carefully (e.g. 2 steps west, 3 steps north) so that you can then spot which bytes have changed that much and determine which are the world coordinates.

Another way of learning more about the savegame file is by actually tampering with it. Using XVI32, I changed the byte after ’96’ from 00 to 13:

u1revenge-tampering

After running the game, note how the Hits shot up from 150 to 5014:

u1revenge-tampering-result

That makes a bit of sense: the 96 (hex) we saw earlier corresponds to 150 in decimal – the original value of Hits. But why did it become 5014 when we tweaked the byte after it?

It’s because DOS games like this stored values as 16-bit integers in little endian format (i.e. the bigger byte is the second one). So if we have the value we tweaked, i.e. 96 13, that’s actually (13 * 100) + 96 (all hex), which results in 5014 (decimal).

Isn’t that neat? Reverse engineering requires a lot of time and patience, but it’s a bit like fitting together the pieces of a jigsaw puzzle. After a while you might end up understanding a good chunk of the data files:

u1revenge-savegame-file-format

Once you understand the data files (which also includes map and graphics files), you can then proceed to write all sorts of tools and stuff. I had called this project U1Revenge (Ultima 1 Reverse Engineering Effort) and wrote a map viewer and was working on an engine for it. Although I stopped working on it, I did release a couple of demos, the latest of which you can grab from the project page.

u1revenge-engine

Reverse engineering is certainly not a new art. The book Masters of Doom describes how fans of DOOM would hack the game’s map files to create their own level editors. Many games have similarly been studied, and a wealth of knowledge is available today. Reverse engineering is not just an achievement; it is a glimpse of history, and helps to understand how games were created even before we were born. The following links provide further reading:

Loading and Saving Images with SDL2

We have seen in past articles how we can load basic image formats (such as BMP, PNG and JPG) using SDL2 and SDL_image 2.0. In this article, we’re going to learn a bit more about the image formats we can load and save with these libraries.

Saving BMPs

Just like SDL2 gives us SDL_LoadBMP() to load BMP images, it also gives us SDL_SaveBMP() to save them. There is no need for SDL_image to use either of these functions, because they are in core SDL2.

Since we know from past articles that we can use SDL_image to load a few other formats, it is then easy to write a small program to convert from PNG (or any other of the supported format) to a BMP:

#include <SDL.h>
#include <SDL_image.h>

int main(int argc, char ** argv)
{
    SDL_Surface * image = IMG_Load("image.png");
    SDL_SaveBMP(image, "out.bmp");
    SDL_FreeSurface(image);

    return 0;
}

As you can see, it is not even necessary to initialize SDL2. We simply load the PNG file, and save it back to disk as BMP.

Saving PNGs

As someone pointed out in this forum thread, there are two undocumented functions that allow you to save a PNG:

sdl2-savepng

Thus, we can use this function to do the opposite conversion from BMP to PNG:

    SDL_Surface * image = SDL_LoadBMP("image.bmp");
    IMG_SavePNG(image, "out.png");
    SDL_FreeSurface(image);

Loading other formats

Disgracefully, there is no documentation for SDL_image 2.0 at the time of writing this article. The ‘documentation’ links on the SDL_image 2.0 homepage are actually for SDL_image 1.2.8, which is very misleading.

The old documentation for IMG_Init() shows three supported flag values you can pass in: IMG_INIT_JPG, IMG_INIT_PNG and IMG_INIT_TIF. Through intellisense I’ve discovered a fourth one for the WEBP format:

sdl2-init-webp

I’ve also found that calling IMG_Init() and IMG_Quit() is completely unnecessary, as everything seems to work without them.

Finally, despite the few init flags mentioned above, there are many more formats support by IMG_Load(). I’ve tested WEBP, PCX, GIF, PPM, TIF, TGA and BMP with success; and there are other formats in the old documentation that may be supported.

Visual Studio bug with long const strings

It turns out that constants aren’t only problematic in ASP .NET 5.

If you have a pretty long const string with a null character (\0) somewhere towards the beginning, then you’ll be pretty surprised to get the following error when you try to compile:

Unexpected error writing debug information — ‘Error HRESULT E_FAIL has been returned from a call to a COM component.’

Say you have a 3,000-character string that looks something like this:

const string s = "aaaaaaaaaaaa\0aa...aaaaa";

Although this is perfectly valid, Visual Studio fails to compile it:

vsconststringbug

I created a Stack Overflow question and a Visual Studio bug report for this.

Comments on the Stack Overflow question confirmed this to be a bug in the PDB writer (Eric Lippert). It’s Visual Studio specific, and doesn’t happen when compiling from the command line (Jon Skeet). Apparently it happens if the null character is before the 2033rd index in the string (Tommy).

One workaround suggested by Tommy is to use the string literal notation, which actually works:

const string s = @"aaaaaaaaaaaa\0aa...aaaaa";

Another workaround is to simply drop the const qualifier.

More Gulp in Practice

In my introductory Gulp article, I explained how to set up Gulp, and how to use it to concatenate and minify JavaScript files. In this article, we’re going to see a bunch of techniques that you’ll find useful when working with Gulp in practice.

We’re going to start with the following package.json:

{
  "name": "gulptest",
  "version": "1.0.0",
  "description": "Learning to use Gulp.",
  "main": "index.js",
  "scripts": {
    "test": "echo \"Error: no test specified\" && exit 1"
  },
  "author": "Daniel D'Agostino",
  "license": "ISC",
  "devDependencies": {
    "gulp": "^3.9.0",
    "gulp-concat": "^2.6.0",
    "gulp-uglify": "^1.5.1"
  }
}

…and the following Gulpfile.js:

var gulp = require('gulp'),
    uglify = require('gulp-uglify'),
    concat = require('gulp-concat');
     
gulp.task('default', function() {
  return gulp.src('js/*.js')
    .pipe(concat('all.js'))
    .pipe(uglify())
    .pipe(gulp.dest('dist/'));
});

This is where we left off in the previous Gulp article.

Restoring Packages

And as we have seen in the previous article, it takes a bit of work to set things up the first time. You have to install a bunch of packages, set up your package.json, and then write your Gulpfile. Fortunately, however, this needs to be done only once. We’ve been installing Gulp and the packages it requires using the –save-dev flag for a reason. Once they get added to the package.json, a person getting this file from source control needs only to run the following command:

npm install

We didn’t specify a package to install, so npm will look in your package.json file and install any packages you’re missing. No need to install all the required Gulp packages every time.

gulp-npm-install

It is still necessary, however, to install Gulp globally (npm install gulp -g) to be able to run the gulp command.

Watch

Some people think it’s a pain in the ass to have to run Gulp every time you change a script. Well, it turns out that there’s a Gulp plugin that will run tasks automatically when changes are detected.

All we need to do is add a watch task that will execute a particular task when changes to a specified set of files are detected:

gulp.task('watch', function() {
    gulp.watch('js/*.js', ['default']);
});

Try this by making a change to one of your JavaScript files (e.g. adding a space) and saving the file. watch detects this and runs the default task:

gulp-watch

JSHint

JavaScript is known to be a language with a lot of pitfalls, and there are many reasons why it takes extra effort to do things right. I’m not going to get into the details here; read JavaScript: The Good Parts (book) if you’re curious.

Fortunately, however, there’s a set of tools we can use to help us. These tools carry out a process called linting, which means syntactic analysis of the code. Just like with compiling just about any programming language, syntactic analysis reports any errors in your programming syntax. That is very useful in catching bugs early.

A linter called JSHint can be used by Gulp. In order to use it, we’ll need to install both jshint and gulp-jshint:

npm install jshint gulp-jshint --save-dev

With that done, add JSHint to your task:

var gulp = require('gulp'),
    jshint = require('gulp-jshint'),
    uglify = require('gulp-uglify'),
    concat = require('gulp-concat');
     
gulp.task('default', function() {
  return gulp.src('js/*.js')
    .pipe(jshint())
    .pipe(jshint.reporter('default'))
    .pipe(concat('all.js'))
    .pipe(uglify())
    .pipe(gulp.dest('dist/'));
});

gulp.task('watch', function() {
    gulp.watch('js/*.js', ['default']);
});

The order of placement of your jshint() is important. If you place it after your concat() call, you’ll see all errors coming from all.js, rather than the actual source filenames.

Now, you’d think jQuery library code would pass linting with flying colours, right? Right?

gulp-jshint-jquery

Development and Production Tasks

If we’re minifying our JavaScript, then how do we debug it? We can’t possibly read minified code.

In fact, we don’t have to. We can set up different tasks for Gulp to run in development and production. For instance:

var gulp = require('gulp'),
    jshint = require('gulp-jshint'),
    uglify = require('gulp-uglify'),
    concat = require('gulp-concat');
     
gulp.task('dev', function() {
  return gulp.src('js/*.js')
    .pipe(jshint())
    .pipe(jshint.reporter('default'))
    .pipe(concat('all.js'))
    //.pipe(uglify())
    .pipe(gulp.dest('dist/'));
});

gulp.task('prod', function() {
  return gulp.src('js/*.js')
    //.pipe(jshint())
    //.pipe(jshint.reporter('default'))
    .pipe(concat('all.js'))
    .pipe(uglify())
    .pipe(gulp.dest('dist/'));
});

gulp.task('watch', function() {
    gulp.watch('js/*.js', ['dev']);
});

Notice I’ve changed the name of the tasks, and commented out different parts of the pipeline in dev and prod. We don’t want to minify our JavaScript during development because we want to be able to debug it, and we don’t want to waste time linting it when preparing a release, because hopefully it turned out impeccable as a result of our development. 🙂

Then, just run:

gulp <taskname>

See:

gulp-named-tasks

Task Dependencies

Right, but now, we lost the ability to just run gulp without specifying the task name, because we no longer have a default task. We can fix this as follows:

gulp.task('default', ['dev']);

Instead of specifying a function for the task to execute, we’re giving it an array of task names it is dependent on. In this case, we’re saying that the default task is dependent on the dev task. So Gulp will run dev first, then default:

gulp-dependencies

This is particularly useful when you want to chain tasks. For instance, your dev task will depend on separate tasks for processing JavaScript and CSS. Speaking of which…

CSS

We’ve mostly seen examples dealing with JavaScript files, but Gulp can do much more than that.

Dealing with CSS is not very different from what we’ve seen so far, but we need a separate plugin for minification:

npm install gulp-minify-css --save-dev

Remember to add a require() for this at the top:

    minifycss = require('gulp-minify-css'),

With that available, we can now create a separate task to concatenate and minify CSS:

gulp.task('dev-css', function() {
  return gulp.src('css/*.css')
    .pipe(concat('all.css'))
    .pipe(minifycss())
    .pipe(gulp.dest('dist/'));
});

This is a good time to rename our former dev task to dev-js for clarity:

gulp.task('dev-js', function() {
  return gulp.src('js/*.js')
    .pipe(jshint())
    .pipe(jshint.reporter('default'))
    .pipe(concat('all.js'))
    //.pipe(uglify())
    .pipe(gulp.dest('dist/'));
});

Then, using the task dependency mechanism we have seen in the previous section, we can set things up so that both these tasks are run when invoking gulp dev or just gulp:

gulp.task('dev', ['dev-js', 'dev-css']);

gulp.task('default', ['dev']);

And here you go:

gulp-css-with-dependencies

Notify

Rather than explaining this one, let’s install it and see what it does:

npm install gulp-notify --save-dev

Let’s update our Gulpfile to notify us when one of the core tasks is ready:

var gulp = require('gulp'),
    jshint = require('gulp-jshint'),
    uglify = require('gulp-uglify'),
    minifycss = require('gulp-minify-css'),
    notify = require('gulp-notify'),
    concat = require('gulp-concat');
     
gulp.task('dev-js', function() {
  return gulp.src('js/*.js')
    .pipe(jshint())
    .pipe(jshint.reporter('default'))
    .pipe(concat('all.js'))
    //.pipe(uglify())
    .pipe(gulp.dest('dist/'))
    .pipe(notify({ message: 'dev-js task complete' }));
});

gulp.task('dev-css', function() {
  return gulp.src('css/*.css')
    .pipe(concat('all.css'))
    .pipe(minifycss())
    .pipe(gulp.dest('dist/'))
    .pipe(notify({ message: 'dev-css task complete' }));
});

gulp.task('prod', function() {
  return gulp.src('js/*.js')
    //.pipe(jshint())
    //.pipe(jshint.reporter('default'))
    .pipe(concat('all.js'))
    .pipe(uglify())
    .pipe(gulp.dest('dist/'))
    .pipe(notify({ message: 'prod task complete' }));
});

gulp.task('dev', ['dev-js', 'dev-css']);

gulp.task('default', ['dev']);

gulp.task('watch', function() {
    gulp.watch('js/*.js', ['dev']);
});

This, by the way, is the final Gulpfile for this article (in case you want to copy it for faster setting up).

Here’s the result of running Gulp with this:

gulp-notify

Not only does it write to the console, but you get a notification from your system tray. Nice.

Semicolon insertion

If you just bump gulp.src onto the next line like this:

gulp.task('dev-js', function() {
  return
    gulp.src('js/*.js')
    .pipe(jshint())
    .pipe(jshint.reporter('default'))
    .pipe(concat('all.js'))
    //.pipe(uglify())
    .pipe(gulp.dest('dist/'));
});

…your task will mysteriously not run. That’s because of a JavaScript feature called semicolon insertion. Basically, JavaScript sees fit to put a semicolon after your return statement, making your task ineffective. Just make sure your return statement isn’t isolated like this, and use the style in the previous sections.

Getting more out of Gulp

There are many other useful plugins for Gulp that you can use. Check out Mark Goodyear’s article for examples involving SASS and image manipulation among other things.

The final package.json

Here you go. This should save you some time setting things up. Remember: npm install.

{
  "name": "gulptest",
  "version": "1.0.0",
  "description": "Learning to use Gulp.",
  "main": "index.js",
  "scripts": {
    "test": "echo \"Error: no test specified\" && exit 1"
  },
  "author": "Daniel D'Agostino",
  "license": "ISC",
  "devDependencies": {
    "gulp": "^3.9.0",
    "gulp-concat": "^2.6.0",
    "gulp-jshint": "^2.0.0",
    "gulp-minify-css": "^1.2.3",
    "gulp-notify": "^2.2.0",
    "gulp-uglify": "^1.5.1",
    "jshint": "^2.8.0"
  }
}

ASP .NET 5 Application Configuration, Part 2

In Part 1, we saw how to retrieve basic application settings from a range of formats available in ASP .NET 5. In this article, we will see techniques used for settings that go beyond simple key-value representation.

Getting a Config Section

Let’s say we have this appsettings.json:

{
  "Title": "configuration",
  "DataSettings": {
    "ConnectionString": "SomeConnectionString",
    "AuditDatabaseName": "AuditDB"
  }
}

…and we want to map the DataSettings to the following C# class:

    public class DataSettings
    {
        public string ConnectionString { get; set; }
        public string AuditDatabaseName { get; set; }
    }

We can start with configuration loading code from the Part 1 article:

        public void ConfigureServices(IServiceCollection services)
        {
            var configurationBuilder = new ConfigurationBuilder();
            configurationBuilder.AddJsonFile("appsettings.json");
            Configuration = configurationBuilder.Build();

            // TODO code goes here
        }

At this point, we need to add the following dependency to our project.json:

    "Microsoft.Extensions.OptionsModel": "1.0.0-rc1-final"

Then, in the TODO part in the code above, we can add the following to read the DataSettings section into its strongly-typed C# class equivalent:

        public void ConfigureServices(IServiceCollection services)
        {
            var configurationBuilder = new ConfigurationBuilder();
            configurationBuilder.AddJsonFile("appsettings.json");
            Configuration = configurationBuilder.Build();

            var section = Configuration.GetSection("DataSettings");
            services.Configure<DataSettings>(section);
        }

You may be disappointed to find that this doesn’t give you an object you can use right away. However, what we are doing is putting our config section in the services collection, which is basically ASP .NET 5’s built-in dependency injection. In the next section, we’ll see how we can actually use this.

Note that by reading a config section, you’re basically pulling out only that section from the config. In the example above, the Title setting is not included in the section we read.

Dependency Injection with the Options Model

One of the most important parts of ASP .NET 5 Configuration is the options model, which is just a fancy way of saying dependency injection. By calling services.Configure() in the previous section, we have set up our settings class with dependency injection. So how do we use it?

Let’s make a simple Web API controller to see this in action. In ASP .NET 5, Web API and MVC are the same thing, so we’ll need the MVC package. Also make sure you have the OptionsModel package from the previous section:

    "Microsoft.Extensions.OptionsModel": "1.0.0-rc1-final",
    "Microsoft.AspNet.Mvc": "6.0.0-rc1-final"

We’ll need to do some simple setup in Startup.cs for MVC to work:

        public void ConfigureServices(IServiceCollection services)
        {
            var configurationBuilder = new ConfigurationBuilder();
            configurationBuilder.AddJsonFile("appsettings.json");
            Configuration = configurationBuilder.Build();

            var section = Configuration.GetSection("DataSettings");
            services.Configure<DataSettings>(section);

            services.AddMvc();
        }

        public void Configure(IApplicationBuilder app)
        {
            app.UseIISPlatformHandler();

            app.UseMvc();
        }

Finally, we can add our controller:

    [Route("api/[controller]")]
    public class DataController : Controller
    {
        IOptions<DataSettings> dataSettings;

        public DataController(IOptions<DataSettings> dataSettings)
        {
            this.dataSettings = dataSettings;
        }

        public IActionResult Index()
        {
            return new ObjectResult(this.dataSettings.Value.ConnectionString);
        }
    }

Notice how by putting an IOptions<DataSettings> in the constructor, we can get our settings class from the dependency injection framework. Accessing its Value gives us the DataSettings instance that we configured earlier.

Sure enough, it works:

aspnet5-web-api-dependency-injection

Strongly-Typed Configuration from Root

We don’t always need to read just a section. Sometimes, it can be handy to read the whole configuration file.

So let’s say I have these settings classes:

    public class MySettings
    {
        public string Title { get; set; }
        public List<string> SupportedFormats { get; set; }
        public List<Hero> Heroes { get; set; }
    }

    public class Hero
    {
        public string CharacterName { get; set; }
        public string ActorName { get; set; }
    }

Our appsettings.json now contains the following:

{
  "Title": "configuration",
  "SupportedFormats": [ "json", "xml", "ini" ],
  "Heroes": [
    {
      "CharacterName": "Luke Skywalker",
      "ActorName": "Mark Hamill"
    },
    {
      "CharacterName": "Han Solo",
      "ActorName": "Harrison Ford"
    }
  ]
}

Then, I can read all this stuff into MySettings as follows:

        public void ConfigureServices(IServiceCollection services)
        {
            var configurationBuilder = new ConfigurationBuilder();
            configurationBuilder.AddJsonFile("appsettings.json");
            Configuration = configurationBuilder.Build();

            var mySettings = new MySettings();
            Configuration.Bind(mySettings);
        }

And… there you go:

aspnet5-config-from-root

If you take a moment to look at the stuff I put into the appsettings.json, you’ll begin to appreciate just how powerful this is. We can read basic strings, arrays, and even lists of entire objects like this. If you’ve experienced what a pain in the ass it is to read a simple list of data from a key in Web.config with the ASP .NET we’re used to, then this should feel like a breath of fresh air.

Custom Configuration Providers

If none of the default setting file formats match what you need, then you’ll probably need to create your own custom configuration provider. The example in the official docs shows a reasonable example: retrieving settings from a database. Unfortunately, however, that example doesn’t work (at the time of writing this article), because the APIs have changed and the official docs have not been updated.

Just for the sake of example, let’s imagine we want to load a file containing pipe-delimited settings. We’ll work with the following pipeconfig.txt:

key1|value1|key2|value2

Our custom provider class needs to:

  1. Inherit from ConfigurationProvider
  2. Override the Load() method
  3. Set the Data dictionary

Here’s an example of what our pipe-delimited-setting loader could look like:

    public class PipeDelimitedConfigSource : ConfigurationProvider
    {
        private string filename;

        public PipeDelimitedConfigSource(string filename)
        {
            this.filename = filename;
        }

        public override void Load()
        {
            string fileContents = File.ReadAllText(filename);
            string[] tokens = fileContents.Split(new char[] { '|' });

            for (int i = 0; i < tokens.Length; i += 2)
            {
                var key = tokens[i];
                var value = tokens[i + 1];
                this.Data[key] = value;
            }
        }
    }

Then, back in Startup.cs, we can feed it to our ConfigurationBuilder using its Add() method:

        public void ConfigureServices(IServiceCollection services)
        {
            var configurationBuilder = new ConfigurationBuilder();
            var configSource = new PipeDelimitedConfigSource("../pipeconfig.txt");
            configurationBuilder.Add(configSource);
            Configuration = configurationBuilder.Build();
        }

        public void Configure(IApplicationBuilder app)
        {
            app.UseIISPlatformHandler();

            app.Run(async (context) =>
            {
                var setting1 = this.Configuration["key1"];
                var setting2 = this.Configuration["key2"];
                string output = $"<h1>{setting1}</h1><h2>{setting2}</h2>";

                await context.Response.WriteAsync(output);
            });
        }

Here’s the output:

aspnet5-custom-config-examplet

Config files and wwwroot

Before ASP .NET 5, configuration resided in Web.config. Having a single file makes it easy to configure web servers not to serve it. The flexibility afforded by having different possible formats and source for configuration in ASP .NET 5 thus begs the question: how do we prevent our config files from being served?

This is easy to deal with if we understand the role of the wwwroot folder. Before ASP .NET 5, the project root and the website root were one and the same. In ASP .NET 5, the website root (called wwwroot by default, but configurable) is a subfolder of the project folder. Thus, to keep files out of reach, it is necessary only to keep them out of wwwroot.

This way, the application code will have access to these files, but they will not be served as static files via simple web requests.

The role of web.config

By reading this article and the previous one, you have hopefully learned that there is no longer a standard web.config file that stores all the web application’s settings. With this in mind, you might be a little surprised to find that standard ASP .NET 5 project templates actually come with a web.config in the wwwroot folder.

At the time of writing this article, the contents of the file (although not important here) are the following:

<?xml version="1.0" encoding="utf-8"?>
<configuration>
  <system.webServer>
    <handlers>
      <add name="httpPlatformHandler" path="*" verb="*" modules="httpPlatformHandler" resourceType="Unspecified"/>
    </handlers>
    <httpPlatform processPath="%DNX_PATH%" arguments="%DNX_ARGS%" stdoutLogEnabled="false" startupTimeLimit="3600"/>
  </system.webServer>
</configuration>

The reason for the presence of the web.config is explained in this StackOverflow answer, which I quote:

“Web.config is strictly for IIS Configuration. It is not needed unless hosting in IIS. It is not used when you run the app from the command line.

“In the past Web.config was used for both IIS configuration and application configuration and settings. But in asp.net 5 it is not used by the application at all, it is only used for IIS configuration.

“This decoupling of the application from IIS is part of what makes cross platform possible.”

Summary

In this article, we have seen more complex ways in which we can read application configuration. The configuration model in ASP .NET 5 is indeed powerful, as we can map settings files to strongly-typed objects, and pass them on to our controllers via dependency injection. Where necessary, we can extend the range of built-in configuration providers by creating our own.

In the final sections, we have also discussed how to protect settings files from being accidentally served over the web, and why there is a web.config file in wwwroot by default despite ASP .NET 5 doing away with web.config.