Tag Archives: Game Development

Getting Started with Unity3D on Linux

If you have any sort of interest in game development, you’ve probably heard of Unity3D. And if you’ve used it before, you probably know that it has for a long time been restricted to Windows and Mac in terms of development platforms. That changed recently, when they added support for Linux. In this article, I’ll show you how I set up Unity3D on my Kubuntu 20.04 installation, and if the distribution you’re using is close enough, the same steps will likely work for you as well.

First, go to the Unity3D Download page and grab the Unity Hub.

Update 14th May 2023: if you get an error saying the repository isn’t signed, check out this forum post for a solution.

Download the Unity Hub, then open it.

After Unity Hub has finished downloading, run it. It’s a cross-platform AppImage, so you can either double-click it or run it from the terminal.

You have no valid licence… you filthy peasant!

Register an account on the Unity3D website if you don’t have one already. Once Unity Hub loads, it immediately complains about not having a licence. If you click “Manage License”, it will ask you to login. You can click on the resulting “Login” link, or else click the top-right icon and then “Sign in”, to log into Unity3D from Unity Hub.

This is where you sign in.
Reject cookies and login. Social providers are under the cookie banner.

Click “Reject All” to opt out of cookies. Then, sign in using your email address and password. Alternatively, if you log into your account using a social identity provider, you’ll find different providers’ icons under the cookie banner.

Now you’re back in the Licence page of Unity Hub. Wait a few seconds for it to activate, then click the “Activate New License” button:

After logging in, you can activate a new licence.

In the next window, select whichever options apply to you. If you’re just a hobbyist, Unity3D is free, so you can select the radio buttons as shown below. Click “Done” when you’re ready.

Choose the relevant options. Unity3D is free unless you’re a company making $100k or more.

You now have a licence! Click the arrow at the top-left to go to the Projects section.

Armed with a licence, go out of Preferences and back to the main sections.

If you try to add a new project, you’ll realise that you need to install a version of the Unity3D editor first. Head over to the Installs section to do this.

You can’t create a new project before you install a version of the Unity3D editor.

In the Installs section, click the “Add” button:

Add a version of the Unity3D editor from here.

Choose whichever version you prefer. The recommended LTS version is best if you need stability; otherwise you can use the latest and greatest version with the newest features.

Choose which version of the Unity3D editor you want to install. The recommended LTS is better for stability; if you’re just starting out, you don’t really need that and can go for the newest one instead.

Click “Next”, and you can now choose which platforms you want your builds to target and what documentation you want. If you’re just starting out, keep it simple and just leave the default “Linux Build Support” enabled. You can always add more stuff later if/when you need it.

Choose which platforms you want to target, and which documentation you want to include. If you’re just starting out, you don’t really care.

Click “Done”, and wait for it to install…

Grab some coffee.

When it’s done, head back to the Projects section. Click the “New” button to create a new project.

In the next window, select the type of project (3D by default), give it a name, and select a folder where your Unity3D projects will go (the new project will be created as a subfolder of this). Then click the “Create” button:

Choose project type, name and location.

Wait for it…

Nice loading screen…

And… that’s it! The editor then comes up, and you can begin creating your game.

The Unity3D editor, finally running on Linux.

If you need a quick place to start, check out my “Unity3D: Moving an Object with Keyboard Input” tutorial here at Gigi Labs, as well as my early Unity3D articles at Programmer’s Ranch.

Simple Ultima-Style Dialogue Engine in C#

The Ultima series is one of the most influential RPG series of all time. It is known for open worlds, intricate plots, ethical choices as opposed to “just kill the bad guy”, and… dialogue. The dialogue of the Ultima series went from being simple one-liners to complex dialogue trees with scripted side-effects.

Ultima 4-6, as well as the two Worlds of Ultima games (which used the Ultima 6 engine), used a simple keyword-based dialogue engine.

In these games, conversing with NPCs (people) involved typing in a number of common keywords such as “name” or “job”, and entering new keywords based on their responses in order to develop the conversation. Only the first four characters were taken into consideration, so “batt” and “battle” would yield the same result. “Bye” or an empty input ends the conversation, and any unrecognised keyword results in a fixed default response.

In Ultima 4, conversations were restricted to “name”, “job”, “health”, as well as two other NPC-specific keywords. For each NPC, one keyword would also trigger a question, to which you had to answer “yes” or “no”, and the NPC would respond differently based on your answer. You can view transcripts for or interact with almost all Ultima 4 dialogues on my oldest website, Dino’s Ultima Page, to get an idea how this works.

Later games improved this dialogue engine by highlighting keywords, adding more NPC-specific keywords, allowing multiple keywords to point to the same response, and causing side effects such as the NPC giving you an item.

If we focus on the core aspects of the dialogue engine, it is really simple to build something similar in just about any programming language you like. In C#, we could use a dictionary to hold the input keywords and the matching responses:

            var dialogue = new Dictionary<string, string>()
            {
                ["name"] = "My name is Tom.",
                ["job"] = "I chase Jerry.",
                ["heal"] = "I am hungry!",
                ["jerr"] = "Jerry the mouse!",
                ["hung"] = "I want to eat Jerry!",
                ["bye"] = "Goodbye!",
                ["default"] = "What do you mean?"
            };

We then loop until the conversation is over:

            string input = null;
            bool done = false;

            while (!done)
            {
                // the rest of the code goes here
            }

We accept input, and then process it to make it really easy to just index the dictionary later:

                Console.Write("You say: ");
                input = Console.ReadLine().Trim().ToLowerInvariant();
                if (input.Length > 4)
                    input = input.Substring(0, 4);

Whitespace around the input is trimmed off, and the input is converted to lowercase to match how we are storing the keywords in the dictionary’s keys. If the input is longer than 4 characters, we truncate it to the first four characters.

                if (input == string.Empty)
                    input = "bye";

                if (input == "bye")
                    done = true;

An empty input or “bye” will break out of the loop, ending the conversation.

                if (dialogue.ContainsKey(input))
                    Console.WriteLine(dialogue[input]);
                else
                    Console.WriteLine(dialogue["default"]);

The above code is the heart of the dialogue engine. It simply checks whether the input matches a known keyword. If it does, it returns the corresponding response. If not, it returns the “default” response. Note that this “default” response could not otherwise be obtained by normal means (for example, typing “default” as input) since the input is always being truncated to a maximum of four characters.

As you can see, it takes very little to add a really simple dialogue engine to your game. This might not have all the features that the Ultima games had, but serves as an illustration on how to get started.

The source code for this article is in the UltimaStyleDialogue folder at the Gigi Labs BitBucket repository.

SDL2 Bounding Box Collision Detection

One of the most basic and fundamental pieces of logic in a game is to check whether an object hit another object. This is known as collision detection. You can use it to check whether a bullet hit the player or an enemy, or to see if the player bumped into an impassable barrier, etc.

The source code for this article is available at the Gigi Labs BitBucket repository.

Although objects in a 2D game may have various shapes, it’s usually easiest to check for collisions by assuming a rectangular boundary (i.e. a bounding box) around each object, and testing those rectangles for intersections. This is both easy to write and efficient to compute, and although it may not be 100% faithful to the shape of the object, in most cases it’s good enough.

To see how this works, we’ll draw two rectangles, and test whether they intersect. We’ll start off with the following code, which is quite similar to what we had in earlier SDL2 articles here:

    // variables

    bool quit = false;
    SDL_Event event;
    int x = 288;
    int y = 208;

    // init SDL

    SDL_Init(SDL_INIT_VIDEO);
    SDL_Window * window = SDL_CreateWindow("SDL2 Bounding Box Collision Detection",
        SDL_WINDOWPOS_UNDEFINED, SDL_WINDOWPOS_UNDEFINED, 640, 480, 0);
    SDL_Renderer * renderer = SDL_CreateRenderer(window, -1, 0);

    SDL_Rect rect1 = { x, y, 100, 100 };
    SDL_Rect rect2 = { 50, 50, 100, 80 };

    // handle events

    while (!quit)
    {
        SDL_Delay(10);
        SDL_PollEvent(&event);

        switch (event.type)
        {
            case SDL_QUIT:
                quit = true;
                break;
            // TODO keyboard input handling goes here
        }

        // TODO rendering & collision detection goes here
    }

    // cleanup SDL

    SDL_DestroyRenderer(renderer);
    SDL_DestroyWindow(window);
    SDL_Quit();

    return 0;

This doesn’t do anything other than render an empty window. We can draw a couple of rectangles by using SDL_RenderFillRect(). Add the following code in the place of the rendering and collision detection comment:

        SDL_SetRenderDrawColor(renderer, 242, 242, 242, 255);
        SDL_RenderClear(renderer);

        SDL_SetRenderDrawColor(renderer, 0, 255, 0, 255);
        SDL_RenderFillRect(renderer, &rect1);

        SDL_SetRenderDrawColor(renderer, 0, 0, 255, 255);
        SDL_RenderFillRect(renderer, &rect2);

        SDL_RenderPresent(renderer);

First we’re clearing the window to a light grayish colour with SDL_RenderClear(), and then we’re drawing two rectangles (one blue, one green) using SDL_RenderFillRect(). Before each of these calls, we must set the drawing colour using SDL_SetRenderDrawColor(). Finally, SDL_RenderPresent() will render everything to the window.

Now we have two rectangles:

Adding some simple keyboard handling code (as per “Handling Keyboard and Mouse Events in SDL2“) will allow us to move the green rectangle with the arrow keys on the keyboard:

        switch (event.type)
        {
            case SDL_QUIT:
                quit = true;
                break;
            case SDL_KEYDOWN:
                switch (event.key.keysym.sym)
                {
                    case SDLK_LEFT:  rect1.x--; break;
                    case SDLK_RIGHT: rect1.x++; break;
                    case SDLK_UP:    rect1.y--; break;
                    case SDLK_DOWN:  rect1.y++; break;
                }
                break;
        }

Now we can work on the actual collision detection: if you move the green rectangle such that it hits the blue one, we’ll change the colour of both to red. We could write the code to check whether the rectangles overlap (e.g. as in Lazy Foo’s collision detection tutorial), but why bother? SDL2 gives us a handy SDL_HasIntersection() function that we can use out of the box. Our rendering and collision detection code changes thus:

        SDL_bool collision = SDL_HasIntersection(&rect1, &rect2);

        SDL_SetRenderDrawColor(renderer, 242, 242, 242, 255);
        SDL_RenderClear(renderer);

        if (collision)
            SDL_SetRenderDrawColor(renderer, 255, 0, 0, 255);
        else
            SDL_SetRenderDrawColor(renderer, 0, 255, 0, 255);
        SDL_RenderFillRect(renderer, &rect1);

        if (collision)
            SDL_SetRenderDrawColor(renderer, 255, 0, 0, 255);
        else
            SDL_SetRenderDrawColor(renderer, 0, 0, 255, 255);
        SDL_RenderFillRect(renderer, &rect2);

        SDL_RenderPresent(renderer);

This code simply decides what colour to draw for each rectangle based on whether a collision occurred. Sure enough, when you drive the green rectangle into the blue one, both change to red:

Sweet! In this article, we learned how to draw rectangles and check whether they intersect using functions that SDL2 provides. Rectangle intersection is a simple way of checking for collision detection between the bounding boxes of objects in a 2D game. This is a simple and fast approach that works well enough for most situations. Sometimes though, you may need to use more appropriate geometry (e.g. a bounding circle works best for a ball).

Multiplayer Game with Akka .NET and Publish/Subscribe

This article shows how to develop the basis of a client/server multiplayer game. The clients move around the playing field and their movements are broadcasted to all other clients via the server. This is done using the Publish/Subscribe (or Observer) pattern. The software is developed using Akka .NET, and the network communications implementation is based on Akka.Remote.

The source code for this article is available at the Gigi Labs BitBucket Repository.

Prerequisites

In this article, we’re going to develop a client/server application. In our solution, we’ll have two different console applications for client and server respectively. We’ll also have a third project: a class library containing message classes used by both. The client and server projects will reference this class library.

We’re going to use Akka .NET and its related Akka.Remote component in both client and server. These can be installed via NuGet.

Install-Package Akka
Install-Package Akka.Remote

Server

The server is actually the simplest part of this application. We have one actor which is a direct implementation of the Publish/Subscribe pattern. This ServerActor keeps track of subscribers (which are remote client actors in this case) using their respective subscriber GUIDs.

    public class ServerActor : TypedActor,
        IHandle<SubscribeMessage>,
        IHandle<UpdateLocationMessage>,
        IHandle<UnsubscribeMessage>
    {
        private Dictionary<Guid, IActorRef> subscribers;

        public ServerActor()
        {
            this.subscribers = new Dictionary<Guid, IActorRef>();
        }

        public void Handle(SubscribeMessage message)
        {
            this.subscribers[message.SubscriberGuid] = Sender;
        }

        public void Handle(UpdateLocationMessage message)
        {
            this.Broadcast(message);
        }

        public void Handle(UnsubscribeMessage message)
        {
            // remove subscription

            if (this.subscribers.ContainsKey(message.SubscriberGuid))
                this.subscribers.Remove(message.SubscriberGuid);

            // broadcast removal to everyone else

            this.Broadcast(message);
        }

        private void Broadcast<T>(T message) where T : class
        {
            foreach (var subscriber in this.subscribers.Values)
                subscriber.Tell(message);
        }
    }

Subscription and unsubscription are simple add/remove operations on the subscriber dictionary. When a client moves in the playing area, he sends an update to the server in the form of an UpdateLocationMessage. This is then broadcasted to all subscribers (in this case also to the sender) so that they can update the position of the client that moved.

The messages will be covered in the next section.

The server program does nothing more than create the ActorSystem, and an instance of the ServerActor within it:

        static void Main(string[] args)
        {
            var configManager = ConfigurationManager.AppSettings;
            string actorSystemName = configManager["actorSystemName"];

            Console.Title = $"{actorSystemName} - Server";

            try
            {
                using (var actorSystem = ActorSystem.Create(actorSystemName))
                {
                    var server = actorSystem.ActorOf(
                        Props.Create<ServerActor>(), "ServerActor");

                    string serverActorAddress = configManager["serverActorAddress"];
                    var remoteServerActor = actorSystem.ActorSelection(serverActorAddress);

                    Console.ReadLine();
                }
            }
            catch (Exception ex)
            {
                Console.WriteLine(ex);
            }
        }

In the server’s App.config, we need to use HOCON to set up Akka.Remote, mainly defining the port at which the server will listen:

<?xml version="1.0" encoding="utf-8" ?>
<configuration>
  <configSections>
    <section name="akka" type="Akka.Configuration.Hocon.AkkaConfigurationSection, Akka" />
  </configSections>

  <startup>
    <supportedRuntime version="v4.0" sku=".NETFramework,Version=v4.6.1" />
  </startup>

  <appSettings>
    <add key="actorSystemName" value="PubSubGame" />
  </appSettings>

  <akka>
    <hocon>
      <![CDATA[
        
        akka
        {
            actor
            {
                provider = "Akka.Remote.RemoteActorRefProvider, Akka.Remote"
            }

            remote 
            {
                helios.tcp
                {
                    port = 7482
                    hostname = localhost
                }
            }
        }
      
      ]]>
    </hocon>
  </akka>
</configuration>

Common Messages

The message classes in the class library project, “GameMessages”, are required by both client and server because they are the means by which basic publish/subscribe interactions occur.

    public class SubscribeMessage
    {
        public Guid SubscriberGuid { get; }

        public SubscribeMessage(Guid subscriberGuid)
        {
            this.SubscriberGuid = subscriberGuid;
        }
    }

The SubscribeMessage is sent by the client when it starts. Through it, the server sets up an association between SubscriberGuid and the client’s IActorRef (with a dictionary entry). Although this association is not needed for message broadcast, it is necessary to remove the subscriber with that GUID when he unsubscribes.

    public class UnsubscribeMessage
    {
        public Guid SubscriberGuid { get; }
        public short LastX { get; }
        public short LastY { get; }

        public UnsubscribeMessage(Guid subscriberGuid,
            short lastX, short lastY)
        {
            this.SubscriberGuid = subscriberGuid;
            this.LastX = lastX;
            this.LastY = lastY;
        }
    }

The UnsubscribeMessage could in most cases be just a subscriber GUID. However, for our game, we are also including the last position of the client in the game area when he left the game. In this way, the other clients can update their view of the playing area by removing the client that left.

    public class UpdateLocationMessage
    {
        public char Avatar { get; }
        public short OldX { get; }
        public short OldY { get; }
        public short NewX { get; }
        public short NewY { get; }

        public UpdateLocationMessage(Guid subscriberGuid,
            char avatar, short oldX, short oldY, short newX, short newY)
        {
            this.SubscriberGuid = subscriberGuid;
            this.Avatar = avatar;
            this.OldX = oldX;
            this.OldY = oldY;
            this.NewX = newX;
            this.NewY = newY;
        }
    }

On startup and whenever a client moves, he sends an UpdateLocationMessage. In our case, this includes the new location of the client, his previous location, and an arbitrary character representing that client (avatar). The clients receiving this update will erase the client from the previous location, and draw him in the new location using the provided avatar.

Client Overview

akka-multiplayer-pubsub2

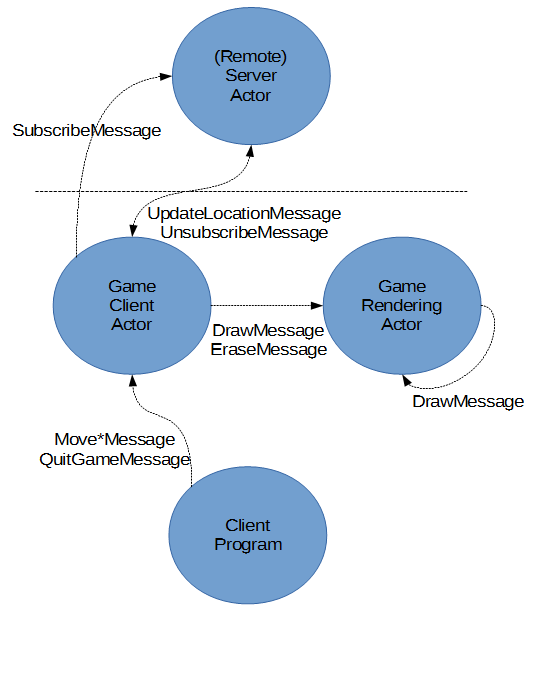
The client application is split up into three components.

  1. The main program logic sets up the ActorSystem and handles input from the console.
  2. The GameClientActor is responsible for communicating with the server. It sends messages to the server as a result of input coming from the main program logic, but also receives updates from the server. In both cases, updates are forwarded to the GameRenderingActor so that they can be drawn on the playing area in the console.
  3. The GameRenderingActor draws the playing area in the console. It keeps this view up to date as a result of the messages it receives from the GameClientActor.

Client – Main Program Logic

The main program for the client first takes care of setting up the ActorSystem, together with a GameClientActor and a GameRendererActor:

        static void Main(string[] args)
        {
            var configManager = ConfigurationManager.AppSettings;
            string actorSystemName = configManager["actorSystemName"];
            char avatar = configManager["avatar"][0];

            Console.Title = $"{actorSystemName} - Client";
            Console.OutputEncoding = Encoding.UTF8;
            Console.CursorVisible = false;

            try
            {
                using (var actorSystem = ActorSystem.Create(actorSystemName))
                {
                    short currentX = 40;
                    short currentY = 12;
                    Guid subscriberGuid = Guid.NewGuid();

                    var gameRendererActor = actorSystem.ActorOf(
                        Props.Create<GameRenderingActor>(), "GameRenderingActor");

                    var gameClientActor = actorSystem.ActorOf(
                        Props.Create<GameClientActor>(gameRendererActor,
                            currentX, currentY, subscriberGuid, avatar),
                        "GameClientActor");

                    HandleInput(gameClientActor);
                }
            }
            catch (Exception ex)
            {
                Console.WriteLine(ex);
            }
        }

Once the ActorSystem is set up, the client enters a game loop, which runs indefinitely until the ESC key is pressed or the client application is killed.

        static void HandleInput(IActorRef gameClientActor)
        {
            while (true)
            {
                var key = Console.ReadKey(intercept: true);

                switch (key.Key)
                {
                    case ConsoleKey.LeftArrow:
                        gameClientActor.Tell(new MoveLeftMessage());
                        break;
                    case ConsoleKey.RightArrow:
                        gameClientActor.Tell(new MoveRightMessage());
                        break;
                    case ConsoleKey.UpArrow:
                        gameClientActor.Tell(new MoveUpMessage());
                        break;
                    case ConsoleKey.DownArrow:
                        gameClientActor.Tell(new MoveDownMessage());
                        break;
                    case ConsoleKey.Escape:
                        gameClientActor.Tell(new QuitGameMessage());
                        return;
                }
            }
        }

Since what we have here is an IActorRef of the GameClientActor rather than a direct instance, we need to communicate with it by sending messages (as opposed to calling methods on it directly).

Each of the messages used by HandleInput() is an empty class, so they are not shown here for brevity.

Although these messages could go into the “GameMessages” shared class library, I opted to put them directly in the client project because the server does not need to know about them. I consider it good practice to keep classes only within the context in which they are needed, as I believe it minimises dependencies (and therefore coupling), though your mileage may vary.

Client – GameRenderingActor

The GameRenderingActor is capable of drawing the state of clients in the playing area by doing only one thing: drawing a single character at a given location in the console window.

    public class GameRenderingActor : TypedActor,
        IHandle<DrawMessage>,
        IHandle<EraseMessage>
    {
        public void Handle(DrawMessage message)
        {
            Console.SetCursorPosition(message.X, message.Y);
            Console.Write(message.Char);
        }

        public void Handle(EraseMessage eraseMessage)
        {
            var x = eraseMessage.X;
            var y = eraseMessage.Y;
            char @char = ' '; // overwrite with space to erase whatever is drawn

            var drawMessage = new DrawMessage(x, y, @char);
            Self.Tell(drawMessage);
        }
    }

As a matter of fact, it knows how to process an EraseMessage (to clear a client’s former position) and a DrawMessage (to draw a client’s current position). These messages include a position (X and Y), and DrawMessage also includes the character to draw (typically the client’s avatar).

The EraseMessage is translated into a DrawMessage (via a message to self) where the character to be drawn is a space. This effectively erases whatever was previously drawn.

In case you’re wondering, the ‘@’ symbol is used because char is a C# reserved word, and you can’t name a variable using a reserved word. The ‘@’ symbol allows you to work around this restriction.

Client – GameClientActor – Setup

The GameClientActor is relatively large because it maintains client state and at the same time coordinates between all the other components in the system (client main program, GameRenderingActor, and the server).

    public class GameClientActor : TypedActor,
        IHandle<UpdateLocationMessage>,
        IHandle<UnsubscribeMessage>,
        IHandle<MoveLeftMessage>,
        IHandle<MoveRightMessage>,
        IHandle<MoveUpMessage>,
        IHandle<MoveDownMessage>,
        IHandle<QuitGameMessage>
    {
        private IActorRef gameRenderingActor;
        private ActorSelection remoteServerActor;

        // client actor state
        private short currentX;
        private short currentY;
        private Guid subscriberGuid;
        private char avatar;

        public GameClientActor(IActorRef gameRenderingActor, short initialX,
            short initialY, Guid subscriberGuid, char avatar)
        {
            this.gameRenderingActor = gameRenderingActor;

            string serverActorAddress = ConfigurationManager
                .AppSettings["serverActorAddress"];
            this.remoteServerActor = Context.ActorSelection(serverActorAddress);

            this.currentX = initialX;
            this.currentY = initialY;
            this.subscriberGuid = subscriberGuid;
            this.avatar = avatar;

            this.Subscribe();
        }

//...

    }

The top of the class declaration makes it immediately evident what messages the GameClientActor is capable of processing (which is one of the reasons why I prefer the IHandle<> approach over ReceiveActors). These include movement/quit messages coming from user input from the main program logic, but also UpdateLocationMessages and UnsubscribeMessages coming from the server.

The constructor takes care of initialising client game state, based on what is passed in from the main program logic. However, the GameClientActor must also keep references to the other actors it talks to, i.e. the GameRenderingActor and the ServerActor running remotely on the server.

When all this state is set up, the client subscribes with the server and sends it an initial location update so that other clients may know it exists. These operations are done thanks to the following two helper methods:

        private void Subscribe()
        {
            // send subscribe message

            var subscribeMessage = new SubscribeMessage(subscriberGuid);
            remoteServerActor.Tell(subscribeMessage, Self);

            // send initial location

            SendLocationUpdate(0, 0);
        }

        private void SendLocationUpdate(short oldX, short oldY)
        {
            var updateLocationMessage = new UpdateLocationMessage(subscriberGuid,
                avatar, oldX, oldY, currentX, currentY);
            remoteServerActor.Tell(updateLocationMessage);
        }

Something very important to note here is that we’re including Self as a second parameter when sending the SubscribeMessage. That’s because of this code in the ServerActor:

        public void Handle(SubscribeMessage message)
        {
            this.subscribers[message.SubscriberGuid] = Sender;
        }

I’ve found that if you want to use a reference to Sender, you need to pass the sender as a second parameter when sending the original message. If you don’t, Sender defaults to some weird dead letter thingy. I don’t know if this is by design or some bug, but keep it in mind because it can bite you.

Client – Configuration

The client configuration is a little bit different from that of the server.

  <appSettings>
    <add key="avatar" value="X" />
    <add key="actorSystemName" value="PubSubGame" />
    <add key="serverActorAddress" value="akka.tcp://PubSubGame@localhost:7482/user/ServerActor" />
  </appSettings>

We can specify an avatar character that will be drawn to represent this client at its position. We will change this for each instance of the client that we run, so that we can distinguish between them.

We also need to set up the endpoint of the remote ServerActor in order to be able to communicate with it.

  <akka>
    <hocon>
      <![CDATA[
        
        akka
        {
            loglevel = ERROR
        
            actor
            {
                provider = "Akka.Remote.RemoteActorRefProvider, Akka.Remote"
            }

            remote 
            {
                helios.tcp
                {
                    port = 0
                    hostname = localhost
                }
            }
        }
      
      ]]>
    </hocon>
  </akka>

Client connections normally don’t need to be bound to a specific port. Instead, by setting the port to 0, we let the operating system give us an available port of its own choosing for the client socket. This is perfectly fine because client connections are outgoing; so unlike server sockets, they don’t need to listen for connections on a particular port, and are not subject to firewall restrictions.

Note that we’re setting loglevel pretty high here. That’s so the typical Akka .NET output doesn’t mess with our drawing of the playing area.

Client – GameClientActor – Movement

A lot of the movement code in GameClientActor is the same: keep a copy of the old position, update the state with the new position, and then send a location update to the server with both the old and the new position. Thus a common helper method is used:

        private void MoveAndSendLocationUpdate(Action move)
        {
            short oldX = currentX;
            short oldY = currentY;

            move();

            this.SendLocationUpdate(oldX, oldY);
        }

The move action is simply a tweak in the location state. It is different for each movement message, and thus passed in to the helper method:

        public void Handle(MoveLeftMessage message)
        {
            this.MoveAndSendLocationUpdate(() => currentX--);
        }

        public void Handle(MoveRightMessage message)
        {
            this.MoveAndSendLocationUpdate(() => currentX++);
        }

        public void Handle(MoveUpMessage message)
        {
            this.MoveAndSendLocationUpdate(() => currentY--);
        }

        public void Handle(MoveDownMessage message)
        {
            this.MoveAndSendLocationUpdate(() => currentY++);
        }

The QuitMessage is a special case, as we need to send an UnsubscribeMessage to the server instead:

        public void Handle(QuitGameMessage message)
        {
            short oldX = currentX;
            short oldY = currentY;

            var unsubscribeMessage = new UnsubscribeMessage(subscriberGuid,
                oldX, oldY);
            remoteServerActor.Tell(unsubscribeMessage);
        }

Client – GameClientActor – Messages from Server

When a location update is received from the server, the GameClientActor passes instructions to the GameRenderingActor to erase the old position of the client that sent the update, and redraw it at its new position:

        public void Handle(UpdateLocationMessage message)
        {
            var eraseMessage = new EraseMessage(message.OldX, message.OldY);
            var drawMessage = new DrawMessage(message.NewX, message.NewY,
                message.Avatar);

            this.gameRenderingActor.Tell(eraseMessage);
            this.gameRenderingActor.Tell(drawMessage);
        }

The UnsubscribeMessage is handled similarly, but erases the old position only:

        public void Handle(UnsubscribeMessage message)
        {
            var eraseMessage = new EraseMessage(message.LastX, message.LastY);

            this.gameRenderingActor.Tell(eraseMessage);
        }

Let’s Run It!

Run one instance of the server. Then, run as many client instances as you like, each with a different avatar configuration. Press the arrow keys in each client console window to move your clients a little. When you move an avatar, you will see it move in all the other windows as well.

pubsubgame-output

Possible Improvement

One thing you’ll notice is that when a new client joins, he won’t see the other clients until they have moved and broadcasted an update. This is a limitation of not keeping client state on the server, and there are many ways to fix this. It is left as an exercise.

Unity3D: Changing game speed and pausing

This article was originally posted on 4th August 2013 at Programmer’s Ranch using Unity3D 4.2.0f4. This updated version of the article uses Unity3D 5.3.4f1, and the source code is available at the Gigi Labs BitBucket repository. Syntax highlighting and a new screenshot have been added, and the text is slightly modified.

In this article, we’ll learn about controlling time in Unity3D. This allows us to easily pause the game, slow it down, or speed it up.

Create a new project and add a sphere to your scene via GameObject menu -> 3D Object -> Sphere. Next, create a new C# script by right clicking in the Project panel, and selecting Create -> C# Script. Name it Ball, and drag it onto your Sphere in the Hierarchy panel. Double-click the script to open it in Visual Studio.

We’re going to make a very basic bouncing ball just to be able to see the effects of our change in speed. Start off with the following code for the Ball script:

public class Ball : MonoBehaviour
{
    private Vector3 velocity;

    // Use this for initialization
    void Start()
    {
        this.velocity = new Vector3(1.0f, 1.0f, 0.0f);
    }

    // Update is called once per frame
    void Update()
    {
        this.transform.position += this.velocity * Time.deltaTime;

        if (this.transform.position.x > 5.0f)
            velocity.x = -velocity.x;
        else if (this.transform.position.x < -5.0f)
            velocity.x = -velocity.x;
        else if (this.transform.position.y > 6.0f)
            velocity.y = -velocity.y;
        else if (this.transform.position.y < -5.0f)
            velocity.y = -velocity.y;
    }
}

This will make the ball bounce when it reaches the sides of the screen. This may vary depending on your monitor so use whichever values work best.

unity3d-speed-ball

Games look interactive because they generate a certain number of images (frames) per second, usually something between 30 and 60. Time.deltaTime is the time between one frame and the next; multiplying this by the velocity makes the ball move pretty uniformly.

Another important property of the Time class is Time.timeScale. This is a measure of how quickly scripts and animations run, and is set to 1.0f by default. We can change this to make the game run at different speeds. To try it out, add the following code to the Ball script’s Update() method:

        if (Input.GetKeyDown(KeyCode.P))
            Time.timeScale = 0.0f;
        else if (Input.GetKeyDown(KeyCode.N))
            Time.timeScale = 1.0f;
        else if (Input.GetKeyDown(KeyCode.F))
            Time.timeScale = 2.0f;
        else if (Input.GetKeyDown(KeyCode.S))
            Time.timeScale = 0.5f;

What we’re doing here is:

  • If the player presses ‘P’ (pause), we set the time scale to zero, effectively stopping any movement in the game.
  • If the player presses ‘N’ (normal speed), we set the time scale to the default of 1.0f.
  • If the player presses ‘F’ (fast), we set the time scale to double the normal speed.
  • If the player presses ‘S’ (slow), we set the time scale to half the normal speed.

This simple property allows you to not only pause the game, but also to play the game at different speeds. Several games including Starcraft and Warcraft 2 have settings that allow you to tweak the game speed in order to make it more challenging or less frenetic.

starcraft-speed-settings

This article showed how a single line of code in Unity3D is enough to change the speed of a game or pause it. Although this was a very easy tutorial, I hope you will also find it very useful in any games you make!