I’m happy to announce Sirius Planner, a task planner app that I’ve been working on in recent weeks. I’ve just released an alpha demo to a small number of people. Check out the features in the video below:
Video tutorial showing features and limitations of Sirius Planner 0.1.
Sirius Planner is a calendar-based task planner that lets you:
Create and manage tasks
Prioritise tasks on a particular day via drag & drop
Move tasks to different days via drag & drop
Focus on tasks in a day, week, or 5-week period
Tag tasks
This project is still in its early stages, but already has most of the core features in place. If this is something you think could be useful to you, please get in touch.
I’ve been doing some work with security on AWS recently, and part of that involved running security assessments using Amazon Inspector to identify vulnerabilities at network and host level.
If I launch a fresh EC2 instance right now using the Microsoft Windows Server 2019 Base AMI and run a host-level assessment, the report lists a vulnerability related to the PowerShellGet module:
Microsoft Security Response Center’s entry about this vulnerability explains a little more about it:
“A security feature bypass vulnerability exists in the PowerShellGet V2 module. An attacker who successfully exploited this vulnerability could bypass WDAC (Windows Defender Application Control) policy and execute arbitrary code on a policy locked-down machine.
“An attacker must have administrator privileges to create a configuration that includes installing PowerShellGet V2 module onto a machine from the PowerShell Gallery. The WDAC policy must be configured to allow the module to run. After this is done, PowerShell script can be injected and run fully trusted, allowing the attacker arbitrary code execution on the machine.”
— CVE-2020-16886 at MSRC
The same page says that this vulnerability was fixed in PowerShellGet v. 2.2.5. So why do we have this problem? Here’s why:
That AMI came with PowerShellGet 1.0.0.1, but we need version 2.2.5. We can install it by running a Powershell session in Administrator mode, and running the following commands (from the Installing PowershellGet documentation) and agreeing to install the NuGet provider:
This results in the new 2.2.5 version being installed alongside the older 1.0.0.1 one:
A Powershell session showing how we started with PowerShellGet 1.0.0.1, installed a more recent version, and now have the new 2.2.5 version alongside the old one.
I don’t know enough to be able to say whether having that version 1.0.0.1 around still poses any kind of risk, but it seems to be enough for Amazon Inspector which no longer reports any vulnerability after installing version 2.2.5:
If you’re really paranoid, check out this Stack Overflow question for ways to get rid of the old version manually. I haven’t actually tried this, so be careful.
My first website, Dino’s Ultima Page, turned 18 years old last week. As a website about games, it’s got hundreds of images, mostly screenshots or other images of in-game objects and people. I spent a lot of time manually making thumbnails for most of the larger images, so that pages would load quickly and larger screenshots would be loaded only when requested.
Now, hopefully a little wiser, I know that such things can be automated. I recently showed how to extract regions of an image using ImageMagick, and this software, which I’m growing to love more and more, is also capable of resizing images (among many other operations).
Resizing a Single Image
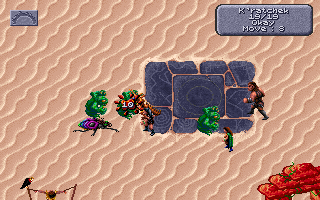
Many of the games I remember from the early 1990s ran at a resolution of 320×200. Although they would often be scaled up during gameplay, taking a screenshot (in DOSBox, for instance) results in an image that is 320 pixels wide and 200 pixels high.
A screenshot from Dark Sun: Shattered Lands.
For an image that I’d like to display on a website, the size is a little annoying. It’s too small to make out much of the details, but possibly slightly too large to use as a thumbnail. I’d like to scale it down to create a thumbnail, but then link to a scaled up version of the image.
Using ImageMagick, it’s pretty easy to resize an image. Assuming the image above is called dsun_003.png, we can create the smaller and larger version as follows:
We call the convert command, passing the following as arguments:
The name of the original image we’d like to resize
The -resize parameter, followed by the new size
The name of the output file where the resized image will be saved
Note that I intentionally chose the new image sizes such that the aspect ratio is preserved (which is usually what you want). If you need to change the aspect ratio, check the Resizing documentation for more advanced examples.
This leaves us with a nice thumbnail and a larger image where we can savour the graphics of 1993:
The original image (top-left), the thumbnail (bottom-left) and the larger image (right).
Resizing all images in a Folder
If we can resize a single image from the terminal, then we should be able to automate this process for a large number of images in a folder, saving a lot of time that would otherwise be spent clicking stuff in an image editor.
For instance, I have a few screenshots from King’s Quest 6 in a folder called kq6. Each image has a size of 640×440 and is of type .png.
Six screenshots of King’s Quest 6.
I’d like to resize all images in this folder regardless of how many there are. I can achieve this using a loop in bash:
for filename in $1/*.png; do
    convert $filename -resize 320x220 "$1/$(basename "$filename" .png)-sm.png"
done
Actually, the trickiest part of this is to extract the filename without the extension. That’s the part where we’re using basename, which takes the filename as the first argument, and the suffix to trim off as the second. This solution works where we know the image type a priori and all images in the folder are the same type.
You’ll also note the use of $1. That’s simply the first argument to the script, so that we can use the same script in different places, just passing the name of the folder as an argument. In fact, after saving the script as resizeall.sh and giving it execute permissions, let’s call it on our kq6 folder:
./resizeall.sh kq6
This has the effect of creating smaller versions of all the images in the folder, which have the same name except for a -sm suffix before the file extension:
We’ve generated smaller versions of each image in the folder.
Conclusion
We’ve seen again that ImageMagick is really handy for image manipulation, and the ability to do things from the terminal makes it really easy to automate operations on large numbers of images. In this case, we found it was really easy to resize game screenshots to create thumbnails and larger images to display on a website.
Selecting a rectangular region of an image and doing something with it is an extremely common operation. Even the simplest image viewers (e.g. Microsoft Paint) allow you to do this. While this is easy enough to do by hand, there are times when it’s useful to do it via the command-line, for example:
The image is too big to load into memory via an image viewer
You need to extract the same region for many images
In this article, we’ll see how to use ImageMagick to extract a region in an image. Just to give some context, I’m using Linux Kubuntu 19.10 and ImageMagick 7.0.10-23.
Installing ImageMagick
The first thing to do is make sure you have ImageMagick installed. While you can definitely check out the ImageMagick Download page, I’ve found these instructions particularly helpful on Kubuntu.
Analysing an Image
Before we go ahead and use ImageMagick, we first need to study the image that we want to process. Let’s say, for instance, that we’re going to work with the following screenshot from Warcraft II: Beyond the Dark Portal:
A screenshot from Warcraft 2: Beyond the Dark Portal, showing the opening screen of the last level of the Orc campaign. Deathwing is the currently selected unit, and a cheat was used to reveal the entire map.
There are a few regions of interest that we could potentially extract: the minimap, the selected unit’s portrait, the main view, etc. Let’s say we want to extract the minimap. First, we need to figure out the details of its rectangular region, namely the coordinates of its top-right corner, its width, and its height.
We can do this using most basic image viewers. For instance, Linux distributions using the K Desktop Environment (KDE) have a simple Paint-like tool called KolourPaint. If you use the rectangular selection tool and use it to draw a boundary around the region of interest, the program should tell you the details of interest in the status bar. This is easier to do accurately if you zoom in enough and turn on the grid lines, allowing you to see exactly where your selection fits within the pixel boundaries.
Zooming in on the minimap with KolourPaint. The blue and yellow dotted line shows the selected region around the minimap. At the bottom, the details of the selection can be seen: 22,24 – 153,155 … 132×132.
For this particular example, we can see that the region of interest has its top-left corner at the coordinates (22, 24), and it has a size of 132×132.
Extracting the Minimap
All we need is to pass this information to ImageMagick along with the image file, and use the -extract switch to extract the region of interest to a separate file, like this:
That means: extract a region of size 132×132 at (22, 24) from deathwing.png and save it to deathwing-minimap.png.
And it works beautifully:
The extracted minimap.
Analysing and Extracting the Unit’s Portrait
To extract Deathwing’s portrait, we just need to repeat the same process for a different region. First, we identify the coordinates and size of the region of interest:
This time, the portrait is selected, and the selected region information is: 6,166 – 57,209 … 52×44.
Then we use ImageMagick to extract the desired region, as before. Obviously, we change the details of the region and the output filename:
This is great, especially because you can do the analysis step once and repeat the command on many images that have the same structure. For instance, if I wanted to create a website with information about each unit in Warcraft 2, I would just need a screenshot for each unit. I could then simply run a command on each image, and extract the units’ portraits with ease.
About a year ago, I ran into a weird bug. After having cloned a repository from Azure DevOps, I was baffled to see that the Solution Explorer in Visual Studio was not showing any files, even though there were plenty:
This problem still annoys my colleagues to this day. What happened in every case was that there was a space in the name of the project in Azure DevOps, so cloning the repo resulted in a folder that included %20 in the name. As I’m sure you’re aware, that’s the URI-encoded version of a space.
Unfortunately, for whatever reason, Visual Studo does not like this very much. It’s not a big deal though. Simply change that %20 to an actual space, and the files suddenly show up in Solution Explorer:
This problem seems to apply only to .NET Core projects. I haven’t been able to replicate it for older .NET Framework projects.
"You don't learn to walk by following rules. You learn by doing, and by falling over." — Richard Branson